



Installing, configuring, upgrading, and uninstalling the agent
This section contains the instructions about the following:
You can also deploy the agent on multiple machines using either GPO or Intune.
Prerequisites
- TCP port 80 or 443 must be open between the agent and the SafeNet server.
- Administrative rights for installing the agent on the Windows machine.
- Microsoft .NET 4.8 or later must be installed on the machine.
- Ensure to place all the sensitive files, like the agent, Agent.bsidkey file at a secure location.
IMPORTANT: Always work in Run as administrator mode when installing, configuring, upgrading, and uninstalling the agent.
Installing the agent
Interactive installation
Perform the following steps to install the agent on a Windows machine (with administrative privileges) using the installer:
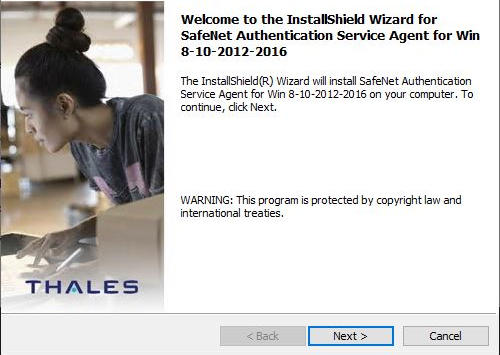
IMPORTANT: The InstallShield wizard will install SafeNet Authentication Service Agent for Win 8-10-2012-2016 on your computer. To continue, click Next.
-
Run the following installer from the downloaded package:
- SafeNet Authentication Service Agent for Win 8-10-2012-2016 x64.exe (64-bit)
-
On the Welcome to the InstallShield Wizard for SafeNet Authentication Service Agent for Win 8-10-2012-2016 window, click Next.
-
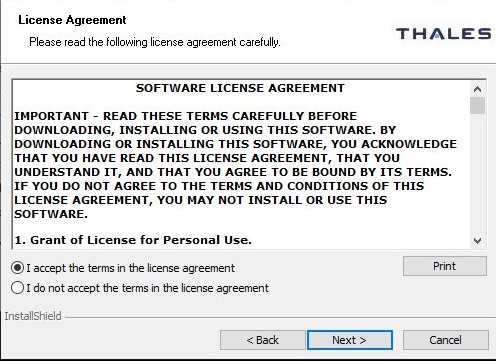
On the License Agreement window, read the software license agreement and to proceed, select I accept the terms in the license agreement option, and click Next.
-
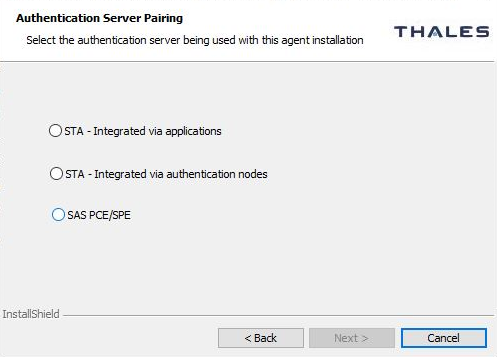
On the Authentication Server Pairing window, select SAS PCE/SPE authentication server type, and click Next.
-
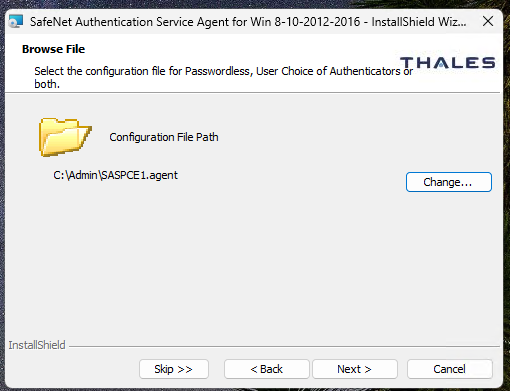
(Optional) On the Browse File window, click Change to browse and select the updated
.agentfile for UCA, FIDO, and Passwordless Windows Logon configuration, and click Next.Click Skip to proceed without selecting an agent configuration file.
Note
If you do not want to configure the agent file, set the DisableUCA registry setting to 1 to disable the UCA feature.
-
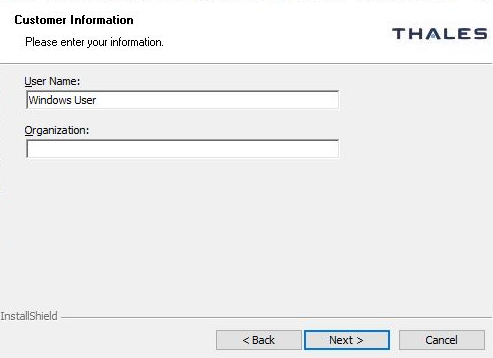
On the Customer Information window, perform the following steps:
-
In the User Name field, enter your user name.
-
In the Organization field, enter the name of your organization.
-
Click Next.
-
-
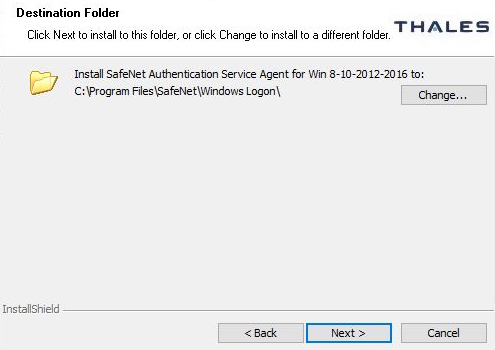
On the Destination Folder window, perform one of the following steps:
-
To accept the default installation destination folder, click Next.
-
To change the installation folder, other than the default one, click Change, and then browse to locate and select the required folder.
Click Next.
-
-
On the Authentication Service Setup window, provide the following information, and click Next.
Field Description Location Enter the hostname or IP address of the primary SafeNet server. The port number for HTTPS and HTTP is 443 and 80 respectively. Connect using SSL (HTTPS) Select this check box if the SafeNet server is configured to accept the incoming SSL connections.
NOTE: We strongly recommend to use SSL.Specify failover SafeNet Authentication Server Select this check box if a failover SafeNet server is used. If selected, you must enter the Location. Location Enter the hostname or IP address of the failover SafeNet server. Connect using SSL (HTTPS) Select this check box if the failover SafeNet server is configured to accept incoming SSL connections. 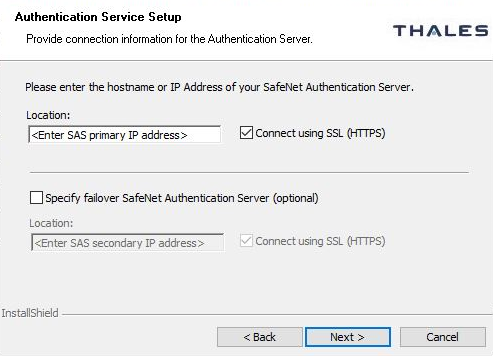
-
On the Windows Logon Setup window, provide the following information, and click Next.
Field Description Exempt Local and Domain Administrator groups from SafeNet Authentication Select this check box to allow administrators to log on without providing SafeNet credentials. Logon Mode Select one of the following logon modes:
- Dual logon: The user enters both SafeNet and Windows credentials with each logon.
- Microsoft Password Caching: SafeNet caches the Windows password after the first use. The user is prompted for their Windows password only on the first logon; on subsequent logons, the cached password is used automatically.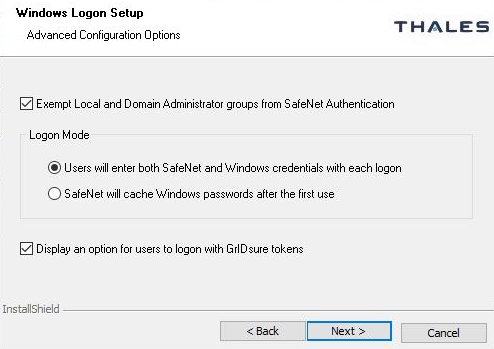
-
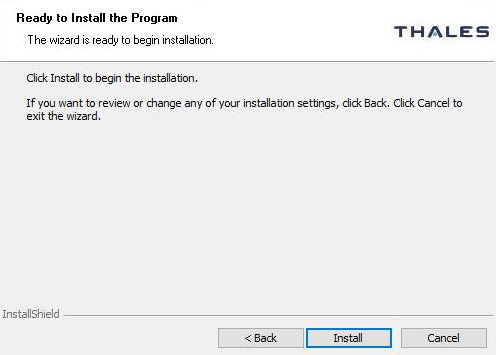
On the Ready to Install the Program window, click Install.
-
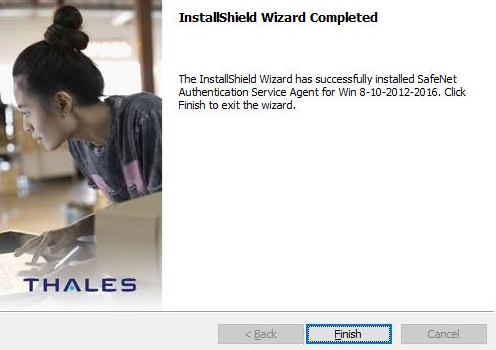
When the installation process completes, the Installshield Wizard Completed window is displayed. Click Finish to exit the installation wizard.
Silent installation
Another approach to install the agent is to run the installation silently with parameters. This allows to set the key configuration items, for example, authentication server FQDN and logon mode.
Launch the following SafeNet Windows Logon msi installation package from the command line:
-
Windows Logon Agent (without UCA and Passwordless)
msiexec /i "SafeNet Authentication Service Agent for Win 8-10-2012-2016 x64.msi" /quiet AGENTMODE=0 -
Windows Logon Agent (with UCA, FIDO, and Passwordless)
msiexec /i "SafeNet Authentication Service Agent for Win 8-10-2012-2016 x64.msi" /quiet AGENTMODE=0 JSONFILEPATH="<PathToAgentFile>"
To set options, the property name is used in name-value pairs with spaces in between each pair.
For example, to set the Primary SafeNet server to 192.168.10.200 with SSL and enable Microsoft Password Caching mode, run the following command:
-
Windows Logon Agent (without UCA and Passwordless)
msiexec /i "SafeNet Authentication Service Agent for Win 8-10-2012-2016 x64.msi" /quiet AGENTMODE=0 TOKENVALIDATORLOCATION=192.168.10.200 LOGONMODE=1 -
Windows Logon Agent (without UCA and Passwordless)
msiexec /i "SafeNet Authentication Service Agent for Win 8-10-2012-2016 x64.msi" /quiet AGENTMODE=0 TOKENVALIDATORLOCATION=192.168.10.200 LOGONMODE=1 JSONFILEPATH="<PathToAgentFile>"
Note
SSL will be enabled by default.
If an installation option is not specified, it is set to the default value, which is equivalent to clicking Next on all pages of the installer dialog. These parameters cannot be specified during agent upgrades.
| Option | Description | Value(s) |
|---|---|---|
| AGENTMODE | Logon mode of installation | 0 |
| JSONFILEPATH | Path to agent file | Path of the updated agent file. |
| TOKENVALIDATORLOCATION | Defines the Primary SafeNet server | IP address or Hostname or FQDN. Default: localhost |
| TOKENVALIDATORLOCATION2 | Defines the Secondary SafeNet server | IP address or Hostname or FQDN. Default: Disabled |
| EXEMPTADMINS | Logon mode of operation | 0: everybody must use MFA Default: 1 |
| LOGONMODE | Logon mode of operation | 0: both the Windows password and MFA is required 1: for Microsoft password caching. Windows password is hidden (cached) Default: Dual Logon (0) |
| AGENTSTATUS | To enable or disable the agent | 1: Enable the agent 0: Disable the agent Default: 1 |
| INSTALLDIR | To install the agent at a non-default location | Use the following command:msiexec /i "<MSI_file_path>\<MSI_file_name>" /quiet INSTALLDIR=<"target_directory_path"> |
Configuring the updated agent file
To configure the updated agent file, push it in either of the following locations and execute the following command on the command line:
cd C:\Program Files\SafeNet\Windows Logon\WinLogonManager.exe JSONFILEPATH="<PathToAgentFile>"
For example, use the following commands to load the configuration from the agent file when the file is pushed to:
-
Installation Directory

-
Centralized Directory

Configuring the settings
This section describes configuration tasks related to the agent.
Realm stripping settings
To work with a short SafeNet server username format (for example, bill instead of Domain\bill or bill@domain.com), after installation, activate the strip function in the SafeNet Windows Logon Agent Manager > Communications tab.
For more information, refer to the Communications Tab section.
Alternatively, this feature can also be configured using the SafeNet Authentication Service, Auth Node module. For more information, refer to the SAS Service Provider Administrator Guide.
Configuring Transport Layer Security
To configure TLS 1.2/1.3 on the agent, set the registry settings as given below:
HKLM\System\CurrentControlSet\Control\SecurityProviders\SCHANNEL\Protocols\TLS 1.2\Client DisabledByDefault => 0x0
HKLM\System\CurrentControlSet\Control\SecurityProviders\SCHANNEL\Protocols\TLS 1.3\Client DisabledByDefault => 0x0
Note
The agent always connects using the highest enabled protocol.
Push authentication
The agent supports Push OTP when working with MobilePASS+.
Note
Push Authentication is supported when working with STA Edition. For SAS PCE/SPE, Push Authentication is only supported with version 3.9.1 and above.
Configuration management
Use SafeNet Windows Logon Agent Manager to configure various options available within the agent.
The Off-line Tab, Policy Tab, Communications Tab, Appearance Tab, and Logging Tab are available only to users who are part of the Local Administrators and Domain Administrators groups. All other groups will only see the Offline Authentication Settings in the Off-line tab.
Note
The management console configuration depends on the value of RegEditCount registry setting. Depending on its value, the local admin user may or may not update certain configurations on the Policy tab. For more details, refer to the Registry Settings section.
Off-line tab
The Off-line tab deals with the following end-user offline authentication settings:
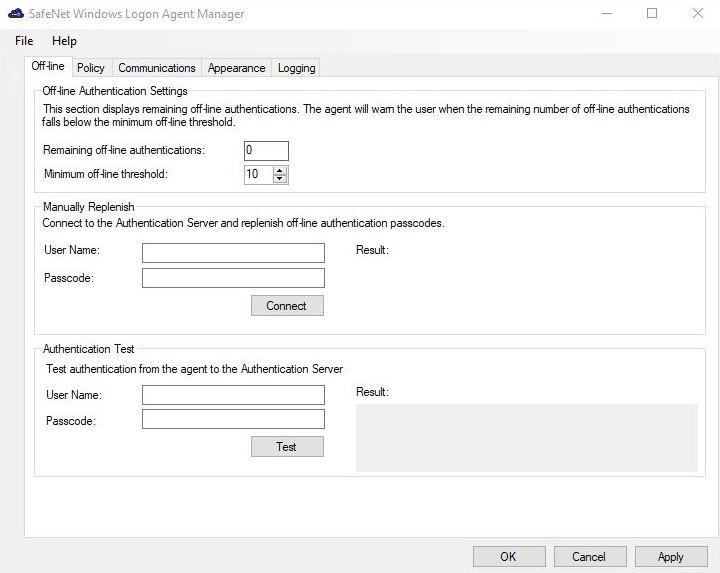
Off-line authentication settings
The agent allow users to log in to their workstations when the SafeNet server is not available.
| Option | Description | Value |
|---|---|---|
| Remaining off-line authentications | The number of SafeNet authentication available before the user can authenticate against the SafeNet server or perform a manual replenish. To modify the default value of offline authentications, navigate to Policy > Token Policies > Token Passcode Processing Policy of the SafeNet server. |
Default: Configured value in SafeNet server Range: 2 - 500 |
| Minimum off-line threshold | The user will see a warning to authenticate against the SafeNet server or perform a manual replenish if this value is reached. | Default: 10 Range: 5 - 99 |
Manually replenish
The offline store is automatically replenished when a user returns and logs in to the corporate network.
If the offline store expires while the user is still at a remote location, the Manually Replenish option allows the admin user to refill the user's offline authentication store. To replenish an offline authentication store manually, the administrator performs the following steps:
-
Establish a VPN connection to the corporate network.
-
Open the SafeNet Agent for Windows Logon Agent Manager.
-
Enter the user's SafeNet credentials into the Passcode field and click Connect.
-
The agent contacts the SafeNet server to verify the logon credentials. If the credentials are valid, the offline authentication is restored; otherwise, the user will receive a warning message to retry the authentication attempt.
Authentication test
Allows administrators to test authentication between the agent and the SafeNet server.
Policy tab
The Policy tab allows SafeNet authentication exclusions to be applied to the agent.
Note
After changing the settings on the Policy tab, the updated settings are enforced either after the machine restart or after a successful online authentication with STA, for each user.
- Authentication Processing
- Credential Tile Filter
- Credential Provider
- Group Authentication Exceptions
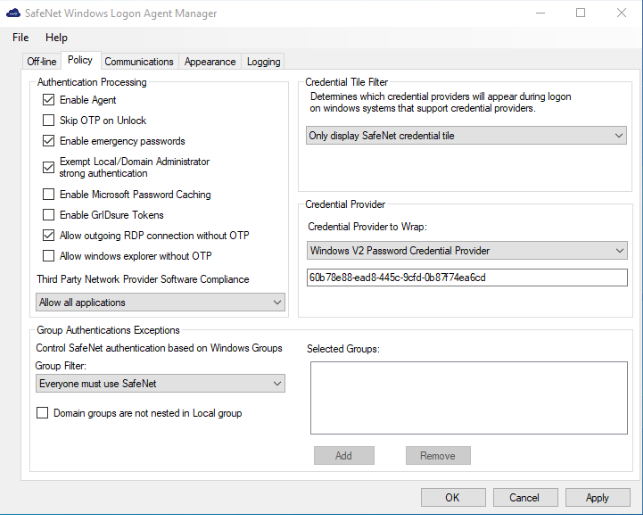
Authentication processing
Specifies the options to be enabled or disabled while processing the authentication.
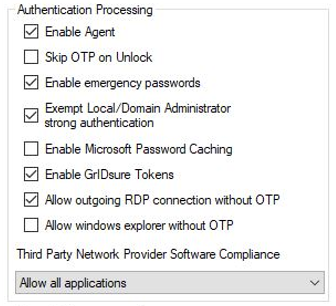
| Option | Description | Default Setting |
|---|---|---|
| Enable Agent | Used to enable or disable the agent. | Enabled |
| Skip OTP on Unlock | Allows the administrators to enable or disable the SafeNet 2FA for last logged on user on system unlock. The functionality extends to sleep and hibernate modes, which means that if the Skip OTP on Unlock check box is selected, and the system enters sleep or hibernate mode, the agent does not prompt for an OTP, and instead logs in successfully using only the AD credentials. |
Disabled |
| Enable emergency passwords | Allows a user to authenticate using an emergency password in offline mode, typically when off-line authentications are exhausted (Remaining off-line authentications = 0). This password can only be used until the workstation regains contact with the SafeNet server. Each user has a unique emergency password, which exists on the Secured Users tab of the SafeNet server. After each online authentication, its value gets changed. 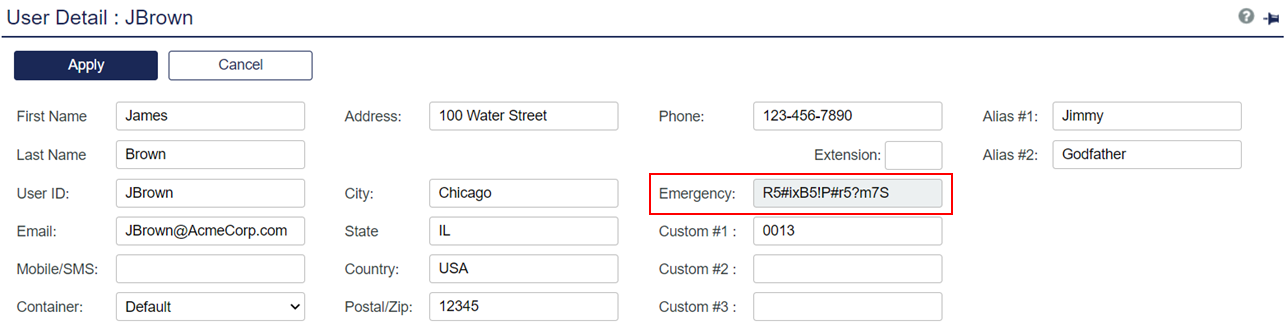 |
Enabled |
| Exempt Local/Domain Administrator strong authentication | Allows the Local and Domain Administrator groups to be exempt from SafeNet authentication during login. NOTE: This feature does not work with pure Azure AD joined machines for domain admins. However, this feature works as expected for the local admins. |
Determined during agent installation |
| Enable Microsoft Password Caching | Used to enable or disable the Microsoft Password Caching mode. Microsoft Password Caching mode: For accessing a WLA protected machine, each user authenticates with OTP first, followed by the Microsoft password. In this mode, the user is prompted for their Microsoft password only once for their first log in. Subsequently, the agent caches the Microsoft password until its expiry or change. NOTE: This feature does not work for the following: - Domain admin users - Users authenticating via the Use a grid pattern link. To use this feature for GrIDsure token, enter "g" character in the Password field. |
Disabled |
| Allow outgoing RDP connection without OTP | Enables SafeNet authentication to be bypassed while making an outgoing RDP connection. This feature is not effective if the Microsoft parameter, enablecredsspsupport:i:0, is set to null, which controls credentials usage on the Operating System level for RDP. |
Enabled |
| Allow windows explorer without OTP | Allows Windows explorer to run without SafeNet Authentication (bypass SafeNet OTP). It is invoked when a network path is accessed or an application is run with other user credentials. NOTE: While accessing a network resource on a domain different than domain of the WLA protected machine, OTP is not prompted. The Windows paasword must be provided in the Passcode field to access the resource. |
Disabled |
| Third Party Network Provider Software Compliance | Select one of the following options: Allow all applications (Default): Allows to install the agent without updating the registry keys under [HKEY_LOCAL_MACHINE\SYSTEM\CurrentControlSet\Control\NetworkProvider\Order].NOTE: Sometimes, selecting this option creates a conflict between the agent and the third-party network provider software. In this case, uninstall the third-party network provider software and remove its registry entry. Before executing this operation, perform the following steps: Ensure that the Allow all applications option is selected. Click Apply and close the management console. Allow only SafeNet compliant applications: Allows to reset the registry key under [HKEY_LOCAL_MACHINE\SYSTEM\CurrentControlSet\Control\NetworkProvider\Order] to "ProviderOrder"=" RDPNP,LanmanWorkstation,webclient ". After selecting this option, all the registry keys will be removed, except the following:"ProviderOrder"=" RDPNP,LanmanWorkstation,webclient "SafeNet compliant keys, such as "PICAClientNetwork"If you change the option from Allow only SafeNet compliant applications to Allow all applications and apply the changes, the registry state under [HKEY_LOCAL_MACHINE\SYSTEM\CurrentControlSet\Control\NetworkProvider\Order] will be restored to the previous state. |
Allow all applications |
Credential tile filter
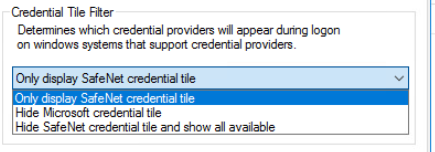
The Credential Tile Filter determines which credential providers are allowed to display the credential tiles on the login screen.
| Option | Description |
|---|---|
| Only display SafeNet credential tile | SafeNet credential tile is displayed on the login screen with the authentication flow (OTP + Microsoft password). All other (third-party) credential tiles are hidden. |
| Hide Microsoft credential tile | SafeNet credential and third-party credential tiles are displayed on the login screen. The Microsoft credential tile is hidden. |
| Hide SafeNet credential tile and show all available | Third-party and Microsoft credential tiles are displayed on the login screen. The SafeNet credential tile is hidden. |
An Incompatible Filter warning may be displayed if a conflicting credential provider filter entry is listed at the following path:
HKEY_LOCAL_MACHINE\SOFTWARE\Microsoft\Windows\CurrentVersion\Authentication\Credential Provider Filters
In such case, a warning will be displayed with two user-response options:
- Yes: removes the conflicting registry entry.
- No: disable the agent.
Credential provider
The Credential Provider determines the version of a credential provider to be created and dynamically wrapped.
| Option | Description |
|---|---|
| Credential Provider to Wrap | Allows the agent to dynamically wrap Microsoft or other third-party credential providers' GUID. > This option defaults to Windows V2 Password Credential Provider. The subsequent text field will auto-populate the relevant GUID. > To wrap another external (third-party) credential provider, select Other Credential Provider and enter its GUID in the subsequent text field. A popularly used external credential provider ServiceNow Password Reset tool is already configured to wrap. However, it will only be visible if ServiceNow is installed and running on the system. NOTE: Before uninstalling a third-party credential provider, unwrap it first. |
Group authentication exceptions
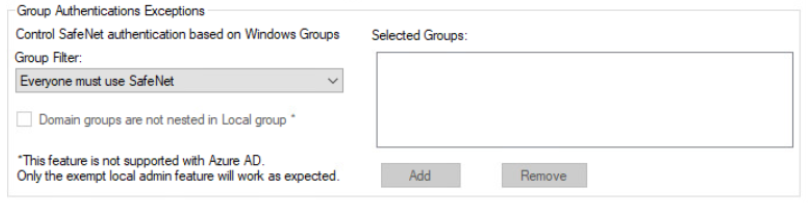
The Group Authentication Exceptions section allows to omit single or multiple local or domain groups from performing SafeNet authentication. Only one group filter option is valid at any given time, and it cannot overlap with another group authentication exception.
Default setting: Everyone must use SafeNet
Note
MFA will not work (as configured) if Primary group is added in the Group Authentication Exception.
| Option | Description |
|---|---|
| Group Filter | Select one of the following drop down option: Everyone must use SafeNet: All users must perform SafeNet authentication. Only selected groups will bypass SafeNet: All users are required to perform SafeNet authentication, except for the defined Microsoft group(s). Only selected groups must use SafeNet: Users are not required to perform SafeNet authentication, except for the defined Microsoft group(s). NOTE: This feature does not work with pure Azure AD joined machines for domain groups. However, this feature works as expected for the local groups. |
| Selected Groups | Click Add. The Select Groups Local / Domain window will be displayed: From this location: Displays local or domain search results. The search results will not be visible in case of pure Azure AD joined machines. Enter the group names to select: Used in conjunction with Check Names or Show All, and allows searches for Microsoft groups. Highlight already selected groups in search result: If a Microsoft group is already configured in the exception, it will appear as a highlighted result. 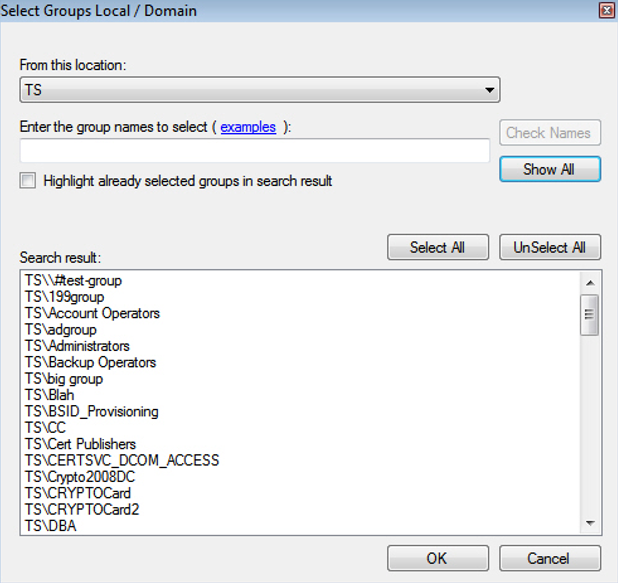 |
| Domain groups are not nested in Local group | If selected, indicates that no Nested Groups (Domain groups are nested in the Local group) are present in the Selected Groups field. Domain lookup is skipped, which improves the login delay time. |
Communications tab
This tab deals with the various connection options for the SafeNet server.
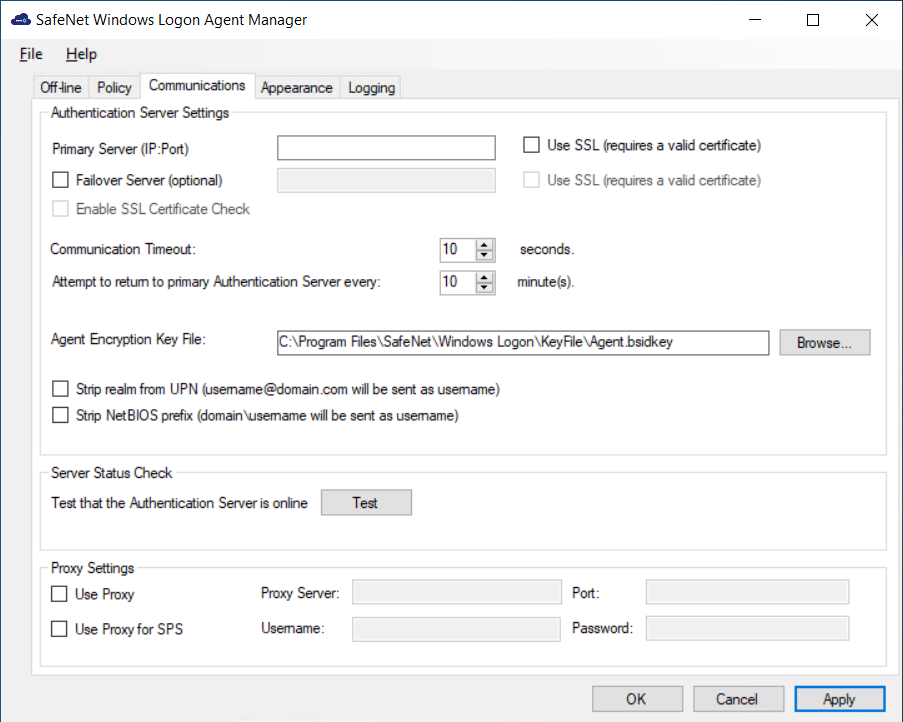
Authentication server settings
| Option | Description |
|---|---|
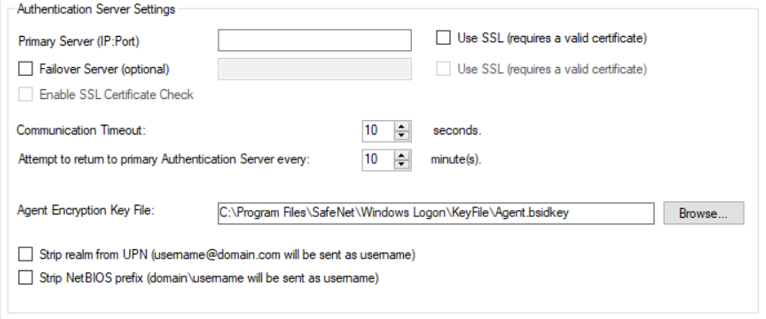
| Primary Server (IP:Port) | Used to configure the IP address/hostname of the primary SafeNet server. Default port: 80 Alternatively, Use SSL checkbox option can also be selected. Default TCP Port for SSL Requests: 443 NOTE: To configure the SafeNet Agent for Windows Logon with TokenValidator Proxy (TVP), click here. |
| Failover Server (optional) | Used to configure the IP address/hostname of the failover SafeNet server. Default port: 80 Alternatively, Use SSL checkbox option can also be selected. Default TCP Port for SSL Requests: 443 NOTE: For fresh installation, the Failover Server option is selected by default. |
| Enable SSL Certificate Check | If selected, the agent validates the certificate from the SafeNet server. The SSL certificate check is enabled by default. NOTE: We strongly recommend to enable the SSL certificate. |
| Communication Timeout | Specifies the maximum timeout value for authentication requests sent to the SafeNet server. Minimum value: 1 second. Do not set a value below the minimum prescribed limit in the registry. Default value: 10 seconds. We highly recommend to use the default value. |
| Attempt to return to primary Authentication Server every | Specifies the primary authentication server retry interval. This setting only takes effect when the agent is using the Failover Server. |
| Agent Encryption Key File | Used to specify the location of the agent's Key File. To use the AES-GCM key standard, perform the following steps the to download a new Agent.bsidkey file from the SafeNet server: 1. Login to the SafeNet server as an administrator and navigate to COMMS > Authentication Processing. 2. Under Task list, click Authentication Agent Settings link and download the Agent.bsidkey file. NOTE: The Agent.bsidkey file must be present at a secure location. 3. Click Browse to update the Agent.bsidkey file at SafeNet Windows Logon Agent Manager > Communications > Agent Encryption Key File. |
| Strip realm from UPN (username@domain.com will be sent as username) | Select if the SafeNet server username is required without the suffix @domain. |
| Strip NetBIOS prefix (domain\username will be sent as username) | Select if the SafeNet server username is required without the prefix domain. NOTE: The realm-stripping feature applies to SafeNet server usernames only. AD usernames are not affected. |
Server Status Check
Under this section, click Test to run a communication test to verify a connection to the SafeNet server.

Proxy settings

Select the proxy settings, as follows:
| Proxy Setting | Configuration | |||
|---|---|---|---|---|
| Without Proxy | With Proxy (all calls) |
With Proxy and TVP (non-push calls go to TVP, push calls go to proxy) |
With Proxy for the SafeNet server (or TVP behind Proxy) and Proxy for SPS | |
Use Proxy |
Not selected |
Selected |
Not selected |
Selected |
Use Proxy for SPS |
Not selected |
Not selected |
Selected |
Selected |
-
Use Proxy: Select to connect to the the SafeNet server via proxy server.
-
Use Proxy for SPS: Select to connect to the Service Provider Server via proxy server.
-
Proxy Server: Enter IP address of the proxy server.
-
Port: Enter proxy server port.
-
NOTE: Ensure that the port is open in Windows network.
-
Username: Enter proxy server user name.
-
Password: Enter proxy server password.
-
NOTE: The Proxy Password should be set only by using the Configuration Management tool, ensuring that it is stored encrypted.
Configuring TokenValidator Proxy (TVP)
The function of the TokenValidator Proxy (TVP) Agent is to implement proxy authentication requests from other agents to the SafeNet server.
When working with SafeNet Agent for Windows Logon without SafeNet Agent for TVP, you need to add an Auth Node for each workstation to the SafeNet server and have each workstation communicate directly with the SafeNet server.
When the SafeNet Agent for Windows Logon is configured with TVP, each Windows Logon agent can be pointed at the TVP Agent, and only the TVP IP address needs to be added as an Auth Node to the SafeNet server.
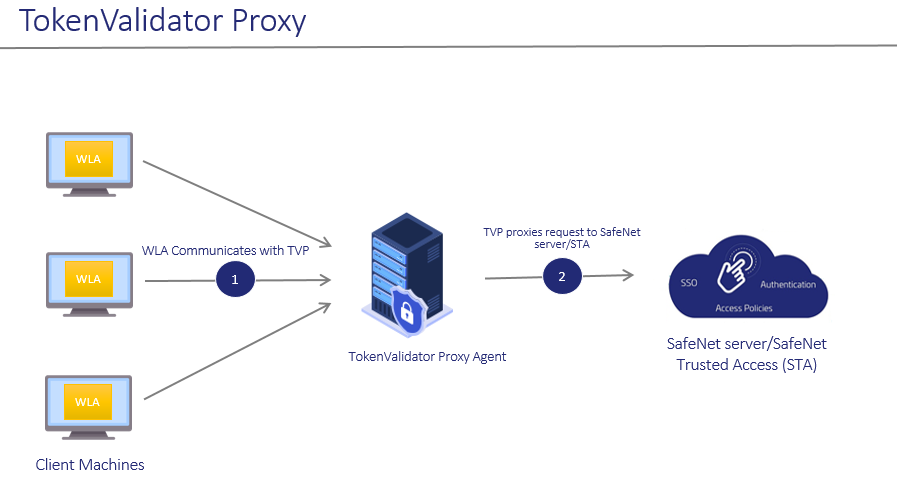
To configure TVP with the SafeNet Agent for Windows Logon, perform the following steps:
-
Configure TVP IP address as the Primary Server or the Failover Server in the Windows Logon Management console.
-
Configure the SafeNet server IP or FQDN in TVP.
For more information, see SafeNet Agent for TokenValidator Proxy: Installation and Configuration Guide.
Appearance tab
This tab allows to customize the logo displayed during authentication.
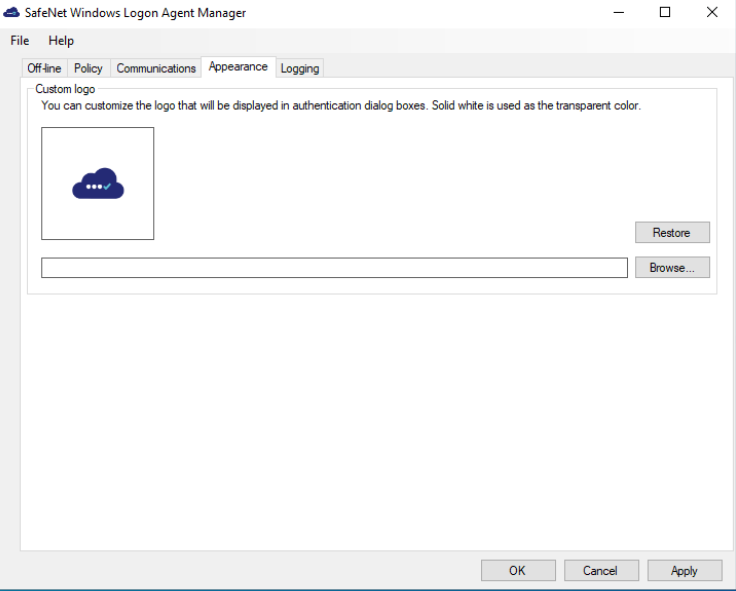
Custom logo
This configuration is used to customize the logo in authentication dialog box.
- The logo file must be saved on the local computer. We recommend saving it in the agent installation folder.
- The custom logo must be a bitmap of 110 x 110 pixels. Solid white is used as the transparent color if the image is smaller than 110 x 110 pixels.
- The Restore option will revert to the default SafeNet logo.
Logging tab
This tab depicts the logging level and specifies the log file location.
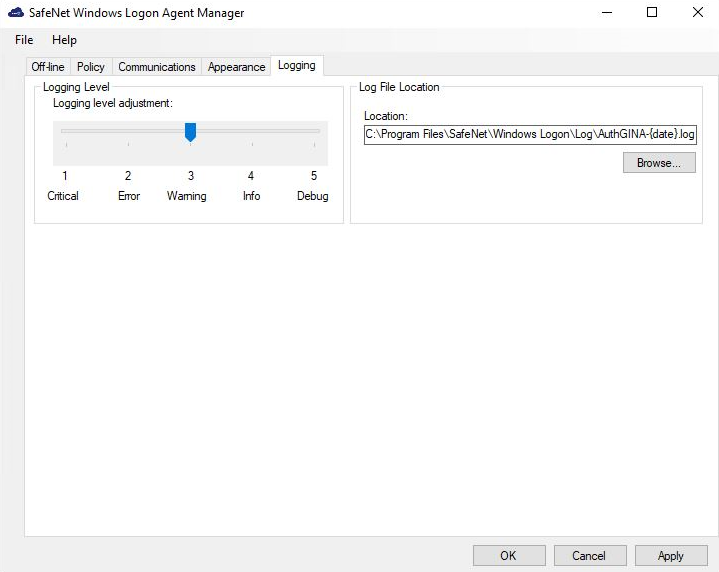
Logging level
This setting is used to adjust the logging level. Drag the pointer on the Logging level adjustment scale to the required level:
- 1 – Critical: Very severe error events that might cause the application to terminate.
- 2 – Error: Error events that prevent normal program execution, but might still allow the application to continue running.
- 3 – Warning: Potentially harmful error events. (Default)
- 4 – Info: Informational error events that highlight the progress of the application.
- 5 – Debug: Detailed tracing error events that are useful to debug an application. (Recommended)
Log file location
It specifies the location where the log files are saved. The log files are rotated on a daily basis.
Default location: C:\Program Files\SafeNet\Windows Logon\AuthGINA-{date}.log
Upgrading the agent
IMPORTANT: For consistent behavior, we highly recommend you to upgrade the agent in online mode (when SafeNet server is available). Ensure to take a backup of the ccl files. You need to manually edit the key values in the required JSON files to match the previous customization.
The agent supports upgrade from v3.4.x (and above). To upgrade, run the installation wizard and select appropriate options when prompted.
Note
After the upgrade, to perform offline authentication, the users must perform at least one successful online authentication.
Silent upgrade
To run silent upgrade, run the following command on the command line:
msiexec /i "SafeNet Authentication Service Agent for Win 8-10-2012-2016 x64.msi" /quiet REINSTALLMODE=vomus REINSTALL=ALL
Here, vomus must be in lower-case.
Note
When upgrading in silent mode, the Off-line authentication parameter is not transferred.
Language selection and customization
For WLA v4.0.0 and earlier
Administrators can customize the language displayed in WLA locally using the ccl files present in the C:\Program Files\SafeNet\Windows Logon\Languages\en folder. To achieve this, it is required to update the changes in the ccl files and then push the updated file using either SCCM, GPO, or Intune to the client machine.
For WLA v4.1.0 and above
With the WLA v4.1.0 release, the ccl files (under C:\Program Files\SafeNet\Windows Logon\Languages\en) through which the customized messages were displayed in WLA are discarded.
Now, the entire WLA messages are combined in JSON files under C:\Program Files\SafeNet\Windows Logon\Languages.
The Languages folder includes different JSON files for each of the supported languages:
- cs: Czech
- da: Danish
- de: German
- en: English
- es: Spanish
- fi: Finnish
- fr: French
- it: Italian
- ja: Japanese
- ko: Korean
- nb: Norwegian
- nl: Dutch
- pt-BR: Português Brasileiro
- sv: Swedish
- zh-CN: Chinese, Mainland China, simplified characters
- zh-TW: Chinese, Taiwan, traditional characters
Each language file contains the list of key-value pairs. The key-value pairs are in the following format:
"key": "value",
The keys are descriptors that help identify where the text is located on the pages.
The values are the text strings that can be customized.
Note
While upgrading or installing the agent, ensure to take a backup of the ccl files. You need to manually edit the key values in the specific language JSON files to match the previous customization. For the detailed information on the key-value pairs, refer to this annexure.
Language selection
The agent operates in multiple languages including English (Default), French, German, and more that allows administrators to choose the display language as per the user's preference.
To select your preferred language to be displayed for the agent, perform the following steps:
-
Navigate to the registry settings at
HKEY_LOCAL_MACHINE\SOFTWARE\CRYPTOCard\AuthGINA. -
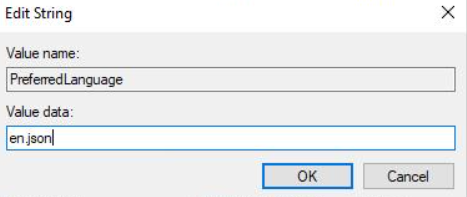
Right-click PreferredLanguage, to open the Edit String dialog box.
-
In the Value data field, enter the preferred language file name (for example, fr.json).
Default: en.json
-
Click OK.
Language customization
To customize some or all of the text strings in any of the language files, perform the following steps:
-
Navigate to the Languages folder.
Default location:
C:\Program Files\SafeNet\Windows Logon\Languages -
Edit the text strings (as per the preference) in the sample language file (for example, en.json) using any text editor.
-
Save the language file with the same file name and the json extension.
Uninstalling the agent
You can uninstall the agent either from Control Panel or perform silent uninstallation.
Using the Windows control panel
To uninstall the agent, perform the following steps:
-
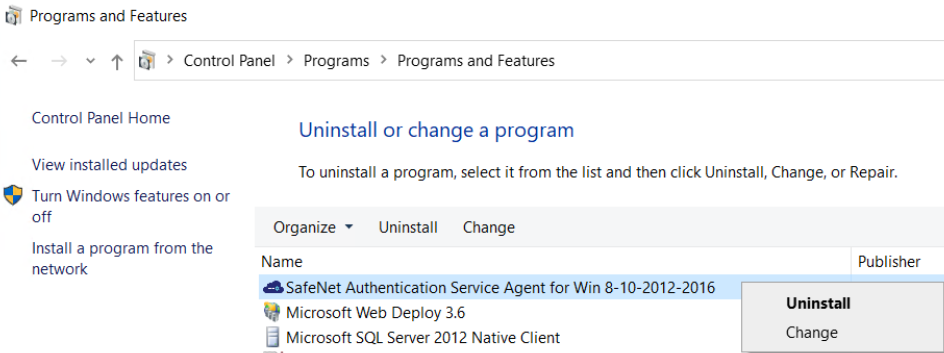
Navigate to Start > Control Panel > Programs > Programs and Features.
-
Select the SafeNet Authentication Service Agent for Win 8-10-2012-2016 program.
-
Click Uninstall.
Silent uninstall
To uninstall the agent silently, run the following command on the command line:
msiexec /x <installerName>.msi
Note
If you have installed the agent using the provided .exe, then you cannot uninstall it using .msi and vice-versa.

