



Deploying the agent via Microsoft Endpoint Configuration Manager
This section describes the steps to deploy the agent via Microsoft Endpoint Configuration Manager, formerly known as, Microsoft System Center Configuration Manager (SCCM).
Note
The agent deployment is tested with Microsoft Endpoint Configuration Manager version 2203.
Prerequisites
As a prerequisite,
- Microsoft Endpoint Configuration Manager must be installed on the admin machine from which the agent will be deployed on the client machines.
- Configuration Manager client must be installed on all the machines in which the agent needs to be deployed.
Installing the agent
Installing the agent involves the following steps:
- Creating an Application in Microsoft Endpoint Configuration Manager
- Distributing the content (Application)
- Deploying the application into client machines
- Pushing computer policy to the client machines
Creating an application in Microsoft Endpoint Configuration Manager
-
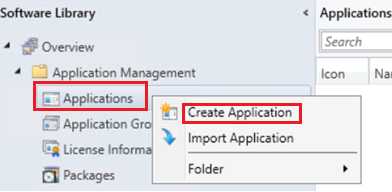
Open the Configuration Manager console. In the left pane, click Software Library > Application Management > Applications > Create Application.
-
On the Create Application Wizard window, under General, in the Location field, enter the file path where the SafeNet Agent for Windows Logon MSI is present in UNC format.
For example,
\\WIN-8INCV9BLBCT\Shared\SafeNet Authentication Service Agent for Win 8-10-2012-2016 x64.MSINote
Use the default MSI name as provided in the downloaded agent package.
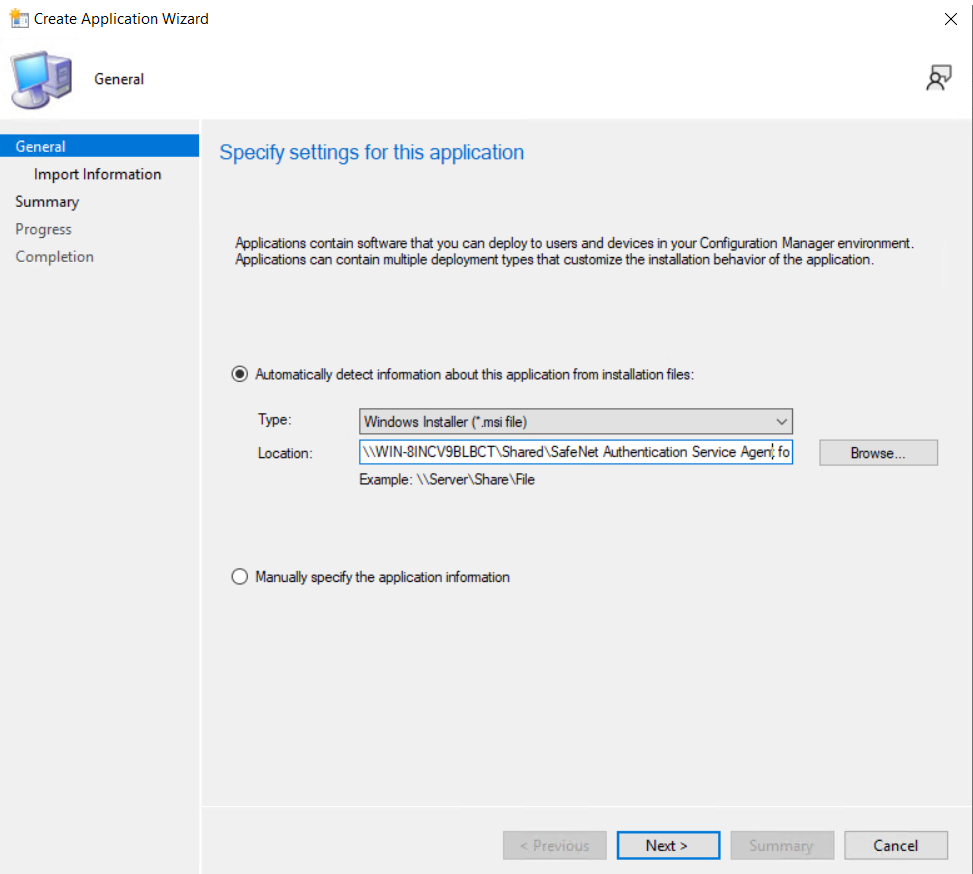
Click Next.
-
On the Import Information window, click Next.
-
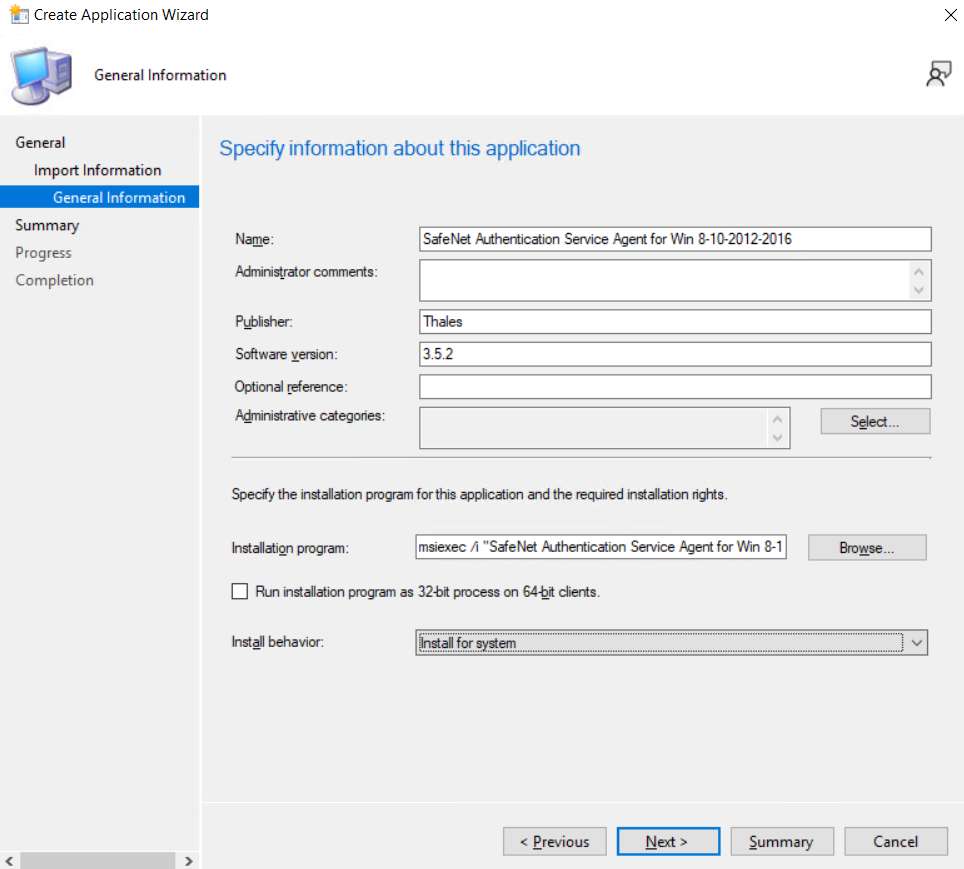
On the General Information window, perform the following steps:
-
In the Name field, enter the application name of your choice or proceed with the default name, that is, SafeNet Authentication Service Agent for Win 8-10-2012-2016.
-
In the Publisher field, enter the company name. For example, Thales.
-
In the Software version field, enter the version of the agent. For example, 3.5.2.
-
In the Installation program field, enter the following command:
msiexec /i "SafeNet Authentication Service Agent for Win 8-10-2012-2016 x64.MSI" /quiet TOKENVALIDATORLOCATION=<Primary SafeNet Server IP address or hostname or FQDN>Note
With the above command, after the agent installation, hard restart will be triggered on the client device. To avoid this, append /norestart parameter in the above command and ensure that you restart the client device later (for the agent to work properly).
-
In the Install behavior drop-down, ensure Install for system is selected.
-
Click Next.
-
-
On the Summary window, click Next.
-
On the Completion window, click Close.
Distributing the content (application)
-
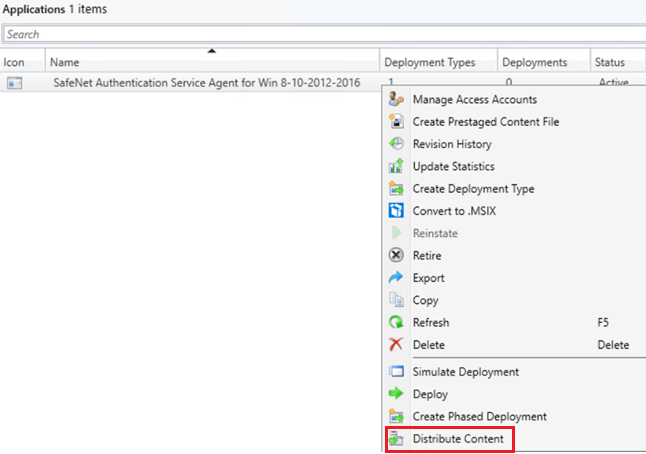
On the Configuration Manager console, in the right pane, under Applications, right-click the application that you have created in the above step, and then click Distribute Content.
-
On the Distribute Content Wizard, under General, click Next.
-
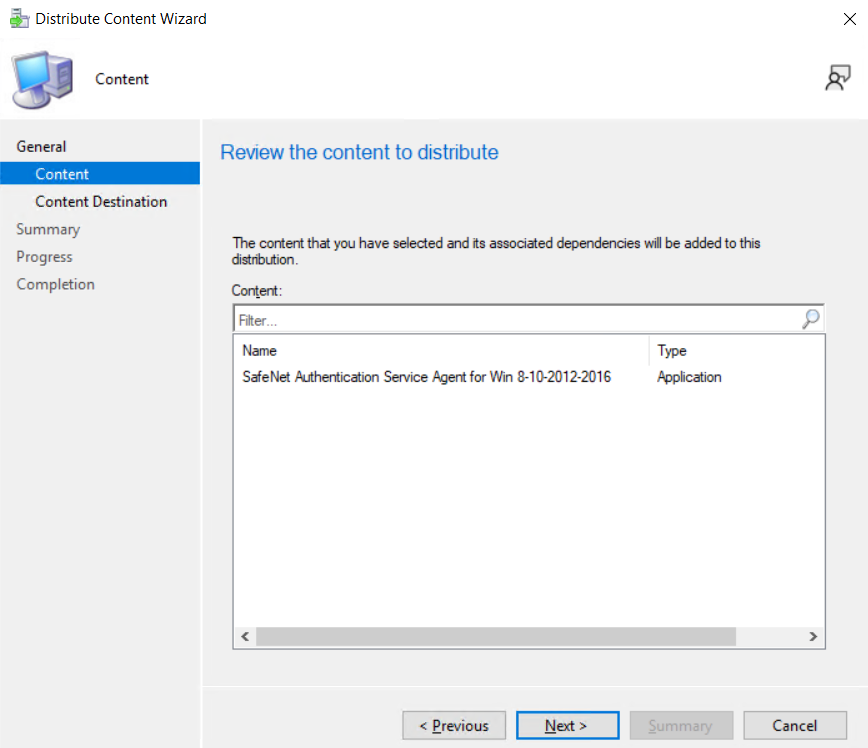
On the Content window, ensure that your application name is listed and then click Next.
-
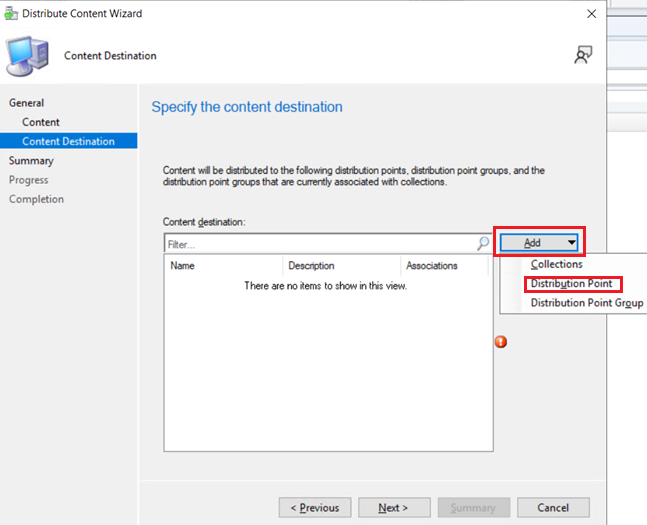
On the Content Destination window, click Add and then click Distribution Point.
-
On the Add Distribution Points window, under Available distribution points, select the distribution point that will host the content.
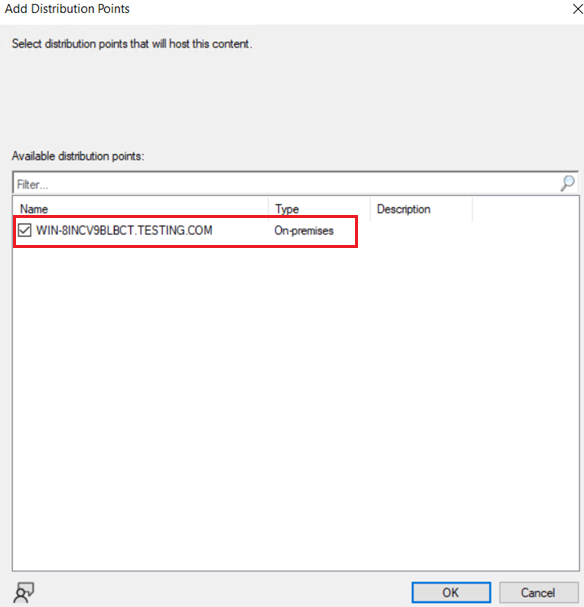
Click OK.
-
On the Content Destination window, click Next.
-
On the Summary window, click Next.
-
On the Completion window, click Close.
Deploying the application into client machines
-
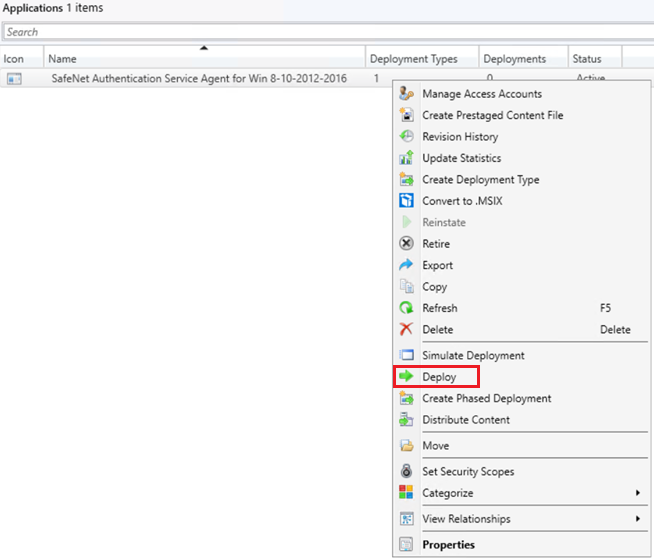
Under Applications, right-click the application that you have created in Creating an Application in Microsoft Endpoint Configuration Manager section and then click Deploy.
-
On the Deploy Software Wizard, under General, click Browse displayed against the Collection field.
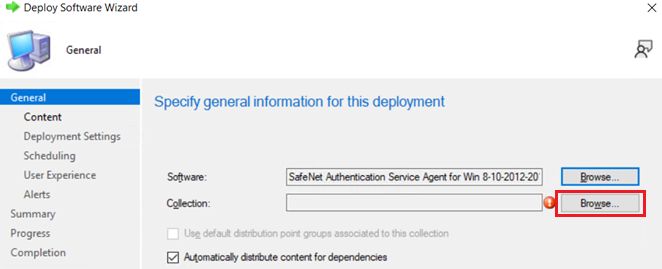
-
Now, under Select Collection window, select Device Collections from the drop-down.
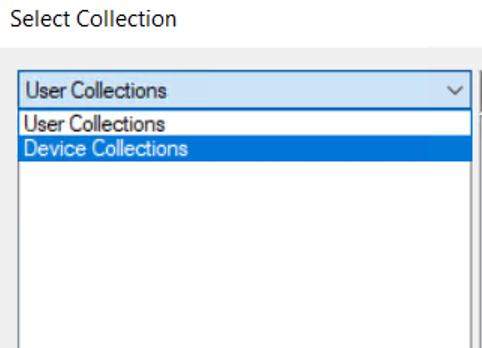
-
Under Device Collections, select the device collection where you want to deploy the agent and then click OK.
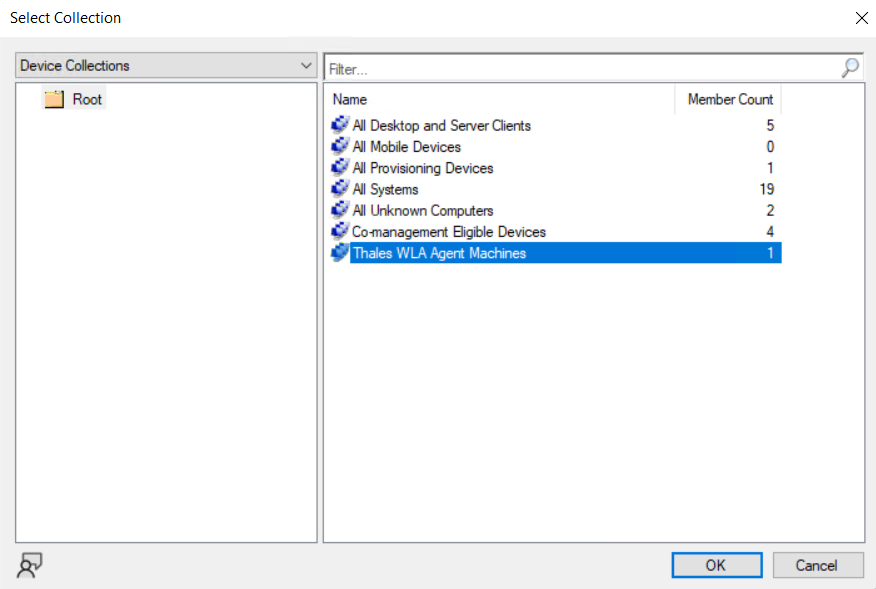
-
On the General window, click Next.
-
Under General > Content, ensure that the distribution point that you have selected in Distributing the content (Application) is listed and then click Next.
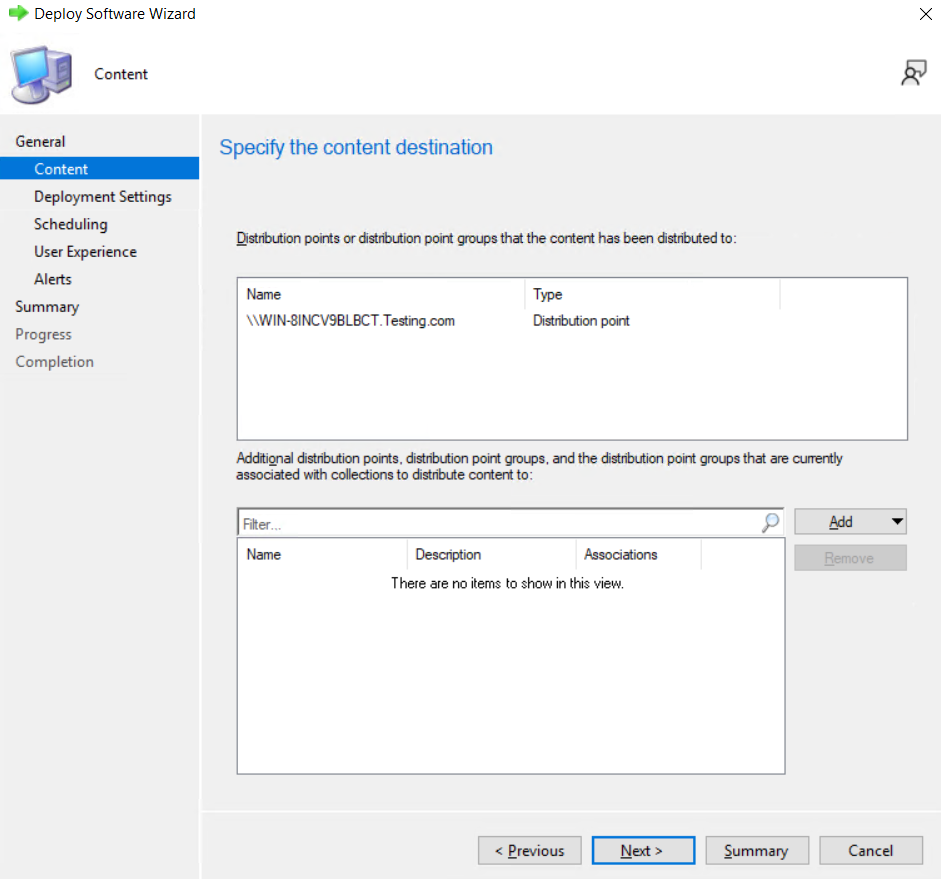
-
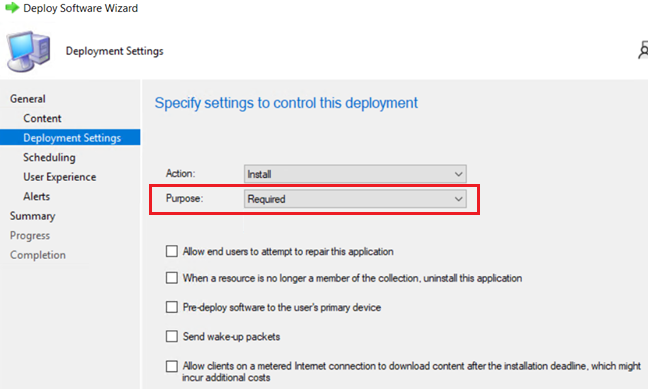
Under General > Deployment Settings, in Purpose, select Required from the drop-down and then click Next.
-
Under General > Scheduling, proceed with the default settings and click Next.
-
Under General > User Experience, proceed with the default settings and click Next.
-
Under General > Alerts, proceed with the default settings and click Next.
-
On the Summary window, click Next.
-
On the Completion window, click Close.
Pushing computer policy to the client machines
-
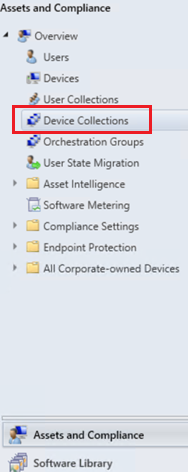
In the left pane, click Assets and Compliance > Device Collections.
-
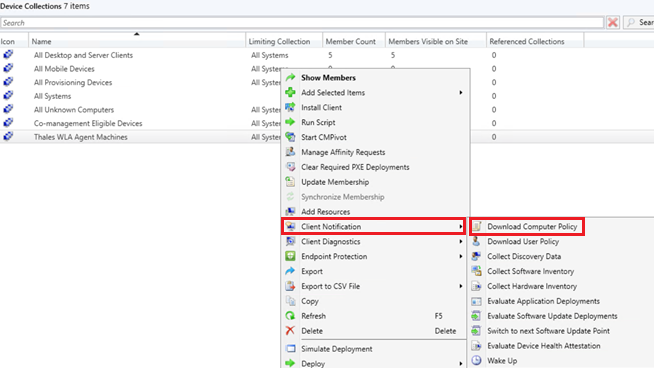
Under Device Collections, in the right pane, right-click the device collection that you have selected in Step 3 of Deploying the application into client machines section. Click Client Notification and then click Download Computer Policy.
-
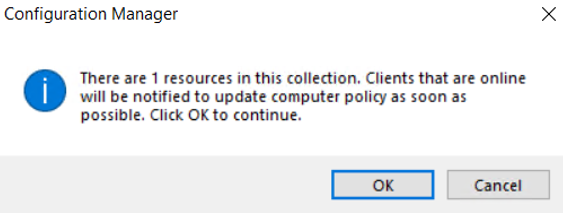
On the Configuration Manager pop-up, click OK.
After following the above steps, the agent will be successfully deployed on the client machine.
Note
Restart might be required after the installation.
Configuring the registry settings
This section involves the steps to configure the registry key values as per your requirement. After the configuration, the updated registry key values will be pushed to the client machines.
Perform the following steps to configure the registry settings:
- Copy the SCCM-Deployment folder from the downloaded agent package
- Creating an Application in Microsoft Endpoint Configuration Manager
- Distributing the content (Application)
- Deploying the application into client machines
- Pushing computer policy to the client machines
Copy the SCCM-Deployment folder from the downloaded agent package
-
Copy the SCCM-Deployment folder from the downloaded agent package and paste it on your local machine. The files present in this folder will be used later.
The SCCM-Deployment folder contains the following two files:
- ConfigurationSetup.cmd
- RegistryConfiguration.reg
Note
If you rename the registry file named RegistryConfiguration, then update the same in ConfigurationSetup.cmd file.
-
To update the registry file, perform the following steps:
-
Open the RegistryConfiguration.reg file in any text editor.
-
Uncomment the specific registry entry that you want to change by removing semi-colon (;).
-
Change the registry key's value as per your requirement. For example, change the LogLevel key value from 3 to 4.
For more details about the Registry Settings, click here.
Save the RegistryConfiguration.reg file after making the required changes. It is recommended that you take a backup of the updated RegistryConfiguration.reg file for contigencies.
-
Creating an application in Microsoft Endpoint Configuration Manager
To push the updated registry settings into the client machines, you need to create an application and deploy it.
-
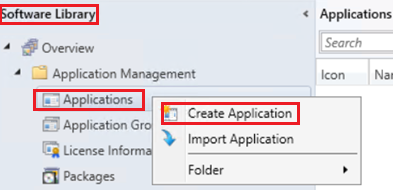
Open the Configuration Manager console. In the left pane, click Software Library > Application Management > Applications > Create Application.
-
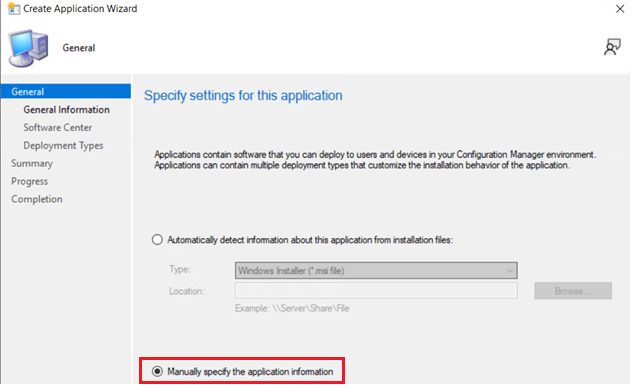
On the Create Application Wizard, under General, select Manually specify the application information radio button, and then click Next.
-
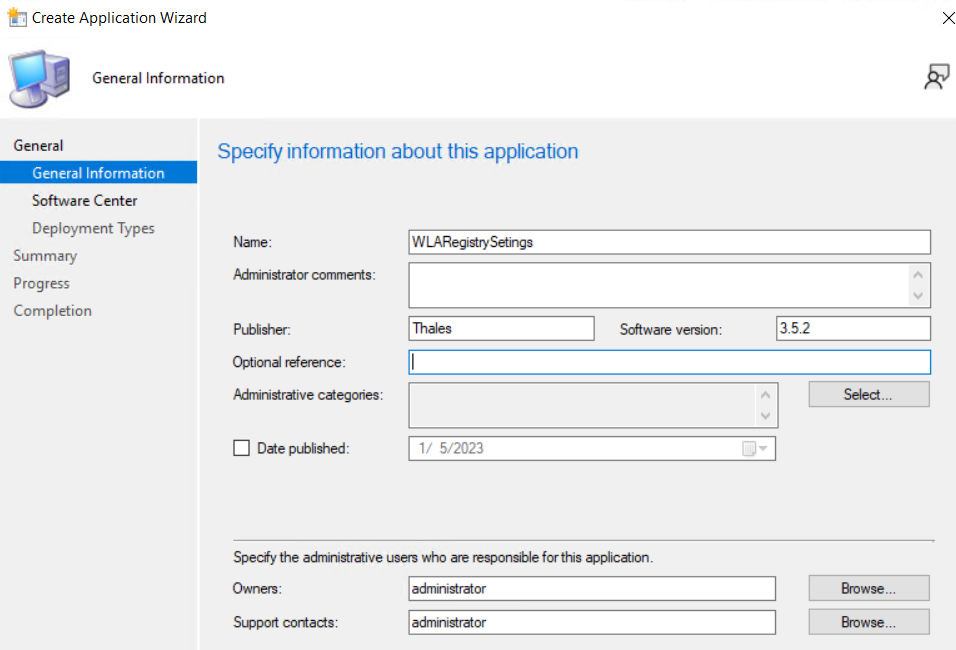
Under General > General Information, perform the following steps:
-
In the Name field, enter the name of the application. For example, WLARegistrySettings.
-
In the Publisher field, enter the company name. For example, Thales.
-
In the Software version field, enter the version of the agent for these registry settings. For example, 3.5.2.
-
Click Next.
-
-
Under General > Software Center, proceed with the default settings and click Next.
-
Under General > Deployment Types, click Add.
-
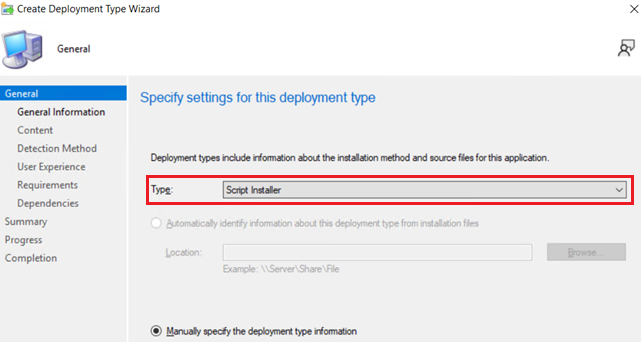
On the Create Deployment Type Wizard, under General, select Script Installer from the Type drop-down and then click Next.
-
Under General > General Information, in the Name field, enter a name for the deployment type. For example, WLARegistrySettings and then click Next.
-
Under General > Content,
-
In the Content location field, enter the SCCM-Deployment folder path in the UNC format that you have copied in Step 1 of Copy the SCCM-Deployment folder from the downloaded package section.
For example,
\\WIN-8INCV9BLBCT\Shared\SCCM-Deployment -
In the Installation program field, enter the CMD file name present in the SCCM-Deployment folder. For example, ConfigurationSetup.CMD.
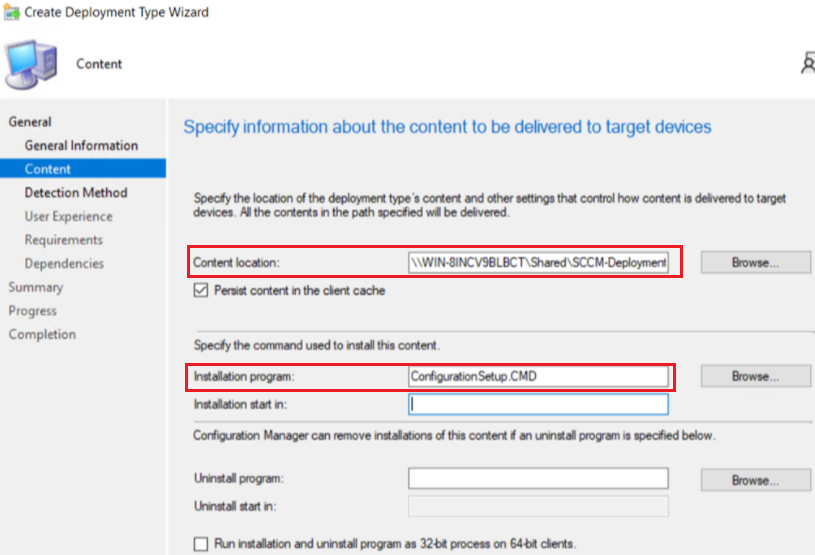
Click Next.
-
-
Under General > Detection Method, click Add Clause.
-
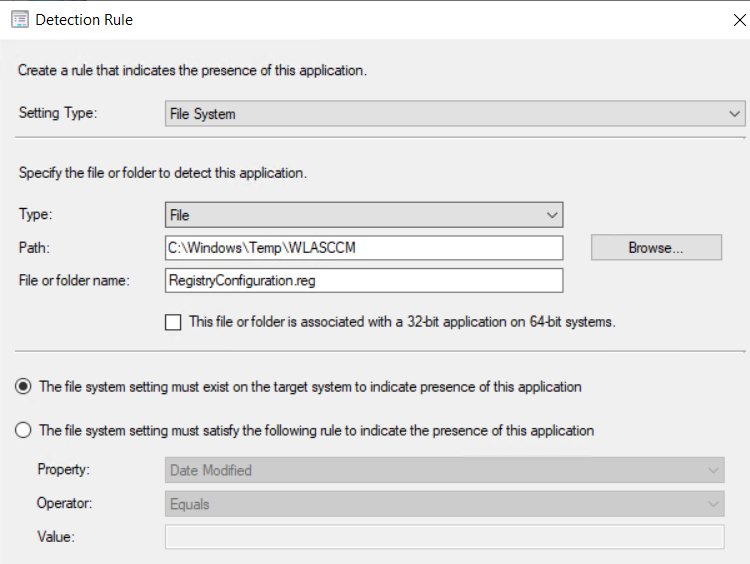
On the Detection Rule window, perform the following steps:
-
In the Setting Type field, ensure that File System is selected.
-
In the Type field, ensure that File is selected.
-
In the Path field, enter
C:\Windows\Temp\WLASCCM.Note
The above path is mentioned in ConfigurationSetup.CMD file, which is present in the SCCM-Deployment folder.
-
In the File or folder name field, enter the registry file name (for example, RegistryConfiguration.reg) that is present in the SCCM-Deployment folder.
-
Un-check This file or folder is associated with a 32-bit application on 64-bit systems checkbox.
-
Click OK.
-
-
-
Under General > Detection Method, click Next.
-
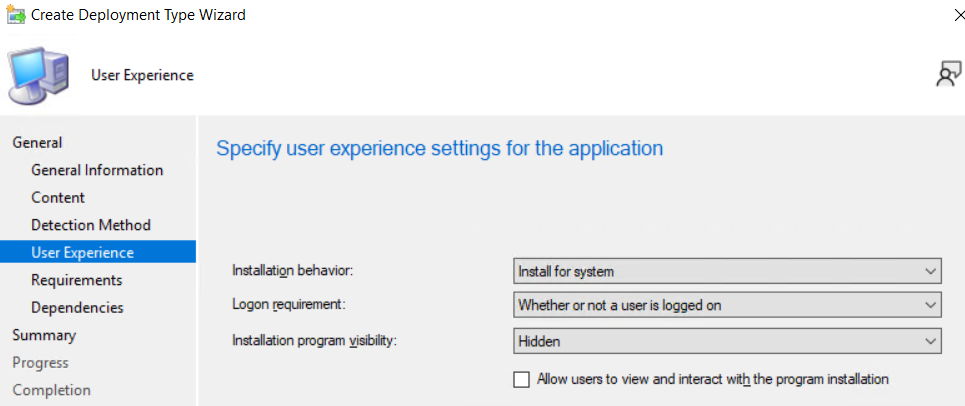
Under General > User Experience, perform the following steps:
-
In Installation behavior, select Install for system from the drop-down.
-
In Logon requirement, select Whether or not a user is logged on from the drop-down.
-
In Installation program visibility, select Hidden from the drop-down.
-
Click Next.
-
-
Under General > Requirements, click Next.
-
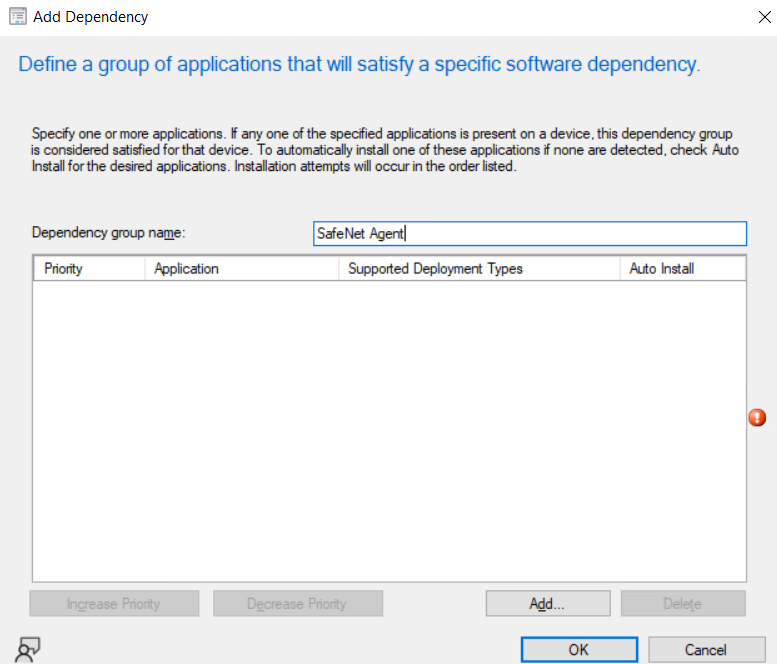
Under General > Dependencies, click Add.
- On the Add Dependency window, in the Dependency group name field, enter the dependency group name. For example, SafeNet Agent and then click Add.
-
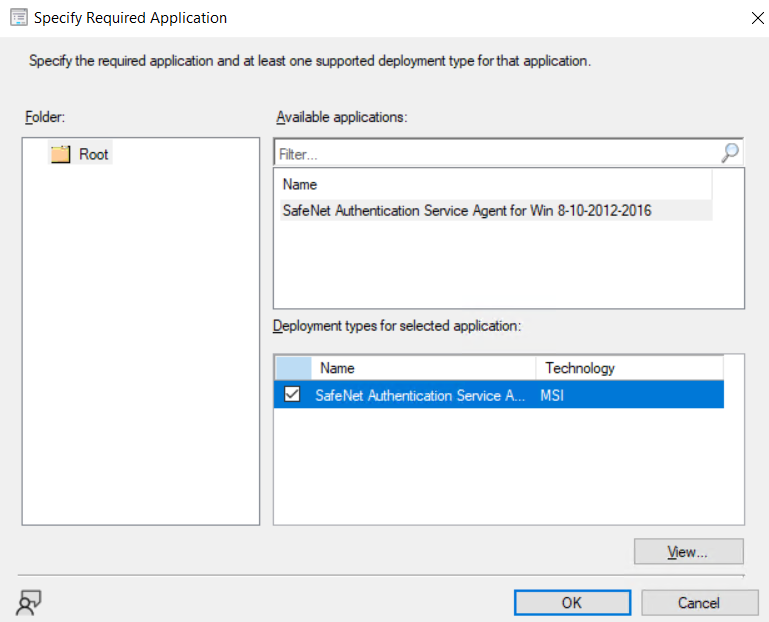
On the Specify Required Application window, perform following steps:
-
Under Available applications, click the application name that you have created in Creating an Application in Microsoft Endpoint Configuration Manager section.
For example, SafeNet Authentication Service Agent for Win 8-10-2012-2016.
-
Under Deployment types for selected application, select the MSI checkbox.
-
Click OK.
-
-
On the Add Dependency window, uncheck the checkbox under the Auto Install column (displayed against the application that you have selected in previous step) and then click OK.
-
Click Next.
-
On the Summary window, click Next.
-
On the Completion window, click Close.
-
On the Create Application Wizard, under General > Deployment Types, click Next.
-
On the Summary window, click Next.
-
On the Completion window, click Close.
Distributing the content (application)
Perform the steps mentioned in Distributing the content (Application) section to distribute the WLARegistrySettings application, which you have created in the above step.
Deploying the application into client machines
Perform the steps mentioned in Deploying the application into client machines section to deploy the WLARegistrySettings application, which you have created in the above step.
Pushing computer policy to the client machines
Perform the steps mentioned in Pushing computer policy to the client machines section to push the computer policy to the client machines for the WLARegistrySettings application, which you have created in the above step.
Uninstalling the agent
This section involves the following steps to uninstall the agent:
- Deleting the deployment from Device Collection
- Deploying the application into client machines for uninstallation
- Pushing computer policy to the client machines
Deleting the deployment from Device Collection
-
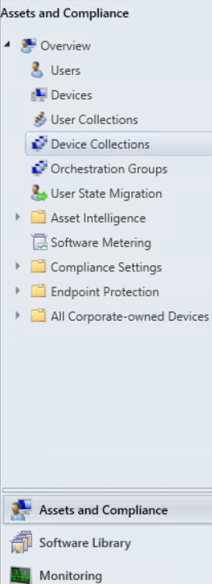
In the left pane, click Assets and Compliance > Overview > Device Collections.
-
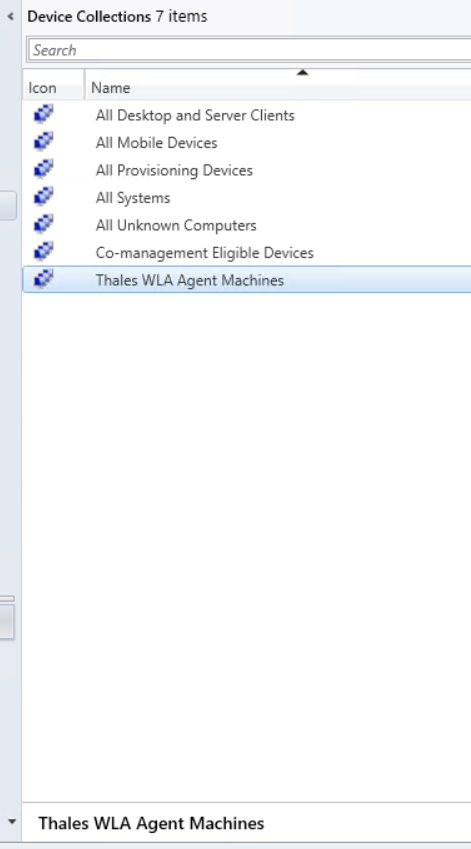
Under Device Collections, in the right pane, click on the device collection from where you want to uninstall the agent. Then, at the bottom pane, click on your device collection tile to view the Deployments.
-
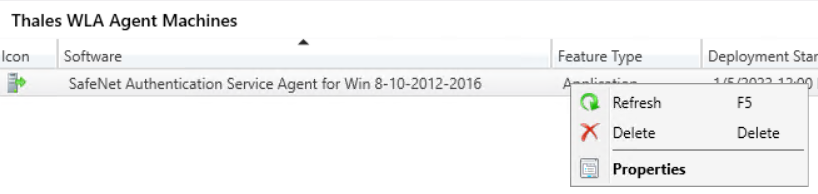
Under the Deployments tab, right-click on SafeNet Authentication Service Agent for Win 8-10-2012-2016 deployment and click Delete.
Note
This deletion will only delete the SafeNet Authentication Service Agent for Win 8-10-2012-2016 deployment from the device collection. It will not delete the SafeNet Authentication Service Agent for Win 8-10-2012-2016 application from the Software Library.
-
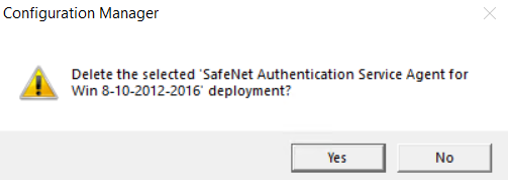
On the Configuration Manager pop-up, click Yes.
Deploying the application into client machines for uninstallation
-
Perform Step 1 to Step 5 of Deploying the application into client machines section to deploy the application into client machines for uninstalling the agent.
-
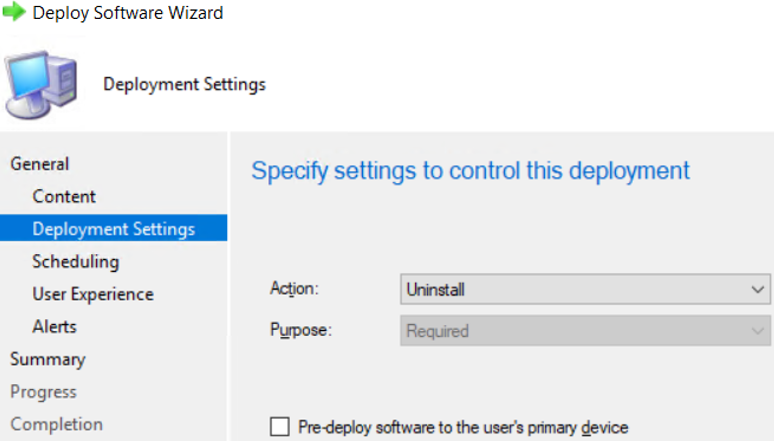
Now, on the General > Deployment Settings window, select Uninstall from the Action drop-down, and then click Next.
-
To complete the deployment, perform Step 7 to Step 11 of Deploying the application into client machines section.
Pushing computer policy to the client machines
Perform the steps mentioned in Pushing computer policy to the client machines section to push computer policy to the client machines for SafeNet Authentication Service Agent for Win 8-10-2012-2016 application, which you have created for agent installation.
After following the steps, a new computer policy for uninstalling the agent will be pushed to the client machines.
Note
This step will uninstall the agent from the client machines. However, in Software Center, sometimes, the uninstall deployment application shows the Removal failed error. It can be removed if you delete the uninstall deployment from the Configuration Manager console (refer to the steps mentioned in Deleting the deployment from Device Collection section).
Upgrading the agent
Upgrading the agent involves the following steps:
- Creating an application with new agent version in Microsoft Endpoint Configuration Manager
- Creating Supersedence relationship
- Updating Detection method for the upgrade
- Distributing the content (Application)
- Deploying the application into client machines
- Pushing computer policy to the client machines
Creating an application with new agent version in Microsoft Endpoint Configuration Manager
Perform the following steps to create an application for the latest version of the agent. Afterwards, we will link this newly created application with the application that has an older version of the agent (for the upgrade).
-
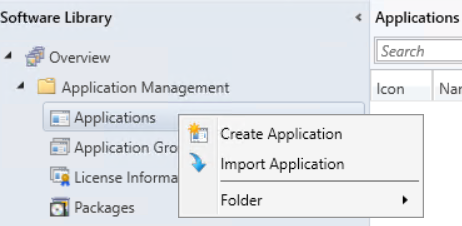
Open the Configuration Manager console. In the left pane, click Software Library > Application Management > Applications > Create Application.
-
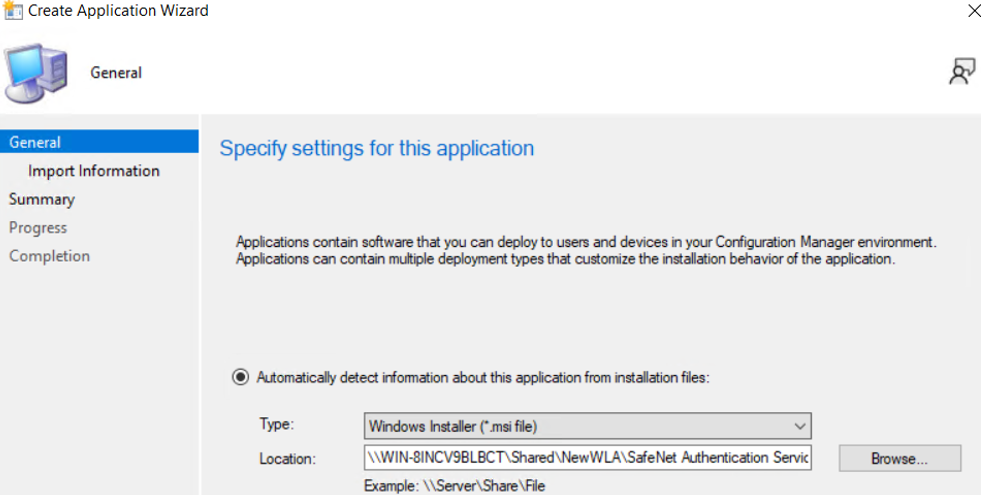
On the Create Application Wizard, under General, in the Location field, enter the file path in UNC format where new version of the agent MSI is present, and then click Next.
For example,
\\WIN-8INCV9BLBCT\Shared\NewWLA\SafeNet Authentication Service Agent for Win 8-10-2012-2016 x64.msiNote
Use the default MSI name provided in the downloaded agent package.
-
Under General > Import Information, click Next.
-
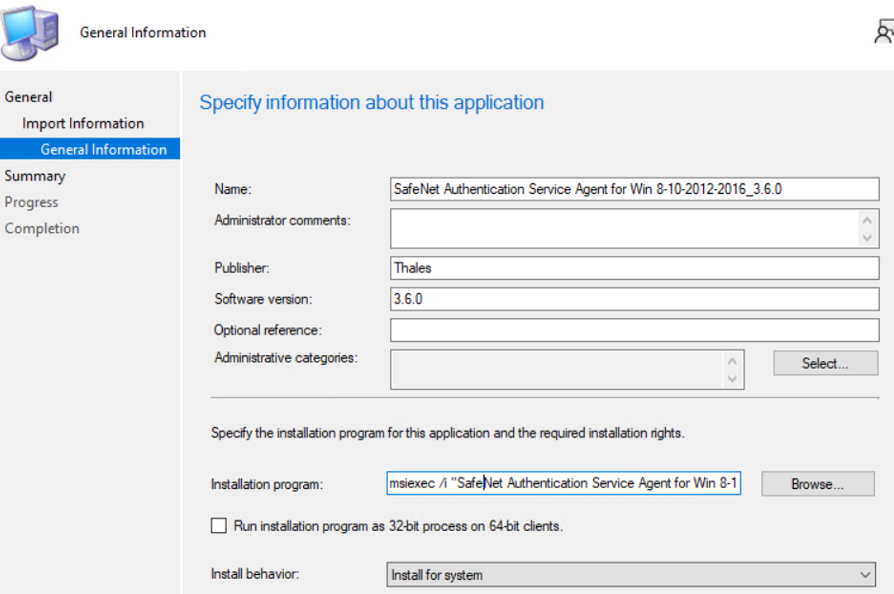
Under General Information, perform the following steps:
-
In the Name field, enter the application name of your choice or proceed with the default name, that is, SafeNet Authentication Service Agent for Win 8-10-2012-2016_3.6.0.
-
In the Publisher field, enter the company name. For example, Thales.
-
In the Software version field, enter the version of the agent. For example, 3.6.0.
-
In the Installation program field, enter the following command:
msiexec /i "SafeNet Authentication Service Agent for Win 8-10-2012-2016 x64.msi" /quiet REINSTALLMODE=vomus REINSTALL=ALLNote
With the above command, after the agent installation, hard restart will be triggered on the client device. To avoid this, append /norestart parameter in the above command and ensure that you restart the client device later (for the agent to work properly).
-
In the Install behavior drop-down, ensure that Install for system is selected.
-
Click Next.
-
-
On the Summary window, click Next.
-
On the Completion window, click Close.
Creating supersedence relationship
-
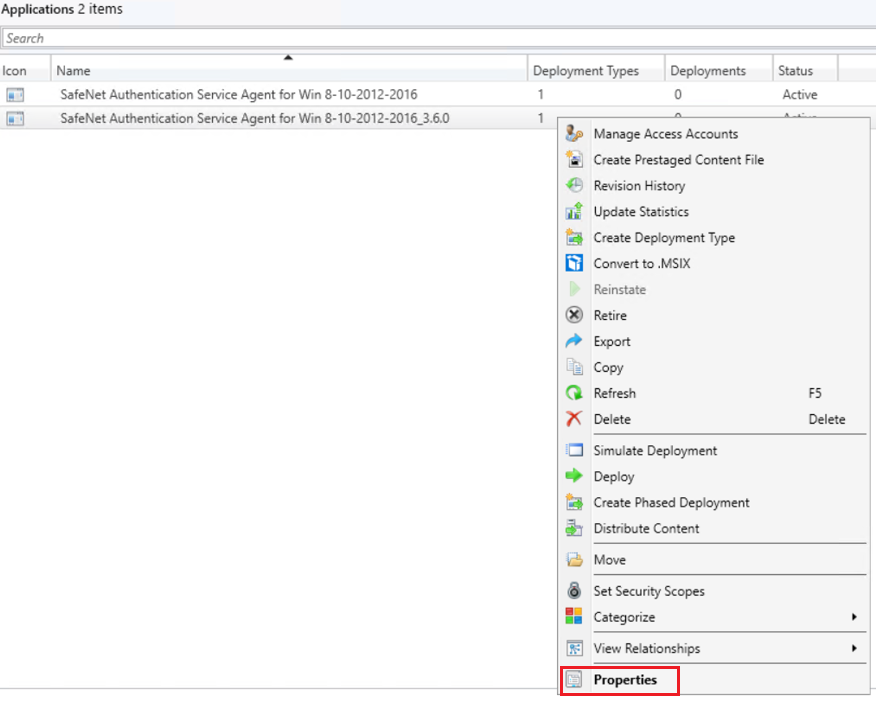
Under Software Library > Application Management > Applications, right-click on the new application that you have created in above step, and then click Properties.
-
Under Supersedence tab, click Add.
-
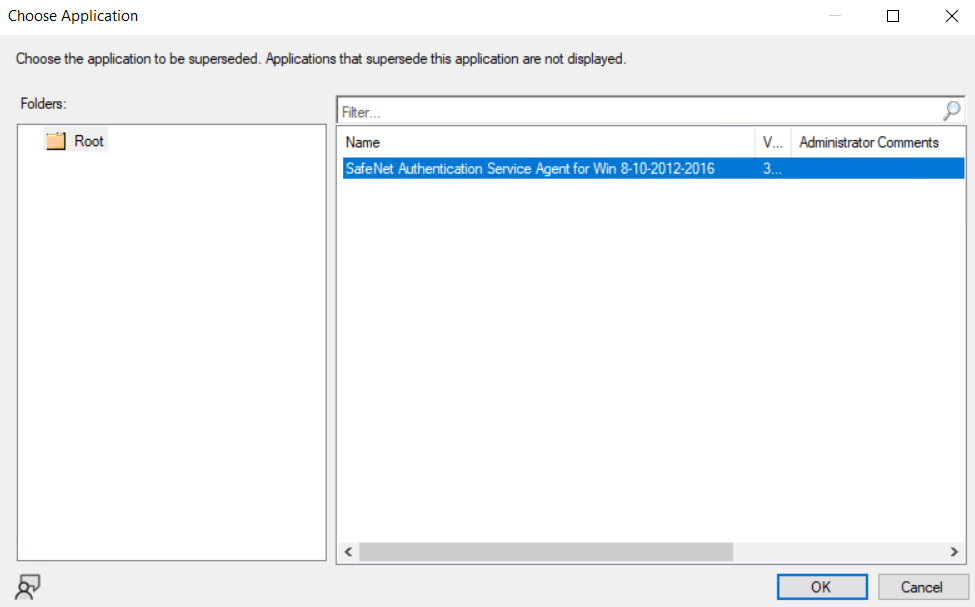
On the Specify Supersedence Relationship window, click Browse against the Superseded Application field.
-
On the Choose Application window, select the application that has older version of the agent, which needs to be replaced with the new application. Click OK.
-
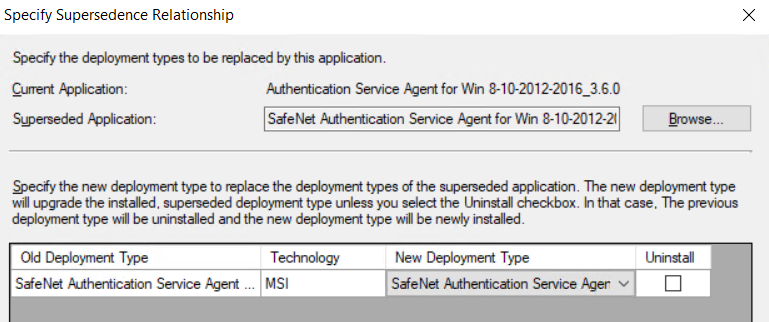
Under the New Deployment Type column, select the deployment type of the new application from the drop-down.
-
Under the Uninstall column, ensure that the checkbox is not selected.
-
Click OK.
-
Click Apply and then click OK.
Updating detection method for the upgrade
-
Under Applications, click on the new application that you have created in Creating an application with new agent version in Microsoft Endpoint Configuration Manager section.
-
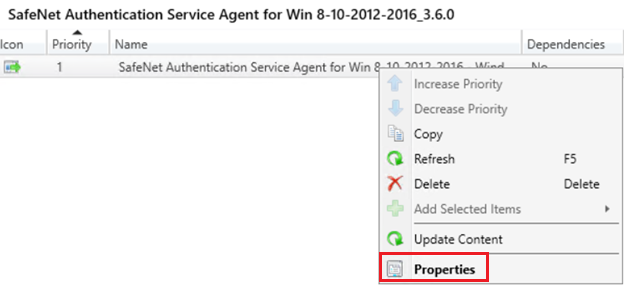
In the bottom pane, click the application tile. Under the Deployment Types tab, right-click on the deployment type and then click Properties.
-
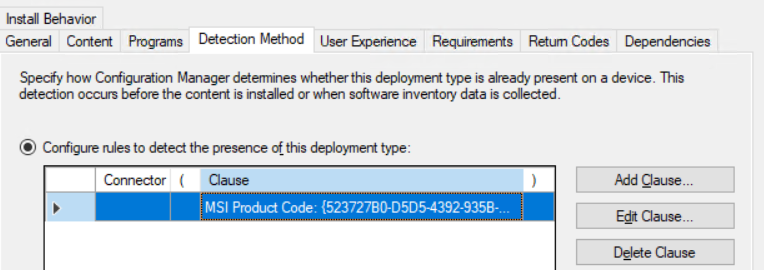
On the SafeNet Authentication Service Agent for Win 8-10-2012-2016 - Windows Installer (.msi file) Properties window, click the Detection Method tab. Select the clause and then click Edit Clause*.
-
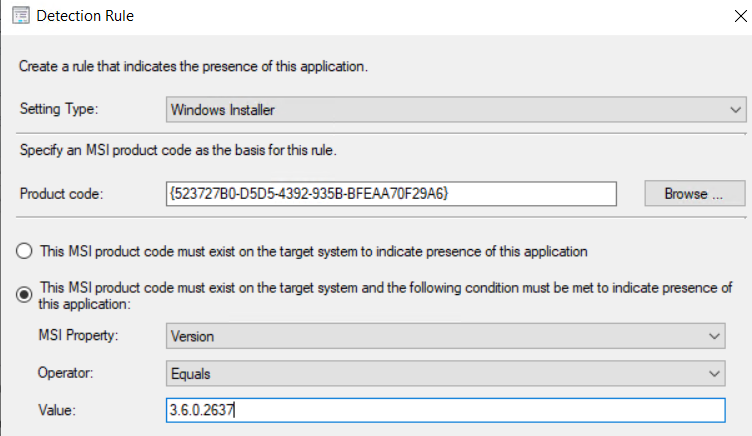
On the Detection Rule window, perform the following steps:
-
Click This MSI product code must exist on the target system and the following condition must be met to indicate presence of this application radio button.
-
In the Value field, enter the latest product version of the agent MSI. For example, 3.6.0.2637.
-
Click OK.
-
-
Click Apply and then click OK.
Distributing the content (application)
Perform the steps mentioned in Distributing the content (Application) section to distribute the application that you have created in Creating an application with new agent version in Microsoft Endpoint Configuration Manager.
Deploying the application into client machines
Perform the steps mentioned in Deploying an application into client machines section to deploy the application that you have created in Creating an application with new agent version in Microsoft Endpoint Configuration Manager.
Pushing computer policy to the client machines
Perform the steps mentioned in Pushing computer policy to the client machines section to push the computer policy to the client machines for the application that you have created in Creating an application with new agent version in Microsoft Endpoint Configuration Manager.
After following the above steps, old version of the agent will be replaced with the new version on the client machines.
Note
Restart might be required after the upgrade.
Updating the agent configuration file
Before deploying the updated agent configuration file, ensure that the .agent file contains the required configuration. For more information, see Configuring the agent file.
Deploying the updated agent configuration file
Perform the following steps to deploy the updated .agent file Sample_Passwordless_UCA_FIDO.agent:
- Downloading the SCCM deployment file
- Creating an application in Microsoft Endpoint Configuration Manager for updating agent configuration settings
- Distributing the content (application) for updating agent configuration settings
- Deploying the application into client machines for updating agent configuration settings
- Pushing computer policy to the client machines for updating agent configuration settings
Downloading the SCCM deployment file
-
Click here to download the UpdateAgentConfig_SCCM zip file.
-
Unzip the downloaded zip file. It contains UpdateAgentConfig.cmd command script.
-
Download the latest
.agentfile from the SAS PCE console and rename it to UpdatedWindowsLogon.agent. -
Copy and paste the following into a network folder location (for example,
\\server\Shared\UpdateAgentConfig_SCCM):- UpdateAgentConfig.cmd command script
- UpdatedWindowsLogon.agent file
Creating an application in Microsoft Endpoint Configuration Manager for updating agent configuration settings
-
Perform steps 1 and 2 in Creating an application in Microsoft Endpoint Configuration Manager.
-
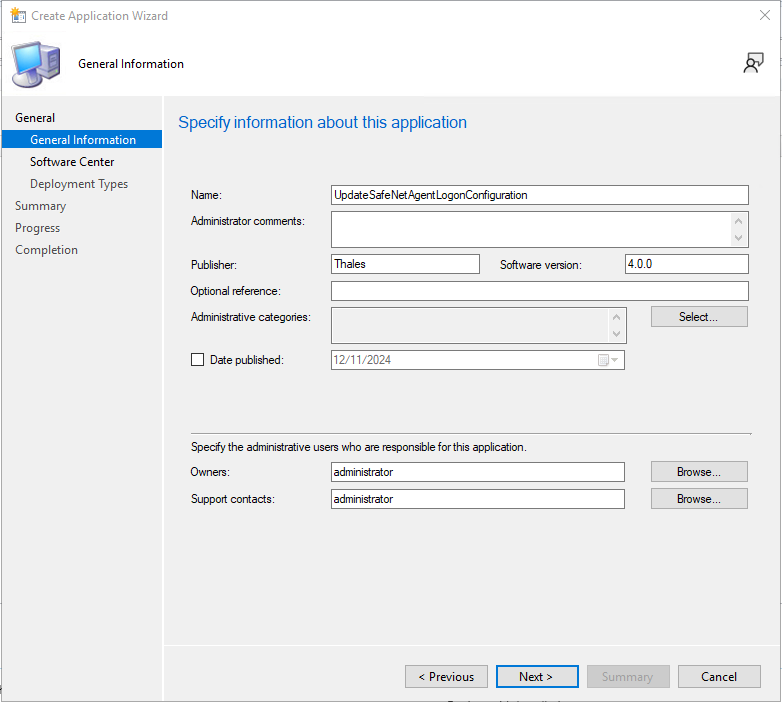
Under General > General Information, perform the following steps:
- In the Name field, enter a name for the application. For example, UpdateSafeNetAgentLogonConfiguration.
- In the Publisher field, enter the company name. For example, Thales.
- In the Software version field, enter the version of the agent. For example, 4.0.0.
- Click Next.
-
Under General > Software Center, proceed with the default settings and click Next.
-
Under General > Deployment Types, click Add.
-
On the Create Deployment Type Wizard, under General, select Script Installer from the Type drop-down, and then click Next.
-
Under General > General Information, in the Name field, enter a name for the deployment type. For example, UpdateSafeNetAgentLogonConfiguration, and then click Next.
-
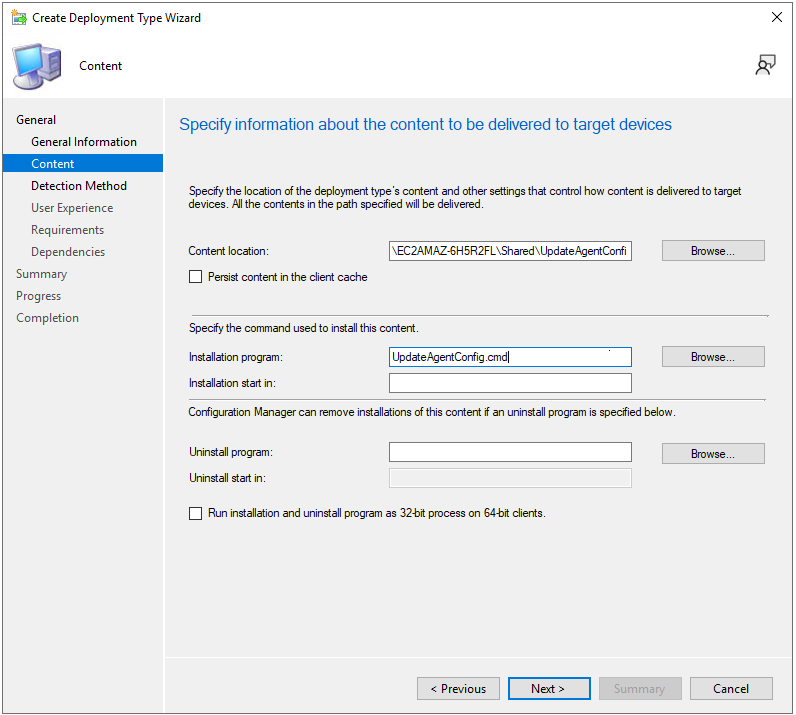
Under General > Content, perform the following steps:
- In the Content location field, enter the network path of the UpdateAgentConfig.cmd file that you placed in Downloading the SCCM deployment file. For example,
\\server\Shared\UpdateAgentConfig_SCCM. - In the Installation program field, enter the CMD file name UpdateAgentConfig.cmd.
- Click Next.
- In the Content location field, enter the network path of the UpdateAgentConfig.cmd file that you placed in Downloading the SCCM deployment file. For example,
-
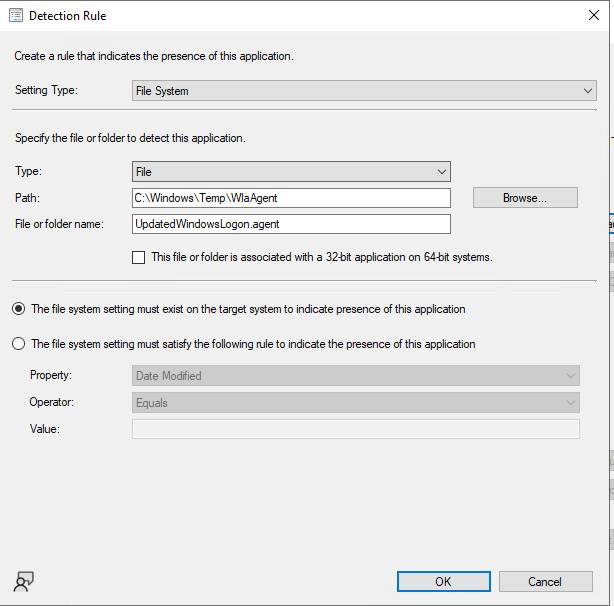
Under General > Detection Method, click Add Clause.
On the Detection Rule window, perform the following steps:
- From the Setting Type drop-down, ensure that File System is selected.
- From the Type drop-down, ensure that File is selected.
- In the Path field, enter
C:\Windows\Temp\WlaAgent. - In the File or folder name field, enter the agent file name UpdatedWindowsLogon.agent.
- Clear the This file or folder is associated with a 32-bit application on 64-bit systems check box.
- Click OK.
-
Under General > Detection Method, click Next.
-
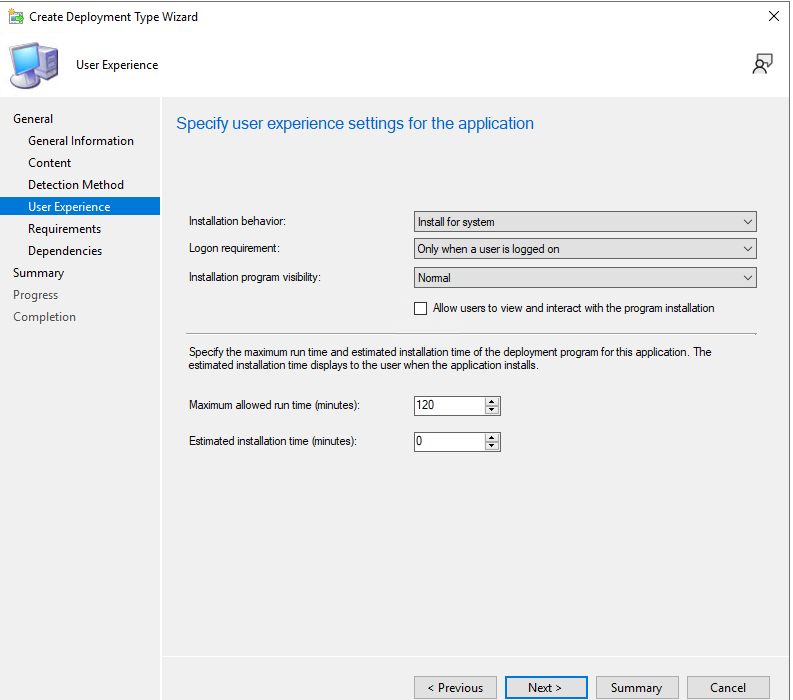
Under General > User Experience, perform the following steps:
- From the Installation behavior drop-down, select Install for system.
- From the Logon requirement drop-down, select Whether or not a user is logged on.
- From the Installation program visibility drop-down, select Normal.
- Click Next.
-
Under General > Requirements, click Next.
-
Under General > Dependencies, click Add.
-
On the Summary window, click Next.
-
On the Completion window, click Close.
-
On the Create Application Wizard, under General > Deployment Types, click Next.
-
On the Summary window, click Next.
-
On the Completion window, click Close.
Distributing the content (application) for updating agent configuration settings
Perform the steps mentioned in Distributing the content (Application) to distribute the newly created application, that is, UpdateSafeNetAgentLogonConfiguration.
Deploying the application into client machines for updating agent configuration settings
Perform the steps mentioned in Deploying the application into client machines to deploy the newly created application, that is, UpdateSafeNetAgentLogonConfiguration.
Pushing computer policy to the client machines for updating agent configuration settings
Perform the steps mentioned in Pushing computer policy to the client machines to push the computer policy to the client machines for the newly created application, that is, UpdateSafeNetAgentLogonConfiguration.
After following the steps, the updated .agent file will be pushed to the client machines.

