
Configuration
This section describes the licensing, software, and hardware requirements.
Licensing
CipherTrust Intelligent Protection is not a licensed product. However, you must acquire the following licenses in order to use it:
CipherTrust Manager
CipherTrust Transparent Encryption
Live Data Transformation (LDT) add-on
CipherTrust Data Discovery and Classification
Note
Add-on license to use the LDT feature. Add-on licenses require a CTE base license activated on the CipherTrust Manager.
Refer to Activating Licenses for details.
Supported Data Stores and Policies
For the data store, CipherTrust Intelligent Protection only supports the following:
Data Store
| Data Store |
|---|
| Local Storage |
| Network Storage (NFS) |
| Network Storage (SMB/CIFS) |
OS and Version
| OS | Version |
|---|---|
| Linux | • RHEL v7.8 • RHEL v8.0 |
| Windows | • Windows 2016 Server • Windows 2019 Server |
Policy
| Data Store | OS | Version | Policy |
|---|---|---|---|
| Local Storage | Linux | RHEL v7.8, v8.0 | Standard and LDT |
| Network Storage (NFS) | Linux | RHEL v7.8, v8.0 | LDT |
| Local Storage | Windows | Windows 2016, 2019 Server | LDT |
| Network Storage (SMB/CIFS) | Windows | Windows 2016, 2019 Server | LDT |
Note
With fresh installation of 7.3 and above, customers can only apply LDT GuardPoints. Standard Policy is no more supported on Windows Local Storage.
Moreover, on upgrade from 7.2 to 7.3 on Windows Local Storage, already existing Standard GuardPoints will run as it is, no fresh Standard GuardPoints can be deployed, only LDT being the supported Policy.
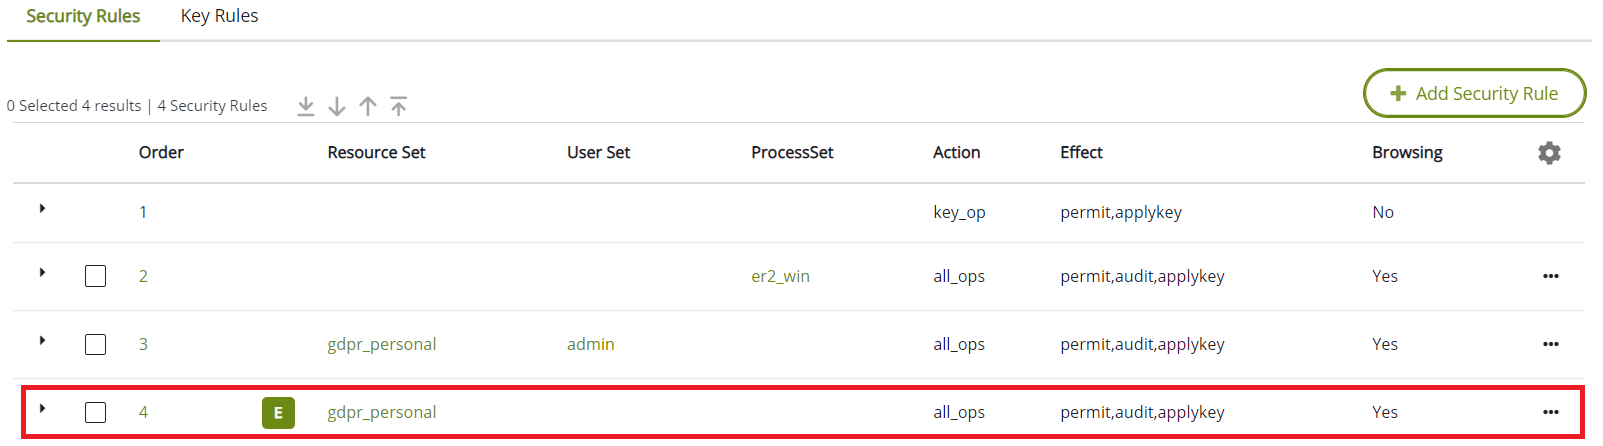
Add a security rule with exclude classification resource set, and assign key permissions (apply_key) to all operations and users for Windows CIP policies. This will allow access to the non-sensitive/non-GDPR files by other users.
File Editors
In CIP, the classification information is tagged with original data files only, and not with temporary files that are created while editing the files using some file editors. These temporary files may impact the CIP workflow.
The file editors that create a temporary file (~file1 or file2~) while using the CIP policies, it is recommended to disable the creation of temporary or backup file in the editors configuration, for example, EMACS editor.
You can specify the following lines in the ".emacs" file under user home directory to disable the creation of temporary or backup file during create or edit operation:
(setq make-backup-files nil) ; stop creating backup~ files
(setq auto-save-default nil) ; stop creating #autosave# files
For VI/VIM editor, to disable the creation of temporary or backup file during create or edit operation, use the following settings in $HOME/.vimrc:
`set nobackup`: Prevents creation of backup files.
`set nowritebackup`: Prevents creation of backup files while editing files.
`set noswapfile`: Prevents creation of swap files.
Software Requirements
The Remediation system consists of the following products. The table below lists the minimum versions of the software packages that are required for CipherTrust Intelligent Protection:
| Product | Version | Notes |
|---|---|---|
| CipherTrust Transparent Encryption(CTE) | v7.1.1 or later | See the CipherTrust Transparent Encryption documentation |
| CipherTrust Manager with connectors for CipherTrust Data Discovery and Classification (DDC Connector) and CipherTrust Transparent Encryption (CTE Connector) | v2.4 or later | See the CipherTrust Manager documentation |
| DDC Agent | v2.3 or later | See the DDC Deployment Guide documentation |
| Thales Data Platform: (TDP) | v3.1.5.1 or later | See the DDC Deployment Guide documentation |
Hardware Requirements
When using Standard Policies, remediation is performed using a secondary copy of the file. Therefore, CipherTrust Intelligent Protection requires free disk space equal to the size of the largest file targeted for remediation.
Configure CipherTrust Manager
See the CipherTrust Manager documentation for details.
Set up CipherTrust Manager with CipherTrust Data Discovery and Classification and CipherTrust Transparent Encryption
Generate a Registration token required for CTE registration
Configure CTE
See the CTE documentation for details.
Install supported CTE agent on a system where data needs to be protected, using the standard installation process
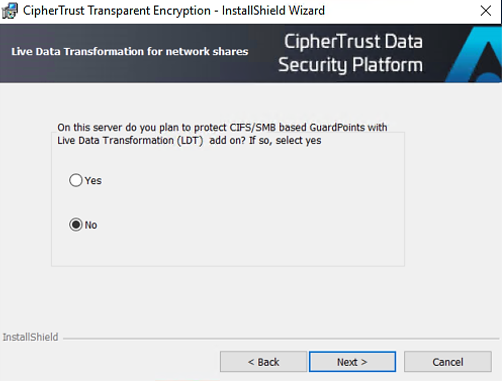
Warning
The option to enable LDT for CIFS/SMB based GuardPoints should be disabled on the CTE Windows agent for CIP on CTE 7.2.0 or below.
Complete the registration process using the token created with CipherTrust Manager
Note
The CTE client name MUST match the DDC Data Store IP Address or hostname. So be consistent while registering, use either use IP Address or hosname only as client name.
Check the status of the CipherTrust Transparent Encryption client on CM to verify that the registration process has completed and the node is healthy.
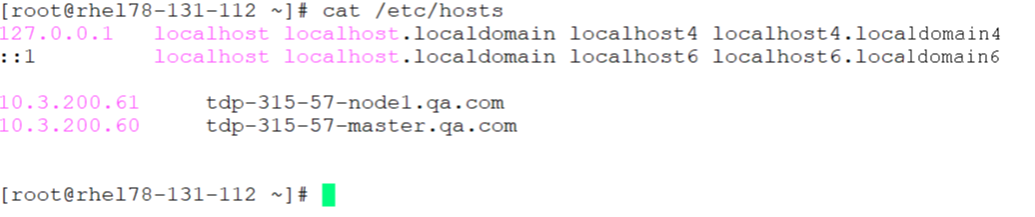
Configure the Hosts file
If a customer does not have a centralized DNS server, the CTE agent may not be able to resolve the TDP Knox server's hostname. Therefore, for a CipherTrust Intelligent Protection TDP Knox cluster setup with HA enabled, you need to enter all of the Knox's nodes IP addresses and hostnames in the /etc/hosts file.
Note
This setting is needed for BOTH Linux and Windows.
Following is an example of a hosts file setup for host name resolution:
Configure DDC
Install the DDC Agent on the same system that contains the local file system for the Data Store.
To configure the DDC agent:
Note
Make sure that you configure the NTP server. DDC requires this to work properly.
Install the DDC agent using the installer binary.
At the prompt, type the following:
# er2-config -interactive
For the active node hostname or IP address, provide the CipherTrust Manager IP address to register the DDC agent with CipherTrust Manager.
Note
DDC requires connecting to the DDC Active node. If more than one CM node is in the cluster, activate DDC on the preferred node and obtain its IP address, as described in the DDC deployment guide.

Restart the DDC agent service on the VM, type:
# er2-agent -stop# er2-agent -start
The DDC agent logs show the successful connection with CipherTrust Manager. Log path:
/var/lib/er2/agent.log
Configure CipherTrust Intelligent Protection
Following configuration are required to set up the environment for CipherTrust Intelligent Protection (CIP):
Configure TDP
Install the VM using the Thales Data Platform OVA file.
Follow the standard instructions and install Hadoop, Ambari and related services.
See the Thales Data Platform Installation Guide for more information on setting up and configuring Hadoop with an Ambari configuration.
Following are the required services on Thales Data Platform for the CIP:
Phoenix Query Server
Spark2
Livy
Configure Knox
The Knox server uses SSL for secure communication and authentication. Make the following changes in the Knox server under Advanced topology:
<service>
  <role>LIVYSERVER</role>
  <url>http://<Livy-node>:8999</url>
</service>
<service>
  <role>AVATICA</role>
  <url>http://<PQS-1>:8765</url>
  <url>http://<PQS-2>:8765</url>
</service>
Note
Restart the services after making the configuration changes.
Hadoop – Console Configuration
Perform the following from the Hadoop console:
Copy hbase-site.xml file on Hbase Master node:
from:
/etc/hbase/3.1.5.1-316/0/hbase-site.xmlto:
/etc/spark2/3.1.5.1-316/0/
Create a directory in HDFS (e.g. /ddc) and grant read/write permissions for the following directories:
sudo -u hdfs hadoop fs -mkdir /ddcsudo -u hdfs hadoop fs -chmod 0777 /ddcsudo -u hdfs hadoop fs -chmod 0777 /user
Note
The /user directory name is fixed and cannot be changed. The /ddc directory is not fixed and can be changed.
Configure Connection Manager (CipherTrust Manager)
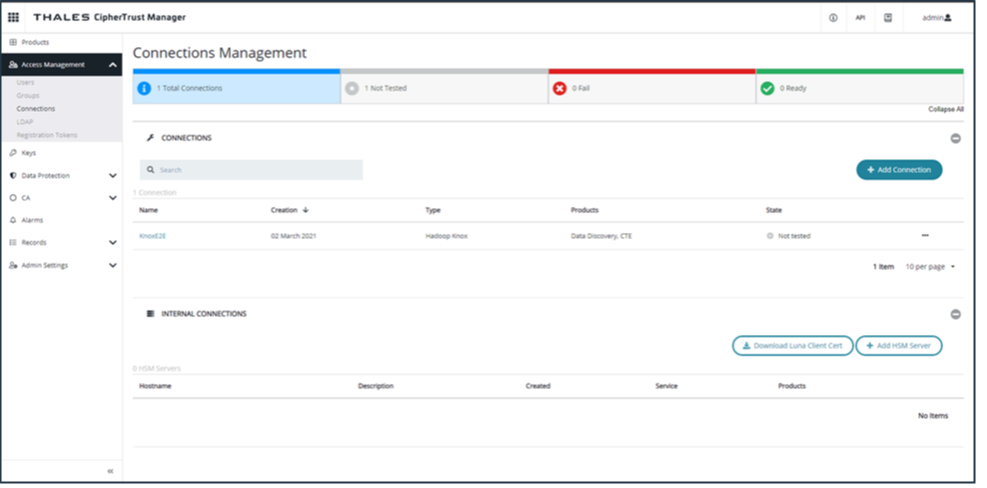 A Knox server is required for connecting with the PQS server. Configure Knox in the CM Connection Manager:
From the dashboard, click Access Management > Connections.
If the Knox server is not already configured, you must configure it manually:
Click Add Connection.
Click TDP.
Provide the hostname for the Thales Data Platform.
Enter the port: 8443.
Click Upload Certificate.
Upload the Knox Certificate.
Configure PQS (CTE)
The Apache Phoenix Query Server (PQS) is the metadata server for all of the remediation based GuardPoints. It communicates with the CipherTrust Transparent Encryption core services.
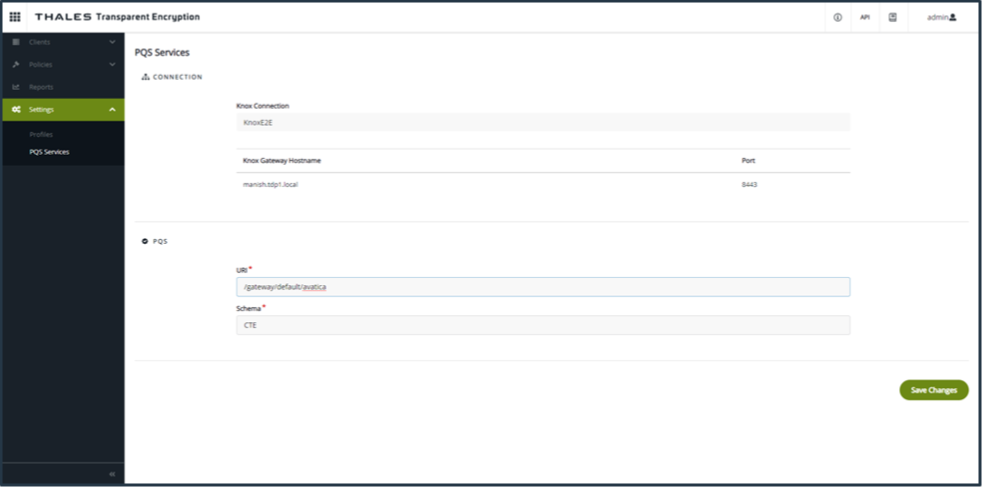
In CTE, click Admin Settings > PQS Services. The Knox setting is automatically fetched from the server.
Enter the PQS URI and schema. For the URI, input:
/gateway/default/avaticaClick Save Changes.
Warning
Thales does NOT support changing schemas in this release of CipherTrust Intelligent Remediation. Changing the PQS schema can corrupt data because GuardPoints do not migrate properly from the old schema to the new schema.
Configure Hadoop Services (DDC)
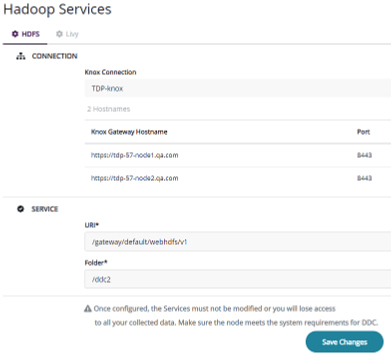
To configure HDFS and Livy:
In DDC, click Settings > Hadoop Services. The Knox service should be pre-populated from DDC.
For the HDFS server, enter the URI as:
/gateway/default/webhdfs/v1.For Folder, enter the directory name, for example, /ddc, that you created in Hadoop – Console Configuration on the previous page, where DDC will store all of the remediated information.
For the Livy server, enter in the URI of the server as:
/gateway/default/livy/v1.Click Save Changes.
Note
Once configured, do not modify the Services or you will lose access to all of your collected data. Make sure the TDP node meets the system requirements for DDC.
Configure Network Storage (NFS) Data Store
Refer to Network Storage Data Stores for details.
Configure SMB/CIFS Data Store
Refer to Network Storage Data Stores for details.
SMB Credentials through Connection Manager
To add connection in the Connection Manager, follow the steps given below:
Select category File-Share, File-Share type CIFS-SMB, and click Next.
Enter Name and Description (optional), and click Next.
Refer to Managing SMB Connections using GUI for details.
For SMB Data Stores with remediation enabled, scans performed after remediation completes, may not find matches in encrypted files.
Workaround: Automatic agent selection does not narrow the selection of DDC Agents to those installed on host with a CTE Agent in the Agent Group protecting the SMB GuardPoint. If DDC selects any of those agents, further scans on the SMB will read the encrypted content, and will be unable to find any match.
To avoid this issue, use labels to force DDC to select only the right agents as follows:
Add one dedicated label to the DDC Agents installed on the hosts with a valid CTE Agent.
Associate the same label to the SMB Data Store to guide automatic agent selection algorithm.
Refer to Adding Network Storage Data Stores for details.