This section contains the following procedures for maintaining and using the Luna Backup HSM G5:
>Initializing the Luna Backup HSM G5 Remote PED Vector
>Updating the Luna Backup HSM G5 Firmware
>Resetting the Luna Backup HSM G5 to Factory Conditions
>Installing or Replacing the Luna Backup HSM G5 Battery
>About Luna Backup HSM G5 Secure Transport and Tamper Recovery
•Creating a Secure Recovery Key
•Setting Secure Transport Mode
•Recovering From a Tamper Event or Secure Transport Mode
Storage and Maintenance
The Luna Backup HSM G5 can be safely stored, containing backups, when not in use. When stored properly, the hardware has a lifetime of 10+ years. Newer Luna Backup HSM G5s ship with an external power supply.
CAUTION! The internal power supply on older Luna Backup HSM G5s uses capacitors that may be affected if they are left unpowered for extended periods of time.If your Luna Backup HSM G5 has an internal power supply, power it on occasionally to recharge the capacitors. If the capacitors lose function, the Luna Backup HSM G5 will no longer receive power.
With the introduction of external power supplies, this is no longer a requirement. If the external power supply fails from being left unpowered, it can be easily replaced.
The Luna Backup HSM G5 Battery
The battery powers the NVRAM and Real-Time-Clock (RTC), and must be installed for use. The battery can be removed for storage, and this is generally good practice. Thales uses high-quality, industrial-grade batteries that are unlikely to leak and damage the HSM hardware, but an externally-stored battery will last longer. The battery must be stored in a clean, dry area (less than 30% Relative Humidity). Temperature should not exceed +30 ºC. When properly stored, the battery has a shelf life of 10 years.
If the battery dies or is removed, and the main power is not connected, NVRAM and the RTC lose power. Battery removal triggers a tamper event. After replacing the battery, the HSM SO must clear the tamper event before operation can resume. The working copy of the Master Tamper Key (MTK) is lost (see About Luna Backup HSM G5 Secure Transport and Tamper Recovery). Backup objects are stored in non-volatile memory, so they are preserved and remain uncorrupted.
There is no low battery indicator, or other provision for checking the battery status. The voltage remains constant until the very end of battery life.
Your stored (backed-up) content is in long-term memory and is not affected by the state of the battery. A failure or removal of the battery does cause a tamper event, but this is intended as an alert to bring the condition to your attention for action, and does not affect the stored content. A situation where battery removal could affect your ability to recover archived data from the Luna Backup HSM G5 is where you have previously extracted a portion of the MTK onto an iKey (PED Key) and then have lost/destroyed/overwritten all copies of that key, leaving the MTK unrecoverable.
Initializing the Luna Backup HSM G5 Remote PED Vector
The Remote PED (via PEDserver) authenticates itself to the Luna Backup HSM G5 with a randomly-generated encrypted value stored on an orange PED key. The orange key proves to the HSM that the Remote PED is authorized to perform authentication. The HSM SO can create this key using LunaCM.
If the Luna Backup HSM G5 is already initialized, the HSM SO must log in to complete this procedure.
Prerequisites
>Luna PED with firmware 2.7.1 or newer
>USB mini-B to USB-A connector cable
>Luna PED DC power supply (if included with your Luna PED)
>Blank or reusable orange PED key (or multiple keys, if you plan to make extra copies or use an M of N security scheme).
>Install the Luna Backup HSM G5 at the client and connect it to power (see Luna Backup HSM G5 Hardware Installation).
>Connect the PED to the Luna Backup HSM G5 using a 9-pin Micro-D to Micro-D cable. Set the PED to Local PED-SCP mode
To initialize the RPV and create the orange PED key
1.Launch LunaCM on the client workstation.
2.Set the active slot to the Luna Backup HSM G5.
lunacm:> slot set -slot <slotnum>
3.If the Luna Backup HSM G5 is initialized, log in as HSM SO. If not, continue to the next step.
lunacm:> role login -name so
4.Ensure that you have the orange PED key(s) ready. Initialize the RPV.
lunacm:> ped vector init
5.Attend to the Luna PED and respond to the on-screen prompts.

•If you have an orange PED key with an existing RPV that you wish to use for this HSM, press Yes.
•If you are creating a new RPV, press No.

Continue following the prompts for PED PIN, M of N, and duplication options.
To set up a Remote PED server, see Configuring a Remote Backup Server.
Updating the Luna Backup HSM G5 Firmware
To update Luna Backup HSM G5 firmware, use LunaCM on a client computer that is connected to the Luna Backup HSM G5. You require:
>Luna Backup HSM G5 firmware update file (<filename>.fuf)
>the firmware update authentication code file(s) (<filename>.txt)
CAUTION! Use an uninterruptible power supply (UPS) to power your HSM. There is a small chance that a power failure during an update could leave your HSM in an unrecoverable condition.
NOTE To perform backup operations on Luna HSM Firmware 7.7.0 or newer (V0 or V1 partitions) you require at minimum:
>Luna Backup HSM 7 Firmware 7.7.1
>Luna Backup HSM G5 Firmware 6.28.0
You can use a Luna Backup HSM with older firmware to restore objects to a V0 or V1 partition, but this is supported for purposes of getting your objects from the older partitions onto the newer V0 or V1 partitions only. V0 and V1 partitions are considered more secure than partitions at earlier firmware versions - any attempt to restore from a higher-security status to lower-security status fails gracefully.
When the Luna Backup HSM is connected directly to the Luna Network HSM 7 appliance, only the SMK can be backed up from or restored to a V1 partition.
To update the Luna Backup HSM G5 firmware
1.Copy the firmware file (<filename>.fuf) and the authentication code file (<filename>.txt) to the Luna HSM Client root directory.
•Windows: C:\Program Files\SafeNet\LunaClient
•Linux
•Solaris: /opt/safenet/lunaclient/bin
NOTE On some Windows configurations, you might not have authority to copy or unzip files directly into C:\Program Files\.... If this is the case, put the files in a known location that you can reference in a LunaCM command.
2.Launch LunaCM.
3.If more than one HSM is installed, set the active slot to the Admin partition of the HSM you wish to update.
lunacm:> slot set -slot <slot_number>
4.Log in as HSM SO. Depending on the currently-installed firmware version, use one of the following two commands:
•lunacm:> role login -name so
•lunacm:> hsm login
5.Apply the new firmware update by specifying the update file and the authentication code file. If the files are not located in the Luna HSM Client root directory, specify the filepaths.
lunacm:> hsm updatefw -fuf <filename>.fuf -authcode <filename>.txt
Resetting the Luna Backup HSM G5 to Factory Conditions
These instructions will allow you to restore your Luna Backup HSM G5 to its original factory conditions, erasing its contents. This could be necessary if you have old backups that you do not wish to keep
To reset the Luna Backup HSM G5 to factory conditions
1.Launch LunaCM on the Luna Backup HSM G5 workstation.
2.Set the active slot to the Luna Backup HSM G5.
lunacm:> slot set -slot <slotnum>
3.Reset the Backup HSM.
lunacm:> hsm factoryreset
Installing or Replacing the Luna Backup HSM G5 Battery
The Luna Backup HSM G5 must have a functioning battery installed to preserve the NVRAM and RTC in case of primary power loss. You can purchase a replacement battery from any supplier who can match the following specifications:
>3.6 V Primary lithium-thionyl chloride (Li-SOCl2)
>Fast voltage recovery after long term storage and/or usage
>Low self discharge rate
>10 years shelf life
>Operating temperature range -55 ºC to +85 ºC
>U.L. Component Recognition, MH 12193
Prerequisites
>Removing the battery causes a tamper event.
To install or replace the Luna Backup HSM G5 battery
1.Remove the front bezel. It is held in place by two spring clips.

2.The battery compartment is spring-loaded and can be removed without much pressure. Use a coin or your fingers to press in the compartment cover and turn counter-clockwise to remove it.
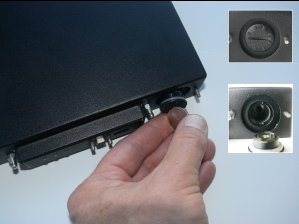
3.If you are replacing the old battery, remove it from the battery compartment.

4.Insert the new battery, negative end first. The positive end should be visible.
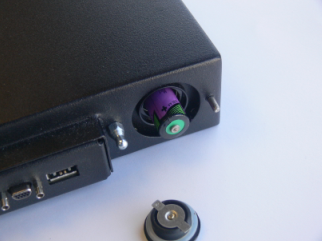
5.Use the battery compartment cover to push the battery into the compartment, aligning the tabs on the cover with the compartment slots. Twist the cover clockwise to lock the compartment.
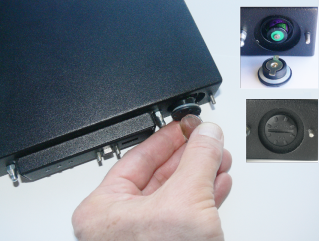
6.Replace the front bezel by aligning the clips with their posts and pushing it into place.
Removing the battery causes a tamper event on the Luna Backup HSM G5.
7.To clear the tamper, see Recovering From a Tamper Event or Secure Transport Mode.
About Luna Backup HSM G5 Secure Transport and Tamper Recovery
The Luna Backup HSM G5 recognizes a similar list of tamper conditions to the Luna Network HSM 7 (see Tamper Events). When a tamper event occurs, a tamper state is reported in the HSM Status field in LunaCM's list of slots.
By default, tamper events are cleared automatically when you reboot the Luna Backup HSM G5 and log in as HSM SO. However, you can choose to prevent any further operations on theLuna Backup HSM G5. The following procedures will allow you to create a purple Secure Recovery Key (SRK) that the Backup HSM SO must present to unlock the HSM after a tamper event. This key contains part of the Master Tamper Key (MTK), which encrypts all sensitive data stored on the Backup HSM. By splitting the MTK and storing part of it on an SRK (purple PED key), you ensure that none of the stored material can be accessible until the SRK is presented.
You can create the purple SRK even for a Luna Backup HSM G5 that is initialized for password authentication. There is no password-based SRK equivalent; you must have a Luna PED and a purple PED key to use Secure Tamper Recovery and Secure Transport Mode.
Initializing the SRK also allows you to place the Luna Backup HSM G5 in Secure Transport Mode (STM). STM on the Luna Backup HSM G5 functions differently from STM on the Luna Network HSM 7 (see Secure Transport Mode for comparison). When the SRK is initialized and secure recovery enabled, STM on the Backup HSM is effectively a voluntary tamper state, where no operations are possible until you present the purple PED key.
CAUTION! Always keep a securely-stored backup copy of the purple PED key. If you lose this key, the Backup HSM is permanently locked and you will have to obtain an RMA for the Backup HSM.
This section provides directions for the following procedures:
>Creating a Secure Recovery Key
>Setting Secure Transport Mode
>Recovering From a Tamper Event or Secure Transport Mode
Creating a Secure Recovery Key
To enable secure recovery, you must create the Secure Recovery Key (purple PED key). This procedure will zeroize the SRK split on the Backup HSM, so that you must present the purple PED key to recover from a tamper event or Secure Transport Mode.
Prerequisites
>Install the Backup HSM at the client and connect it to power (see Luna Backup HSM G5 Hardware Installation).
>You require the Backup HSM SO credential (blue PED key).
>Ensure that the Backup HSM can access PED service (Local or Remote PED), and that you have enough blank or rewritable purple PED keys available for your desired authentication scheme
•[Local PED] Connect the PED using a 9-pin Micro-D to Micro-D cable. Set the PED to Local PED-SCP mode
•[Remote PED] Set up a Remote PED server to authenticate the Backup HSM (see Configuring a Remote Backup Server).
•[Remote PED] Initialize the Backup HSM RPV (see Initializing the Luna Backup HSM G5 Remote PED Vector). You require the orange PED key.
To create a Secure Recovery Key
1.Launch LunaCM on the client workstation.
2.Set the active slot to the Luna Backup HSM.
lunacm:> slot set -slot <slotnum>
3.[Remote PED] Connect the Luna Backup HSM G5 to the Remote PED server.
lunacm:> ped connect -ip <PEDserver_IP> -port <portnum>
4.Create a new split of the MTK on the Luna Backup HSM G5.
lunacm:> srk generate
5.Log in as Backup HSM SO.
lunacm:> role login -name so
6.Enable secure recovery.
lunacm:> srk enable
Attend to the Luna PED prompts to create the purple PED key. Secure Recovery is now enabled on the Luna Backup HSM G5.
Setting Secure Transport Mode
The following procedure will allow you to set Secure Transport Mode on the Luna Backup HSM G5.
Prerequisites
>Ensure the Luna Backup HSM G5 can access PED services.
>Secure Recovery must be enabled on the Backup HSM (see Creating a Secure Recovery Key). You require the Secure Recovery Key (purple PED key) for the Luna Backup HSM G5.
To set Secure Transport Mode on the Luna Backup HSM G5
1.Launch LunaCM on the client workstation.
2.Set the active slot to the Luna Backup HSM G5.
lunacm:> slot set -slot <slotnum>
3.[Remote PED] Connect the Luna Backup HSM G5 to the Remote PED server.
lunacm:> ped connect -ip <PEDserver_IP> -port <portnum>
4.Set Secure Transport Mode.
lunacm:> srk transport
a.You are prompted for the SRK (purple PED key). This is to ensure that you have the key that matches the SRK split on the HSM.
b.The Luna PED displays a 16-digit verification code. Write this code down as an additional optional check.
The SRK is zeroized on the Luna Backup HSM G5 and STM is now active.
Recovering From a Tamper Event or Secure Transport Mode
With Secure Recovery Mode enabled, the procedure to recover from a tamper event or to exit STM is the same.
Prerequisites
>Ensure the Luna Backup HSM G5 can access PED services.
>You require the Secure Recovery Key (purple PED key) for the Luna Backup HSM G5.
>If you are recovering from a tamper event, reboot the Backup HSM and LunaCM before recovering.
lunacm:> hsm restart
lunacm:> clientconfig restart
To recover from a tamper event or exit STM
1.Launch LunaCM on the client workstation.
2.Set the active slot to the Luna Backup HSM G5.
lunacm:> slot set -slot <slotnum>
3.[Remote PED] Connect the Luna Backup HSM G5 to the Remote PED server.
lunacm:> ped connect -ip <PEDserver_IP> -port <portnum>
4.Recover the Luna Backup HSM G5 from the tamper event or STM.
lunacm:> srk recover
Attend to the Luna PED prompts:
a.You are prompted for the SRK (purple PED key).
b.[STM] The Luna PED displays a 16-digit verification code. If this code matches the one that was presented when you set STM, you can be assured that the Luna Backup HSM G5 has remained in STM since then.
The Luna Backup HSM G5 is recovered from the tamper/STM state and you can resume backup/restore operations.
Disabling Secure Recovery
To disable secure recovery, you must present the Secure Recovery Key (purple PED key) so that it can be stored on the Luna Backup HSM G5. You will no longer need to present the purple key to recover from a tamper event.
Prerequisites
>Ensure the Luna Backup HSM G5 can access PED services.
>You require the Secure Recovery Key (purple PED key) for the Luna Backup HSM G5.
To disable secure recovery
1.Launch LunaCM on the client workstation.
2.Set the active slot to the Luna Backup HSM G5.
lunacm:> slot set -slot <slotnum>
3.[Remote PED] Connect the Luna Backup HSM G5 to the Remote PED server.
lunacm:> ped connect -ip <PEDserver_IP> -port <portnum>
4.Log in as Backup HSM SO.
lunacm:> role login -name so
5.Disable secure recovery.
lunacm:> srk disable
You are prompted for the SRK (purple PED key).