This section contains instructions for installing your Luna Backup HSM G5.
>Luna Backup HSM G5 Required Items
>Installing the Luna Backup HSM G5
Luna Backup HSM G5 Required Items
This section provides a list of the components you should have received with your Luna Backup HSM G5 order.
| Qty | Item |
|---|---|
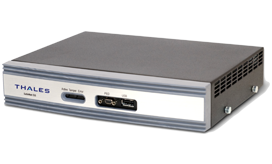
| 1 |
Luna Backup HSM G5
|
| 1 |
External Power Supply The Luna Backup HSM G5 now ships with an external power supply. Previously, these HSMs relied on an internal power supply, requiring the HSM to be periodically powered on to recharge internal capacitors. Failure to charge the capacitors could result in an inability to power on the HSM. With the introduction of external power supplies, periodically powering on the HSM is no longer required. A failed external power supply can be replaced and there is no need to return the HSM for repair (RMA). NOTE External power supplies do contain capacitors which may be affected by extended periods of being unpowered, but they are more easily replaced in the event of failure. |
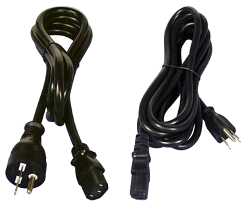
| 1 |
Power Supply Cord Your order should include one power supply cord for the Luna Backup HSM G5. The actual cord received depends on the country for which you ordered the Luna Backup HSM G5.
|
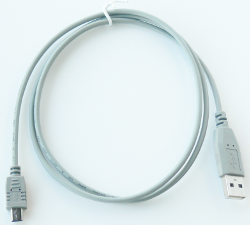
| 1 |
USB cable (USB A to USB mini B)
Your order should include one USB A to 5-pin (Mini-B) cable. |
Optional Items
Your order may also include the following optional item
Luna Backup HSM G5 Rack-Mount Shelf
The Luna Backup HSM G5 rack-mount shelf (available by separate order) fits a standard 19-inch equipment rack, allowing you to install up to two Luna Backup HSM G5 units side-by side in server-room racks. For office use, without rack mounting, Luna Backup HSM G5 units can be placed on a desktop and are stackable.
Physical Features
The front panel of the Luna Backup HSM G5 is illustrated below, with important features labeled. In the second image, the front bezel has been removed, exposing the battery enclosure.


The rear panel of the Luna Backup HSM G5 is illustrated below, with important features labeled. The first image depicts a backup HSM with an internal power supply. The second image depicts one that ships with an external power supply.


| 1 |
Status LEDs. When illuminated, they indicate: >Active: The backup HSM is performing a procedure. Do not disconnect or unplug the device when this light is illuminated. >Tamper: The backup HSM is in a tamper state. You must clear the tamper state before backing up or restoring partitions. >Error: HSM device driver error. Contact Thales Customer Support (see Support Contacts). |
| 2 | Serial port for attaching a local Luna PED using a 9-pin Micro-D to Micro-D cable. |
| 3 | USB port. Not applicable to backup/restore functions. |
| 4 | Battery enclosure. See Installing or Replacing the Luna Backup HSM G5 Battery. |
| 5 | Power connector for a Luna Backup HSM with an internal power supply. See Storage and Maintenance for more information. |
| 6 | Index hole. Engages with the index post on a Luna Backup HSM rack shelf. |
| 7 | Mini-USB port for connecting the Luna Backup HSM G5 to a Luna HSM or client workstation. See Installing the Luna Backup HSM G5. |
| 8 | Power source connector for a Luna Backup HSM G5 with an external power supply (included). |
Installing the Luna Backup HSM G5
You can connect the Luna Backup HSM to a Luna Network HSM, a Luna HSM Client workstation, or a host machine containing a Luna PCIe HSM. Refer to Planning Your Backup HSM Deployment for detailed descriptions of the configuration options.
To install the Luna Backup HSM G5
1.Connect the Luna Backup HSM G5 to power using the external power source or a standard power cable.
2.If you are connecting the Luna Backup HSM G5 to a client workstation
3.[Local PED] If you plan to authenticate the Luna Backup HSM G5 with a local Luna PED, connect the PED using a 9-pin Micro-D to Micro-D cable (see Physical Features).
To use the same local PED to authenticate both the Backup HSM and Luna Network HSM 7, connect the PED to the Luna Network HSM 7 using a USB Mini-B to USB cable (see Physical Features). You can switch between the two using PED modes (see Modes of Operation).
4.Connect the Luna Backup HSM G5 using the included Mini-USB to USB cable. If you are connecting the Backup HSM to:
•Luna Network HSM 7: Connect to one of the USB ports on the front or rear panel of the appliance.
•Luna HSM Client: Connect to a USB port on the client workstation. Run LunaCM on the client workstation to confirm that the Luna Backup HSM G5 appears in a slot.
•Luna PCIe HSM 7 host: Connect to a USB port on the host workstation. Run LunaCM on the host workstation to confirm that the Luna Backup HSM G5 appears in a slot.
5.If your Backup HSM was shipped in Secure Transport Mode, see Recovering From a Tamper Event or Secure Transport Mode.