
Install and Configure FIDO Server
The FIDO server can be deployed as a Single Node using either of the following:
Podman
For the FIDO server deployment in the Podman environment, refer the following:
Prerequisites
Ensure that you are using a system with a DNF-based package manager (for example, RHEL) and that you have sudo privileges.
-
Install Podman.
sudo dnf install -y podman -
Install Podman Compose.
sudo dnf install -y python3-pippip3 install --user podman-compose -
Install OpenSSL.
- For RHEL/CentOS:
sudo dnf install -y openssl - For Ubuntu:
sudo apt-get install -y openssl
- For RHEL/CentOS:
-
Verify if the podman installation is successful.
podman --version -
Verify if the podman compose installation is successful.
podman-compose --versionNote
If the
podman-composecommand is not found after installation, you may need to add~/.local/binto your PATH environment variable.
Deployment steps
-
Ensure that the complete package named SafeNet Access Exchange v1.3.0.zip is downloaded/copied on the RHEL machine. This package includes the SAE and FIDO-server folders, which are required for deploying the SafeNet Access Exchange (SAE) and the FIDO server.
-
Unzip the package.
-
Create the FIDO network: Create a dedicated network for the FIDO containers to enable communication with each other using the following command:
podman network create fido_networkVerify it using the following command:
podman network ls
-
Set up Bitnami MariaDB (FIDO server database):
-
Navigate to the fido-mariadb folder under fido2-server-xxxxxx.xxxx.
-
Run the following commands to set up the Bitnami MariaDB for your FIDO server:
podman-compose up -d
Note
Do not change the default database name fido2-server, as it is referenced in multiple places throughout the deployment.
Validate MariaDB container using the following command:
podman psTo validate the creation of database for fido2-db, use the following command:
podman exec -it <<ContainerID>> mariadb -u root -pshow databases -
-
Load the FIDO-Server image:
-
Navigate to the fido2-server-xxxxxx.xxxx folder.
-
Unzip and load the FIDO-Server container image using the following command:
podman load --input fido2-server-240916.0838.tar
-
-
Verify the loaded images using the following command:
podman imagesYou should see the MariaDB, FIDO server images in the output.

-
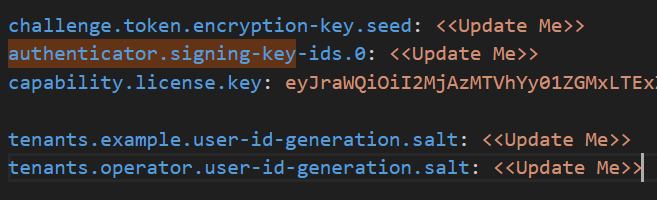
Ensure that you are in the fido2-server-xxxxxx.xxxx directory and navigate to server > secrets. In this folder, open the application-secret.yaml file and update all the configurations marked as <<Update Me>> (as shown in the screenshot below) with the generated seed.
To generate the seed, use the following command:
openssl rand -base64 32Run the same command four times to generate random secret and copy each unique output to replace the following entries in the file.
-
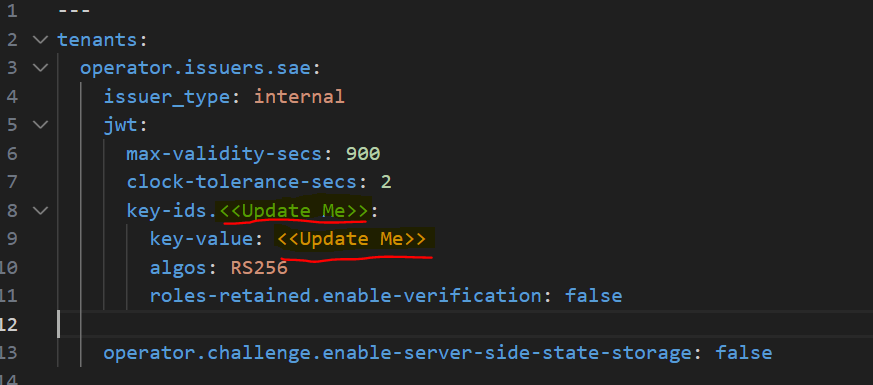
Navigate back to the server > tenants folder. Open the tenants-config.yaml file and update the key-ids and key-value marked as <<Update Me>> (as shown in the screenshot below):
-
key-ids Replace <<Update Me>> with the Key ID obtained in the step Operator Realm setup for FIDO.
-
key-value Replace <<Update Me>> with the Key Value obtained in the step Operator Realm setup for FIDO.
-
-
Start Services: The deployment process is automated using a script that handles all necessary setup and execution steps. Follow the instructions below to start all FIDO server services:
-
Make the script executable:
chmod +x Fido_SingleDeployment/start_deployment.sh -
Navigate to the fido2-server-xxxxxx.xxxx directory and execute the script to start all services:
cd " fido2-server-xxx… "./start_deployment.sh
Note
User must have all the privileges mentioned under start_deployment.sh or use sudo su to run the FIDO server.
The script will perform the following actions:
-
Set the required execute permissions on the janitor's entry point script.
-
Ensure the server's temporary directory is writable.
-
Start all services in the correct order using podman-compose.
-
Display the status of all running containers.
The services will start as follows:
-
dbschemamgr: Runs once to prepare the database schema and exits after completion.
-
fido2-server: Starts and runs continuously to handle FIDO operations.
-
fido2-janitor: Starts and runs continuously in the background, performing an initial cleanup on startup and repeating the task every 24 hours.
-
-
After the script runs successfully, the FIDO server will be up and running with http://<<Internal IP Address>>:9080/fido2 if FIDO-server is running on internal IP.
Docker
For the FIDO server deployment in the Docker environment, refer the following:
Prerequisites
Ensure that you are using a system with a DNF-based package manager (for example, RHEL) and that you have sudo privileges.
-
Install Docker.
sudo dnf install -y docker -
Install Docker Compose.
sudo dnf install -y python3-pippip3 install --user docker-compose -
Install OpenSSL.
- For RHEL/CentOS:
sudo dnf install -y openssl - For Ubuntu:
sudo apt-get install -y openssl
- For RHEL/CentOS:
-
Verify if the docker installation is successful.
docker --version -
Verify if the docker compose installation is successful.
docker-compose --versionNote
If the
docker-composecommand is not found after installation, you may need to add~/.local/binto your PATH environment variable.
Deployment steps
This section provides the instructions to deploy the FIDO server in the Docker environment:
-
Ensure that the complete package named SafeNet Access Exchange v1.3.0.zip is downloaded/copied on the RHEL machine. This package includes the SAE and FIDO-server folders, which are required for deploying the SafeNet Access Exchange (SAE) and the FIDO server.
-
Unzip the package.
-
Create the FIDO network: Create a dedicated network for the FIDO containers to enable communication with each other using the following command:
docker network create fido_networkVerify it using the following command:
docker network ls
-
Set up Bitnami MariaDB (FIDO server database):
-
Navigate to the fido-mariadb folder under fido2-server-xxxxxx.xxxx.
-
Run the following commands to set up the Bitnami MariaDB for your FIDO server:
docker-compose up -d
Note
Do not change the default database name fido2-server, as it is referenced in multiple places throughout the deployment.
Validate MariaDB container using the following command:
docker psTo validate the creation of database for fido2-db, use the following command:
docker exec -it <<ContainerID>> mariadb -u root -pshow databases -
-
Load the FIDO-Server image:
-
Navigate to the fido2-server-xxxxxx.xxxx folder.
-
Unzip and load the FIDO-Server container image using the following command:
docker load --input fido2-server-240916.0838.tar
-
-
Verify the loaded images using the following command:
docker imagesYou should see the MariaDB, FIDO server images in the output.
-
Ensure that you are in the fido2-server-xxxxxx.xxxx directory and navigate to server > secrets. In this folder, open the application-secret.yaml file and update all the configurations marked as <<Update Me>> (as shown in the screenshot below) with the generated seed.
To generate the seed, use the following command:
openssl rand -base64 32Run the same command four times to generate random secret and copy each unique output to replace the following entries in the file.
-
Navigate back to the server > tenants folder. Open the tenants-config.yaml file and update the key-ids and key-value marked as <<Update Me>> (as shown in the screenshot below):
-
key-ids Replace <<Update Me>> with the Key ID obtained in the step Operator Realm setup for FIDO.
-
key-value Replace <<Update Me>> with the Key Value obtained in the step Operator Realm setup for FIDO.
-
-
Start Services: The deployment process is automated using a script that handles all necessary setup and execution steps. Follow the instructions below to start all FIDO server services:
-
Make the script executable:
chmod +x Fido_SingleDeployment/start_deployment.sh -
Navigate to the fido2-server-xxxxxx.xxxx directory and execute the script to start all services:
cd " fido2-server-xxx… "./start_deployment.sh
Note
User must have all the privileges mentioned under start_deployment.sh or use sudo su to run the FIDO server.
The script will perform the following actions:
-
Set the required execute permissions on the janitor's entry point script.
-
Ensure the server's temporary directory is writable.
-
Start all services in the correct order using docker-compose.
-
Display the status of all running containers.
The services will start as follows:
-
dbschemamgr: Runs once to prepare the database schema and exits after completion.
-
fido2-server: Starts and runs continuously to handle FIDO operations.
-
fido2-janitor: Starts and runs continuously in the background, performing an initial cleanup on startup and repeating the task every 24 hours.
-
-
After the script runs successfully, the FIDO server will be up and running with http://<<Internal IP Address>>:9080/fido2 if FIDO-server is running on internal IP.