Configuring SafeNet Agent for ADFS
Configure the SAS/STA management console
Communication must be established between the SafeNet Agent for ADFS and the SafeNet server.
To configure, add an Auth Node in SAS/STA as follows:
-
In the SAS/STA management console, select VIRTUAL SERVERS > COMMS > Auth Nodes.
-
Enter the name or IP address of the computer where the SafeNet Agent for ADFS is installed.
Configure the agent key file
This agent uses an encrypted key file to communicate with the authentication web service. This ensures all communication attempts made against the web service are from valid recognized agents.
A sample key file (Agent.bsidkey) has been installed for evaluation purposes; however, it is recommended to generate your own key file for a production environment, as the sample file is publicly distributed.
To load the key file:
-
In the SAS console, select the Comms tab and download an agent key file from the Authentication Agent Settings section.
-
To open the SafeNet Agent for ADFS, select Start > All Programs > SafeNet > SafeNet Agent for ADFS.
-
Click the Communications tab.
-
Click the Agent Encryption Key File browse button and navigate to the agent key file.
Note
It is strongly recommended to use the default location for the Agent Encryption Key File, to avoid possible errors.
-
Click Apply.
-
Close and re-open the SafeNet Agent for ADFS.
Note
The final step, Close and re-open the SafeNet Agent for ADFS is required to ensure that the new key file (.bsidkey) is recognized.
Configuring SafeNet Agent for ADFS
To open the SafeNet Agent for ADFS, select Start > All Programs > SafeNet > SafeNet Agent for ADFS.
Policy
To configure the SafeNet Agent for ADFS policy:
-
On the SafeNet Agent for ADFS window, click the Policy tab.
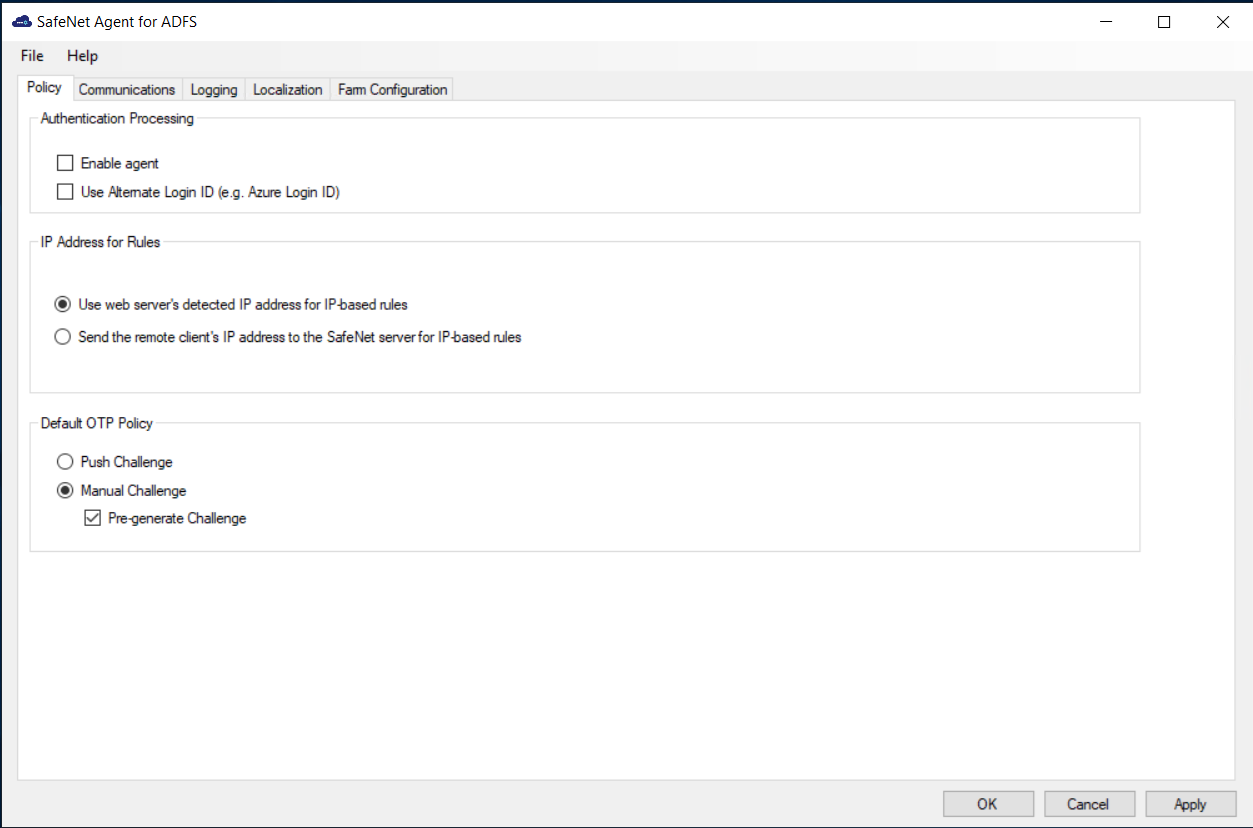
-
Complete the following fields, and click Apply.
Field Description Enable Agent Select to enable the SafeNet Agent for ADFS.
Note: If you de-activate the agent, by clearing the Enable Agent checkbox, you must remove users and groups from the ADFS server. Failure to do so may result in failure of authentication though the ADFS Server. See Removing users and groups.Use Alternate Login ID (e.g. Azure Login ID) Select this option if you are using an alternate login ID in the connected AD application (for example, Azure). IP Address for Rules Select one of the following:
- Use web server’s detected IP address for IP based rules
- Send the remote client’s IP address to the SafeNet server for IP-based rulesDefault OTP Policy Select from the following:
- Push Challenge – to use the Push OTP Feature
Note: The SafeNet Agent for ADFS supports the Push OTP function with MobilePASS+ when working with SAS PCE/SPE 3.9.1 and later versions.
- Manual Challenge – For using any authenticator
- Pre-Generate Challenge – Select to display the grid. If this option is not selected, the user can display the GrIDsure grid by leaving the OTP field empty and clicking Submit.The default OTP policy does not apply to user choice of authenticator (UCA).
Communications
-
On the SafeNet Agent for ADFS window, click the Communications tab.
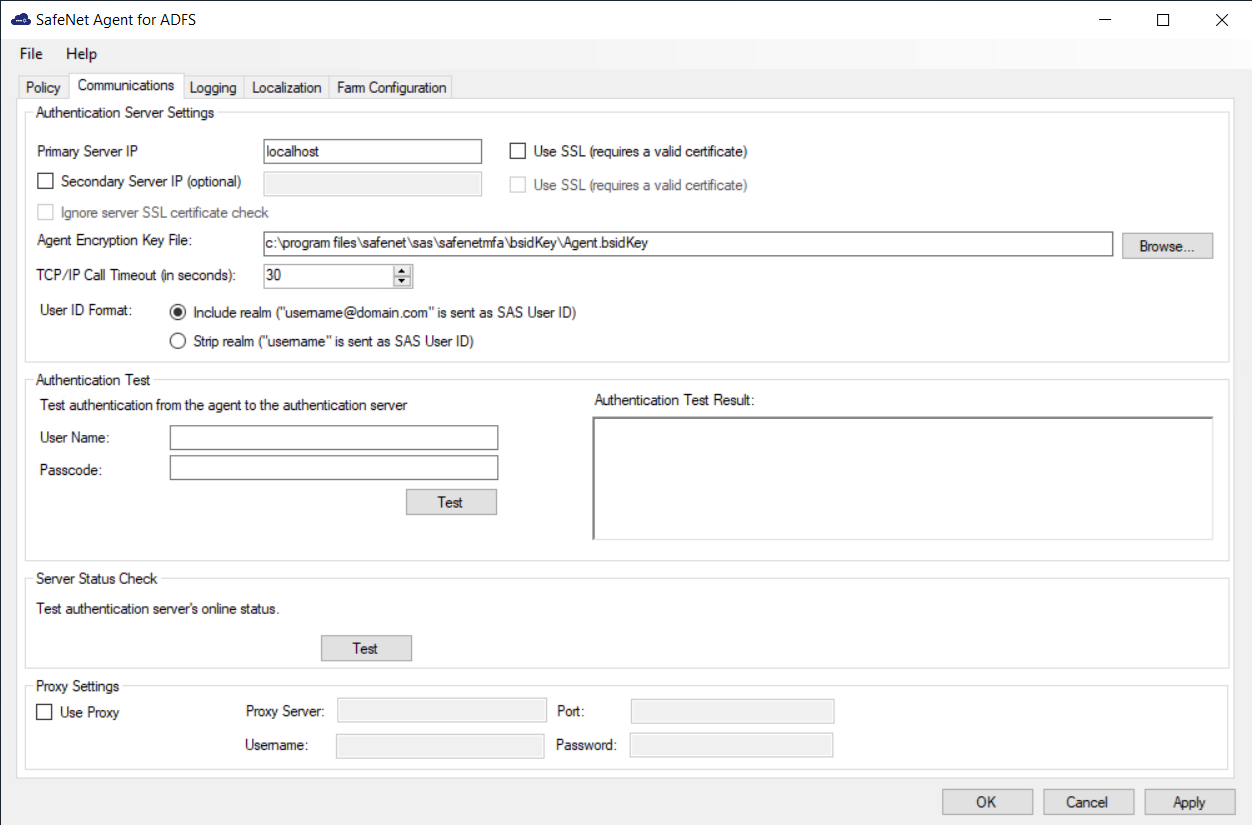
-
Complete the following fields, and click Apply:
Field Description Primary Server IP (IP:Port) Used to configure the IP address/ hostname of the primary SafeNet server. The default is port 80. Alternatively, Use SSL can also be selected. The default TCP port for SSL requests is 443. Secondary Server IP (optional) Used to configure the IP address/ hostname of the failover SafeNet server. The default is port 80. Alternatively, Use SSL can also be selected. The default TCP port for SSL requests is 443. Ignore server SSL certificate check Select the checkbox to disable the SSL server certificate error check on the agent.
It is unchecked by default.
If customers are using the on-premise deployment of SAS/STA within a well-controlled network (where self-signed certificates are used and cannot be properly validated by the SafeNet Agent for ADFS), this checkbox needs to be selected.
NOTE: We strongly recommend the use of SSL certificates.Agent Encryption File Key Used to specify the location of the SafeNet Agent for ADFS key file. See Configure the agent key file. TCP/IP Call Timeout (in seconds) Sets the maximum timeout value in seconds for authentication requests sent to the SafeNet server. User ID Format Select the required ID format for the SAS/STA usernames:
Include Realm (“Username@domain.com” is sent as SAS/STA User ID)
Strip realm (“Username” is sent as User ID)
Note: The realm stripping feature applies to SAS/STA usernames only. Active Directory usernames are not affected.Authentication Test This function allows administrators to test authentication between the SafeNet Agent for ADFS and the SafeNet server.
Enter User Name and Password and click Test. The result of the test is displayed in the Authentication Test Result text box.
Notes:
- The behavior of the test will be in accordance with the realm stripping configuration. For example, if realm stripping has been activated and the user name is entered in the format username@domain, the domain will be removed.
- The test works with manual OTP. Push OTP is not supported.Server Status Check This function performs a communication test to verify a connection to the SafeNet server. Proxy Settings Enter the following details:
- Use Proxy: Select the checkbox to connect the SAS/STA via a proxy server.
- Proxy Server: Enter IP address of the proxy server (mandatory).
- Port: Enter proxy server port (mandatory).
- Username: The proxy server user name (if required).
- Password: The proxy server password (if required).
Logging
-
On the SafeNet Agent for ADFS window, click the Logging tab.
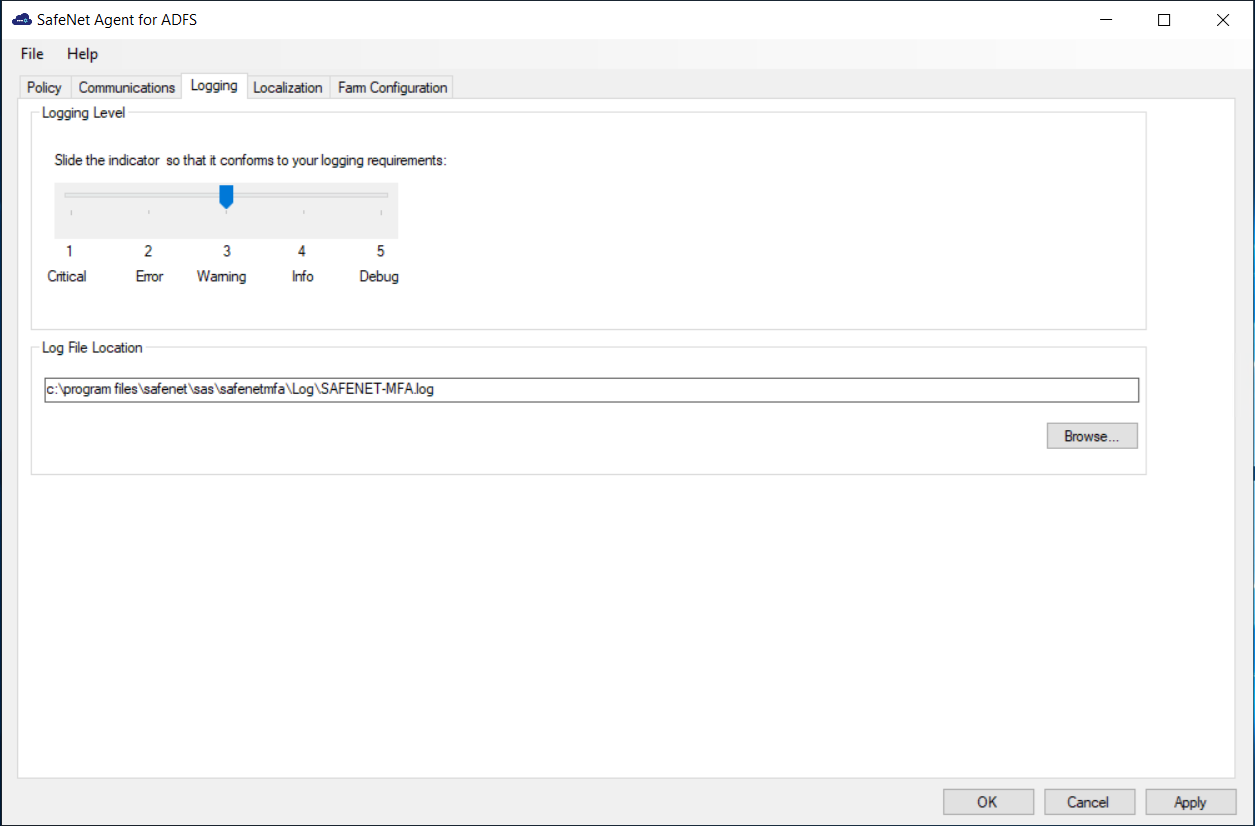
-
Complete the following settings, and click Apply:
Field Description Logging Level Set the required logging level (default value 3):
1 Critical - only critical
2 Error - critical and errors
3 Warning - critical, errors, and warnings
4 Info - critical, errors, warnings, and information messages.
5 Debug - all available informationLog File Location Specifies the location of the log files. The log file is rotated on a daily basis.
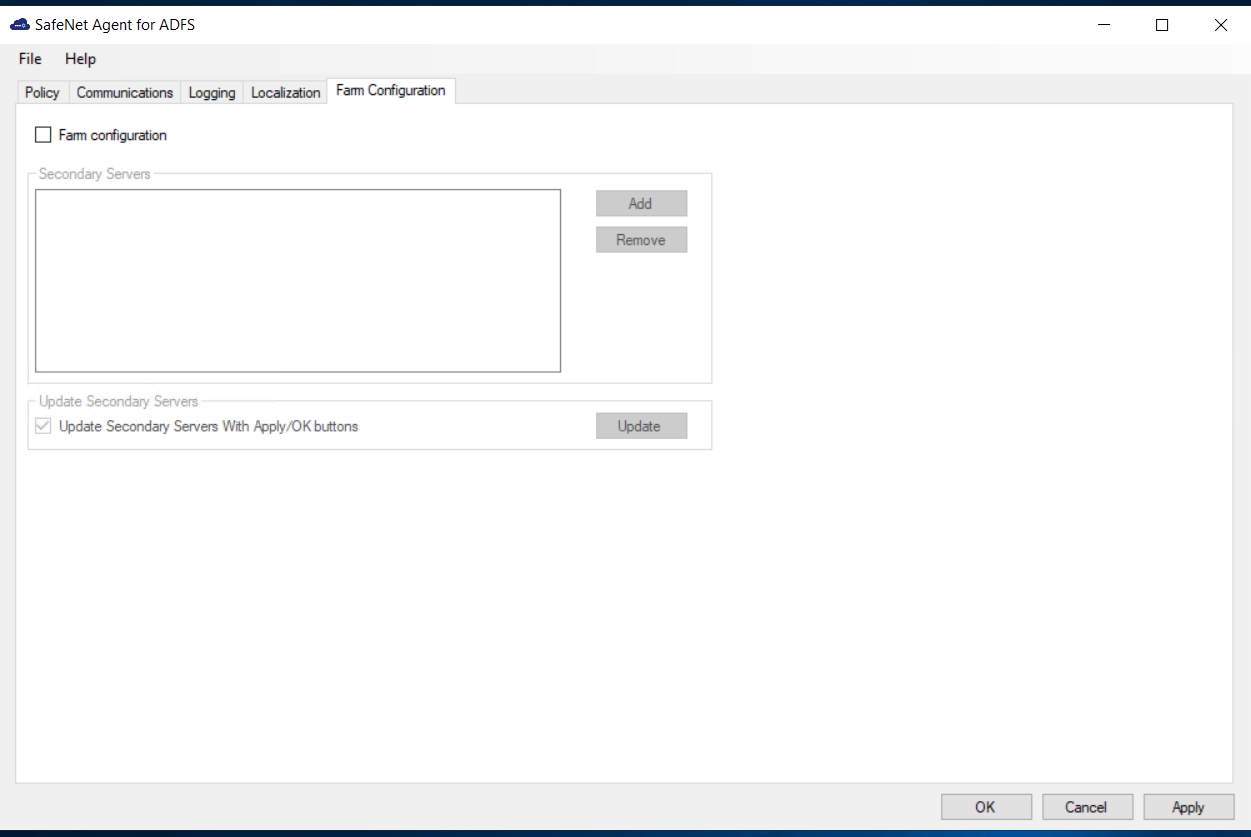
ADFS federation server farm
In an ADFS federation server farm using Windows Internal Database (WID), the first server in the farm acts as the primary server, hosting a read/write copy of the database. Secondary servers then replicate the configuration data into their read-only database. The secondary servers are fully functional federation members and can service the clients in the same way as the primary server. However, they are unable to write any configuration changes to the WID. Therefore, when the SafeNet Agent for ADFS is installed and configured on the primary server, to ensure that configuration is replicated on the secondary servers, the secondary servers must be included in the farm through the Farm Configuration tab.
Note
- You need to install the .Net FW version 4.8 manually on the Secondary Servers to enable the MFA after installation/upgrade to the current version.
- To configure an ADFS Federation Server farm, you must be logged-in as a Domain Administrator.
To configure the server farm:
Note
You first need to enable the agent on Primary Server. Then, disable the agent and click Apply.
-
On the SafeNet Agent for ADFS window, click the Farm Configuration tab.
-
Select Farm configuration.
-
Click Add.
-
In the Add Secondary Server window, in the Server IP/Name field, enter the IP address or name of the server to be added, and click Add.
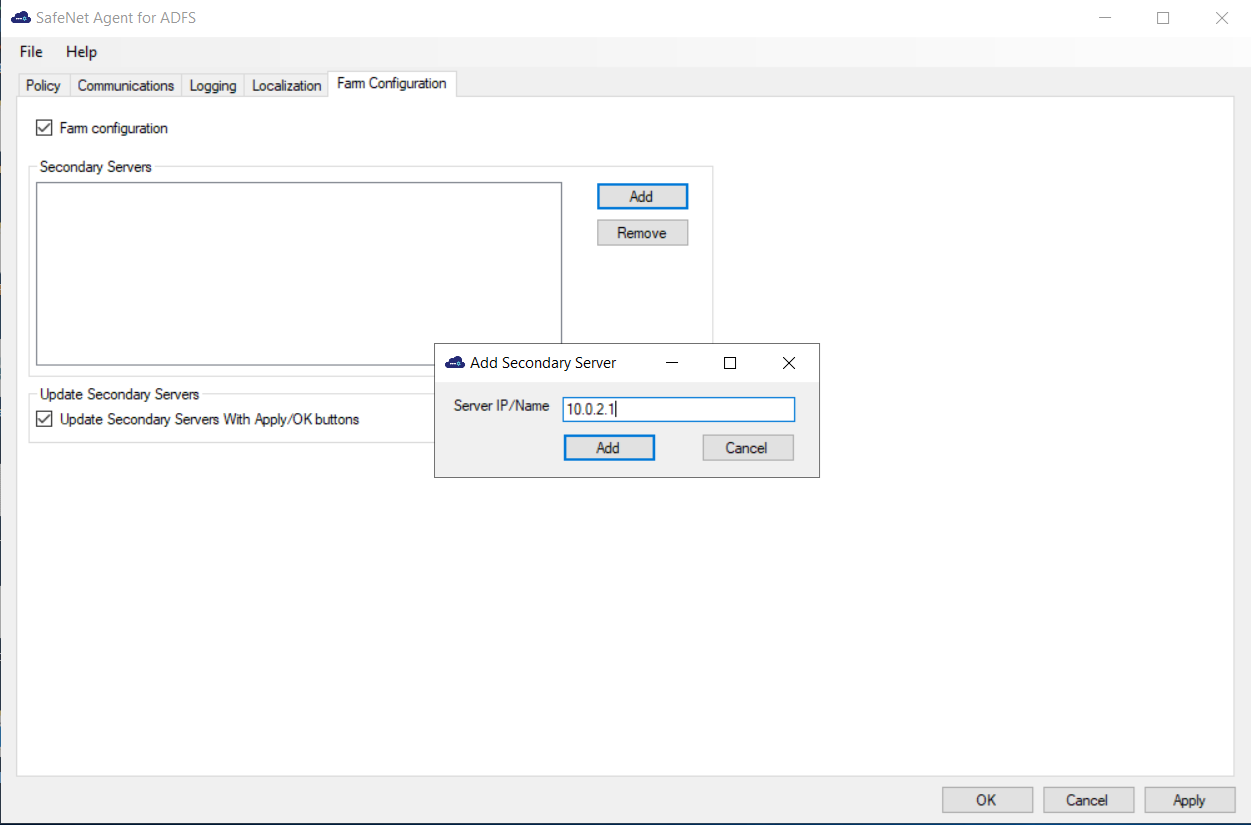
-
The server is added to the Secondary Servers list.
Repeat the above steps for each secondary server.
-
To update the configuration to secondary servers whenever the agent is activated, select Update Secondary Servers With Apply/OK buttons.
-
The secondary servers will be updated when you Enable the agent, click OK and Apply. To update immediately, select Update.
Note
Ensure that the Turn on file and printer sharing option is selected for the File and printer sharing field (available at the following location):
Control Panel > All Control Panel Items > Network and Sharing Center > Advanced sharing settings > Domain
Following configuration of the ADFS federation server farm, the following folders are installed on each server:
C:\Program Files\SafeNet\SAS\SafeNetMFA
C:\Windows\Microsoft.NET\assembly\GAC_MSIL\SafenetExtAuthMethod
C:\Windows\Microsoft.NET\assembly\GAC_MSIL\AgentEncryptor
C:\Windows\Microsoft.NET\assembly\GAC_MSIL\log4net
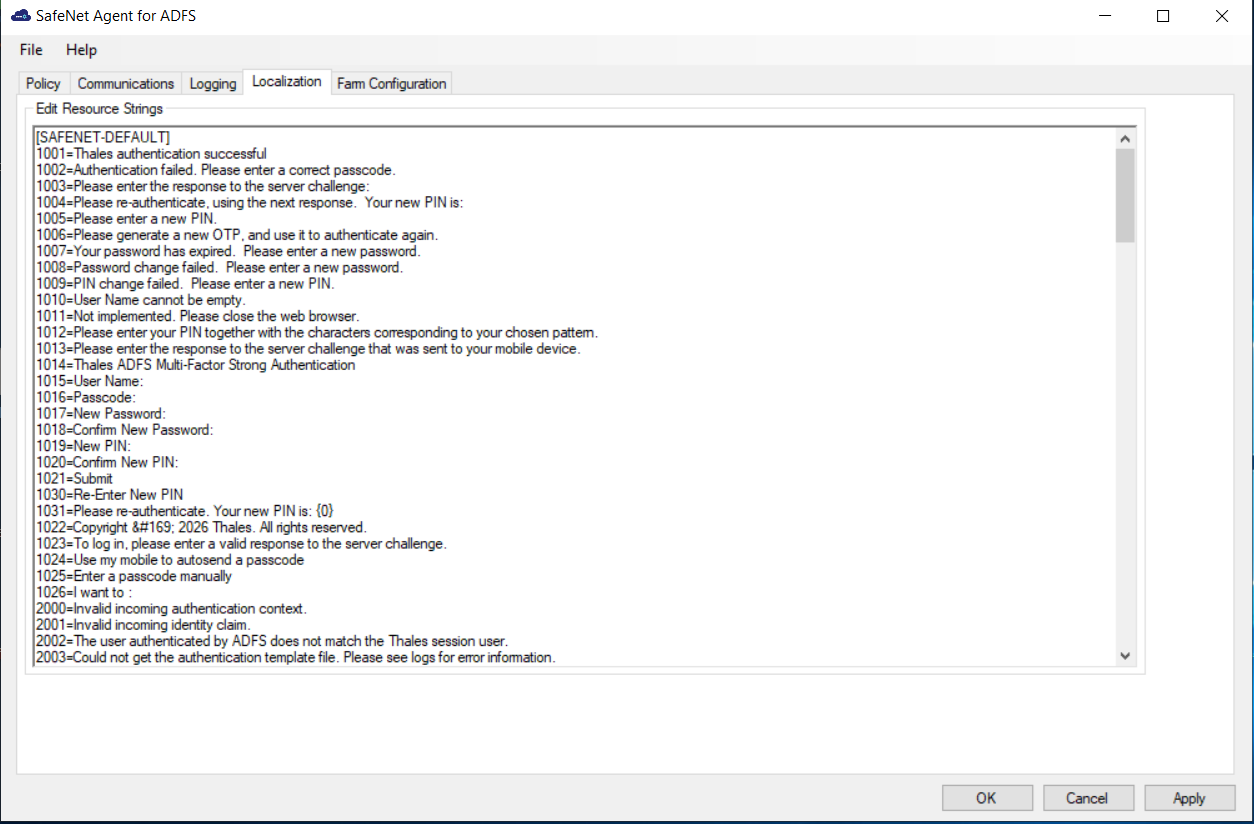
Localization
Localization is controlled by the INI file, which is preconfigured for English-United States and French-Canadian.
Note
The French-Canadian text is for demonstration purposes only. The translation should be proofread by a professional translator before use.
Setting additional locales
The INI file describes the available options for setting additional locales. Adding a new locale to the INI file is a manual procedure.
Note
It is strongly recommended to make a backup of the INI file before making any changes.
To add a supported locale:
-
Obtain the decimal Microsoft Locale ID (LCID) for the language, available here.
-
Open the INI file (
C:\Program Files\SafeNet\SAS\SafeNetMFA\ini\SAFENET_MFA.INI) in a text editor.In the
AvailableLcidsrow, the supported languages are specified by their decimal LCID, separated by comma.The INI includes the following by default:
`AvailableLcids=1033,3084`
    where:
        - `1033` is the decimal LCID English-United States, the equivalent of `[SAFNET-DEFAULT] – DO NOT CHANGE`.
        - `3084` is the decimal LCID value for French-Canada.
In the MFA Metadata section of the INI file, the [SAFENET-DEFAULT] section lists the messages in English-United States.
[SAFENET-DEFAULT]
[SAFENET-DEFAULT]
1001=Thales authentication successful
1002=Authentication failed. Please enter a correct passcode.
1003=Please enter the response to the server challenge:
1004=Please re-authenticate, using the next response.  Your new PIN is:
1005=Please enter a new PIN.
1006=Please generate a new OTP, and use it to authenticate again.
1007=Your password has expired.  Please enter a new password.
1008=Password change failed.  Please enter a new password.
1009=PIN change failed.  Please enter a new PIN.
1010=User Name cannot be empty.
1011=Not implemented. Please close the web browser.
1012=Please enter your PIN together with the characters corresponding to your chosen pattern.
1013=Please enter the response to the server challenge that was sent to your mobile device.
; Page Title
1014=Thales ADFS Multi-Factor Strong Authentication
1015=User Name:
1016=Passcode:
1017=New Password:
1018=Confirm New Password:
1019=New PIN:
1020=Confirm New PIN:
1021=Submit
1030=Re-Enter New PIN
1031=Please re-authenticate. Your new PIN is: {0}
1022=Copyright © 2026 Thales. All rights reserved.
1023=To log in, please enter a valid response to the server challenge.
1024=Use my mobile to autosend a passcode
1025=Enter a passcode manually
1026=I want to :

2000=Invalid incoming authentication context.
2001=Invalid incoming identity claim.
2002=The user authenticated by ADFS does not match the Thales session user.
2003=Could not get the authentication template file. Please see logs for error information.
2004=Failed to pre-generate a challenge for user [{0}].
2005=Invalid posted user. User name do not match  with user in Thales session.
2006=New PIN / Password values are empty or do not match.
2007=Could not get the PIN / Password change template file. Please see logs for error information.

2021=Your request timed out. Please try again.
2022=Error when creating autosend message, Please contact administrator.
2023=Authentication process was canceled.
2024=Passcode was not autosent. Please try again or enter passcode.
2025=Auto push has failed, Authentication ID not found, Please contact administrator.
2026=Auto push has failed, Authentication ID conflicted, Please contact administrator.
2027=Auto push has failed, unknown error.
2028=Authentication failed.
2029=Authentication request was cancelled. Please try again
2030=Password is too long (> 16 characters).

; ----------------------------------------------------------------- UCA Strings (English) -------------------------------------------------------------------------------
3004=Use your grid pattern
3005=Send a push to MobilePASS+
3006=Enter a code
3008=Passkey
3023=Approve the login request that was sent to your MobilePASS+ authenticator.
3025=Type the characters that correspond to your chosen pattern.
3031=Enter the passcode that was sent to you by text message.
3032=Enter the passcode that was sent to you by email.
3033=Enter the passcode that was sent to you by email and text message.
3038=Other options
3040=Please respond to the challenge:
3042=Add Authenticator
3043=Enter a passcode
3044=LOGIN
3045=Passcode
3046=or
3052=We did not receive your approval. Please try again or use other options.
3053=Resend a push notification to MobilePASS+
3054=Send Push
3055=Entered grid pattern is incorrect. Please try again or use other options.
3056=Entered passcode is incorrect. Please try again or use other options.
3058=This authenticator is inactive and cannot be used. Contact your administrator to reactivate it.
3060=We were unable to verify your account. Please check with your local administrator.
3059=You don't have this authenticator type. Please use another authenticator.
3061=Send a code by text message or email
3062=Enter the passcode that was sent to you by text message or email
3070=For example, you may have a passcode from a hardware token or an authenticator app.
3071=Tap this number on your
3072=authenticator to approve your login.
3073=Type your PIN followed by the characters that correspond to your chosen pattern.
3074=PIN + Passcode
3075=Type the characters that correspond to your chosen pattern followed by your PIN.
3076=Passcode + PIN
3077=Type your PIN and pattern in order, all in one line with no spaces. For example, if your PIN is 1234 and your pattern characters are 5678, type 12345678.
3078=Type your pattern and PIN in order, all in one line with no spaces. For example, if your pattern characters are 1234 and your PIN is 5678, type 12345678.
3079=Remember for future logins
3100=Value cannot be empty.
3101=Values do not match.
3102=Your PIN has expired. Please type a new PIN.
3103=Follow the instructions from your browser to verify your identity
The [3084] section lists the same messages as in the [SAFENET-DEFAULT] section, but translated to French-Canadian.
[3084]
1001 = Authentification réussie 1002 = L'authentification a échoué. Veuillez réessayer. 1003 = Veuillez répondre au défi du serveur : 1004 = Veuillez vous authentifier à nouveau en utilisant la réponse suivante. Votre nouveau code PIN est : 1005 = Veuillez saisir un nouveau code PIN. 1006 = Veuillez vous authentifier avec un nouvel OTP. 1007 = Votre mot de passe a expiré. Veuillez saisir un nouveau mot de passe. 1008 = Le changement de mot de passe a échoué. Veuillez saisir un nouveau mot de passe. 1009 = Le changement de PIN a échoué. Veuillez saisir un nouveau code PIN. 1010 = Le mom d'utilisateur ne peut pas être vide. 1011 = Non implémenté. Veuillez fermer le navigateur web. 1012 = Veuillez saisir votre code PIN en utilisant les caractères correspondant au modèle choisi. 1013 = Veuillez saisir la réponse au challenge du serveur qui a été envoyé à votre mobile. ; Titre de la page 1014 = Thales ADFS Authentification forte multi-facteurs 1015 = Nom d'utilisateur: 1016 = Passcode: 1017 = Nouveau mot de passe: 1018 = Confirmer le nouveau mot de passe: 1019 = Nouveau code PIN: 1020 = Confirmer le nouveau code PIN: 1021 = Envoyer 1030 = Resaisir le nouveau code PIN 1031 = Veuillez vous authentifier à nouveau. Votre nouveau code PIN est : {0} 1022 = Copyright © 2026 Thales. Tous droits réservés. 1023 = Pour vous connecter, veuillez répondre au challenge du serveur. 1024=Utiliser mon appareil mobile pour l'envoi automatique d'un Passcode 1025=Saisir un passcode manuellement 2000 = contexte d'authentification invalide. 2001 = invalide revendication d'identité entrant. 2002 = L'utilisateur authentifié par ADFS ne correspond pas à l' utilisateur de la session Thales. 2003 = Impossible de trouver le fichier de modèle d'authentification . Veuillez regarder les logs pour obtenir plus d'information. 2004 = Impossible de générer un challenge pour l'utilisateur [ { 0 } ] . 2005 = Utilisateur invalide : le nom d'utilisateur ne correspond pas à l'utilisateur de session Thales. 2006 = Le nouveau code PIN et le mot de passe sont vides ou ne correspondent pas. 2007 = Impossible d'obtenir le fichier modèle de PIN ou mot de passe. Veuillez regarder les logs pour obtenir plus d'information. 2021 = Le délai de votre demande a expiré. Veuillez réessayer. 2022 = Erreur survenue lors de la création du message d'envoi automatique. Veuillez contacter votre administrateur. 2023 = Le Processus d'authentification a été annulé. 2024 = Le passcode n'a pas été envoyé automatiquement. Veuillez reessayer ou saisir un passcode. 2025 = L'envoi de la notification a échoué. L'indentifiant d'authentification est introuvable. Veuillez contacter votre administrateur. 2026 = L'envoi de la notification a échoué. Conflits d'identifiant d'authentification. Veuillez contacter votre administrateur. 2027 = L'envoi de la notification a échoué, erreur inconnue. 2028 = Authentification réussie. 2029 = L'authentification a été annulée. Veuillez réessayer. 2030 = Le mot de passe est trop long (> 16 caractères). ; ----------------------------------------------------------------- UCA Strings (French Canada) ------------------------------------------------------------------------------- 3004 = Utiliser votre schéma de grille 3005 = Envoyer une notification poussée à MobilePASS+ 3006 = Entrer un code 3008 = Clé d'accès 3023 = Approuvez la demande de connexion envoyée à votre authentifiant MobilePASS+. 3025 = Entrez les caractères qui correspondent au schéma que vous avez choisi. 3031 = Entrez le code d’accès qui vous a été envoyé par message texte. 3032 = Entrez le code d’accès qui vous a été envoyé par courriel. 3033 = Entrez le code d’accès qui vous a été envoyé par courriel et par message texte. 3038 = Autres options 3040 = Veuillez répondre au défi: 3042 = Ajouter un authentificateur 3043 = Entrez un code d'accès 3044 = CONNEXION 3045 = Code d’accès 3046 = ou 3052 = Nous n’avons pas reçu votre approbation. Veuillez réessayer ou utiliser une autre méthode. 3053 = Renvoyer une notification poussée à MobilePASS+ 3054 = Envoyer Push 3055 = Le schéma de grille saisi est incorrect. Veuillez réessayer ou utiliser d’autres options. 3056 = Le code d’accès saisi est incorrect. Veuillez réessayer ou utiliser d’autres options. 3058=Cet authentifiant est inactif et ne peut pas être utilisé. Communiquez avec votre administrateur pour le réactiver. 3060=Nous n’avons pas pu vérifier votre compte. Veuillez vérifier auprès de votre administrateur local. 3059=Vous ne disposez pas de ce type d’authentificateur. Veuillez utiliser un autre authentificateur. 3061=Envoyer un code par message texte ou par courriel 3062=Entrez le code qui vous a été envoyé par message texte ou par courriel 3070=Par exemple, vous pouvez avoir un code provenant d’un jeton matériel ou d’une application d’authentification. 3071=Entrez ce numéro sur votre 3072=authentifiant pour approuver votre connexion. 3073=Entrez votre NIP suivi des caractères qui correspondent au schéma que vous avez choisi. 3074=NIP + code d’accès 3075=Entrez les caractères correspondant au schéma que vous avez choisi, puis votre NIP. 3076=Code d’accès + NIP 3077=Entrez votre NIP et le schéma dans l’ordre, le tout sur une seule ligne sans espaces. Par exemple, si votre NIP est 1234 et que vos caractères du schéma sont 5678, entrez 12345678. 3078=Entrez votre schéma et votre NIP dans l’ordre, le tout sur une seule ligne sans espaces. Par exemple, si vos caractères du schéma sont 1234 et que votre NIP est 5678, entrez 12345678. 3079=Se souvenir de moi pour les prochaines connexions 3100=Le champ de la valeur ne peut pas être vide. 3101=Les valeurs ne correspondent pas. 3102=Votre NIP a expiré. Veuillez entrer un nouveau NIP. 3103=Suivez les instructions de votre navigateur pour vérifier votre identité. -
To add an additional language, add the decimal LCID to the AvailableLcids row, inserting a comma as a delimiter.
For example, to add German-Germany (1031), use:
AvailableLcids=1033,3084,1031 -
Add the description for the added LCID, inserting a comma as a delimiter.
Descriptions=SafeNet Multi Factor Authentication Adaptor (SMFAA) for Microsoft ADFS,SafeNet multi Factor Authentication Adaptor (SMFAA) pour Microsoft ADFS,<add description for LCID 1031> -
Add the FriendlyNames for the added LCID, inserting a comma as a delimiter.
FriendlyNames=SafeNet-MFAA,SafeNet-MFAA,<add FriendlyName for LCID 1031> -
In the MFA Metadata section, add a new subsection titled [decimal LCID] and translate the MFA Metadata Entries section of the additional support language strings, following the same pattern as used for the English-United States and French-Canadian language.
This example shows [1031], the decimal LCID for German-Germany.
[1031] [<String-ID>] = <String> [<String-ID>] = <String> [<String-ID>] = <String> -
Repeat from step 3 (above) for each additional language.
Viewing localization settings
Note
The localized text cannot be edited on the Localization tab interface. It must be edited in the INI file as described above. See Setting additional localizations.
To view the localization settings in the SafeNet Agent for ADFS:
-
To open the SafeNet Agent for ADFS, click Start > All Programs > SafeNet > SafeNet Agent for ADFS.
-
On SafeNet Agent for ADFS window, click the Localization tab to view the localization settings.
Global authentication policy
MFA policies in ADFS 5.0 (on Windows Server 2025) and ADFS 2019 (on Windows Server 2019 and Windows Server 2022)
Enabling the SafeNet Agent for ADFS on the Policy tab (see Configuring SafeNet Agent for ADFS) registers the agent with ADFS and enables it at the global policy level.
To ensure that the MFA policies are enforced at the required level in the ADFS window, perform the steps:
-
Under ADFS > Service, select Authentication Methods.
-
Click the Edit Multi-factor Authentication Methods option from the right pane.
-
In the Edit Authentication Methods window, ensure that the default option, SafeNet Multi Factor Authentication (SMFA) is selected.
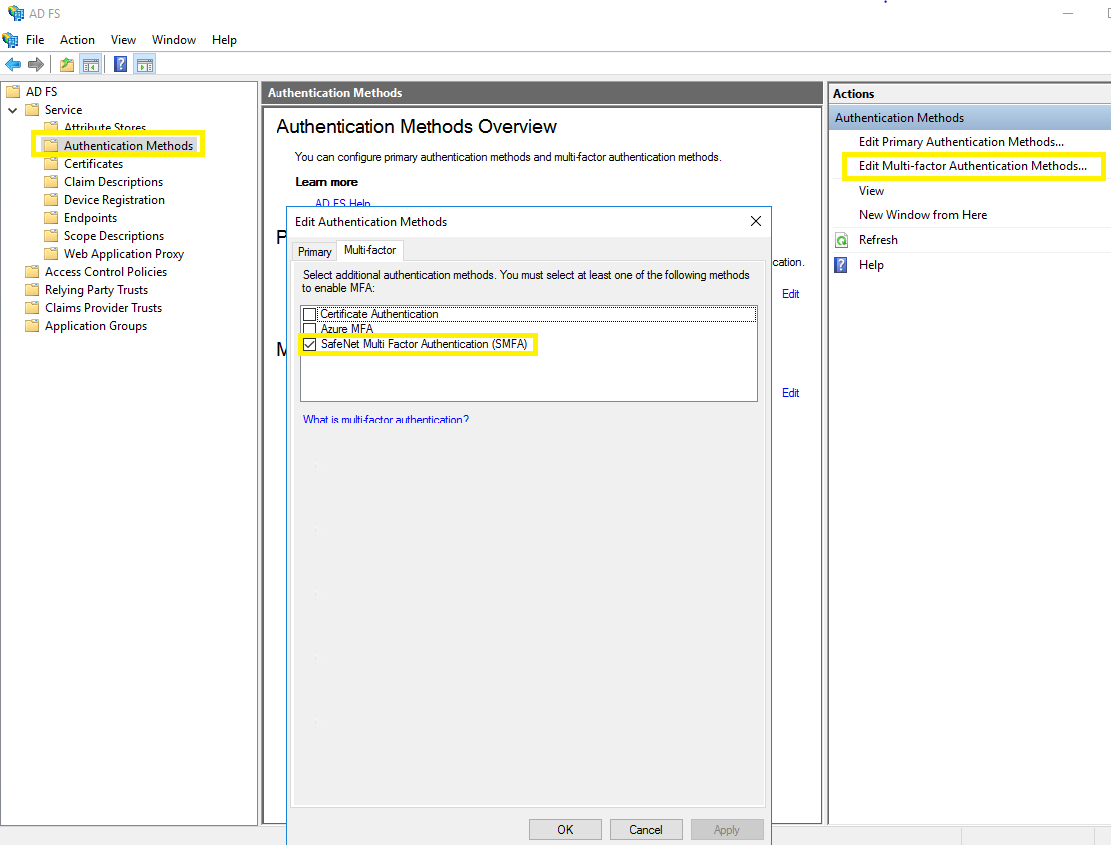
Note
If the agent is reinstalled or upgraded for Windows Server 2019, Windows Server 2022, or Windows Server 2025 and if the ADFS admin enables the Allow additional Authentication Provider as Primary settings and from the list, chooses SafeNet Multi Factor Authentication (SMFA) as the primary authentication method, then under the Additional Authentication tab, the SMFA check box must be cleared. This ensures that the primary authentication type doesn’t conflict with the additional authentication type.
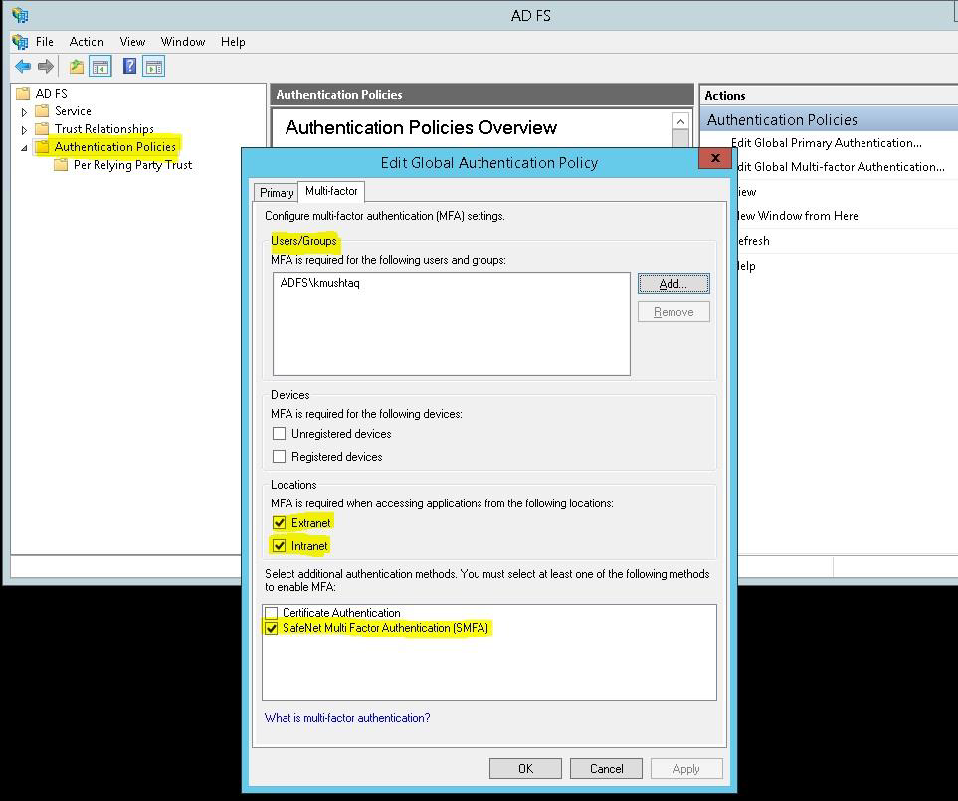
MFA policies in ADFS 4.0 (on Windows Server 2016)
Enabling the SafeNet Agent for ADFS on the Policy tab (see Configuring SafeNet Agent for ADFS) registers the agent with ADFS and enables it at the global policy level.
After registration, you can enforce MFA policies at the required level in the ADFS window.
To enforce MFA policies:
- Under ADFS, select Authentication Policies.
- Select Edit Global Authentication Policies.
-
If required, in Edit Global Authentication Policy window, complete the following steps:
a. Add the required users and groups (optional).
b. Select Extranet or Intranet to specify if MFA is required when accessing applications at these locations.
c. Select SafeNet Multi Factor Authentication (SMFA) method.
d. Click OK.