
Deploying the agent via Intune
This section describes the steps to deploy, configure, and uninstall the agent via Intune.
Prerequisites
-
The users must have an Azure account with an active Microsoft Intune license.
-
Users and groups must be created and assigned to the Microsoft Intune license.
-
MDM service must be enabled and assigned to the Groups. For detailed information, refer to Setup enrollment for Windows devices in the Microsoft documentation.
Installing SafeNet Agent for Windows Logon via Intune involves the following steps:
- Creating an IntuneWin package
- Deploying the IntuneWin package
- Deploying PowerShell Script to configure the Settings
- Upgrading SafeNet Agent for Windows Logon
Creating an IntuneWin package
Deploying the agent via Intune (as a Win32 Application) requires a .IntuneWin package for WLA Installer and Settings Configuration.
-
Click here to download the Intune-Deployment package.
-
Unzip the package in your preferred location, for example, C:\
-
Open the Intune-Deployment folder and create the following sub-folders:
- Installer
- InstallerOutput
- ConfigurationOutput
Creating an IntuneWin package of WLA Installer
-
Copy the .agent and .msi file (SafeNet Authentication Service Agent for Win 8-10-2012-2016 x64.msi) as downloaded in the Creating an Application in STA section and paste it in the Intune-Deployment\Installer folder.
-
Download the Microsoft Win32 Content Prep Tool as a .zip package. Under Intune-Deployment folder, unzip the package and then launch IntuneWinAppUtil.exe. The tool converts app installation files into the .intunewin format.
-
In the command prompt, enter the following details:
-
source folder - Enter the path of the folder where the .agent and .msi file (SafeNet Authentication Service Agent for Win 8-10-2012-2016 x64.msi) is present. For example, C:\Intune-Deployment\Installer.
-
setup file - Enter the path of .msi file. For example, C:\Intune-Deployment\Installer\SafeNet Authentication Service Agent for Win 8-10-2012-2016 x64.msi.
-
output folder - Enter the path of the InstallerOutput folder to save the .IntuneWin package. For example, C:\Intune-Deployment\InstallerOutput.
-
catalog folder - Enter N.

-
Now, a .IntuneWin package (SafeNet Authentication Service Agent for Win 8-10-2012-2016 x64.intunewin) is ready for deployment under Intune-Deployment\InstallerOutput as a Win32 application in Intune.
Creating an IntuneWin package for configuring the Settings
-
In the Intune-Deployment folder, navigate to Configuration folder and open DefaultConfiguration.reg in any text editor.
-
Update the required parameters and remove the parameters that are not needed. For more details about the Registry Settings, click here.
It is recommended to update the PrimaryServiceURL and OptionalSecondaryServiceURL.
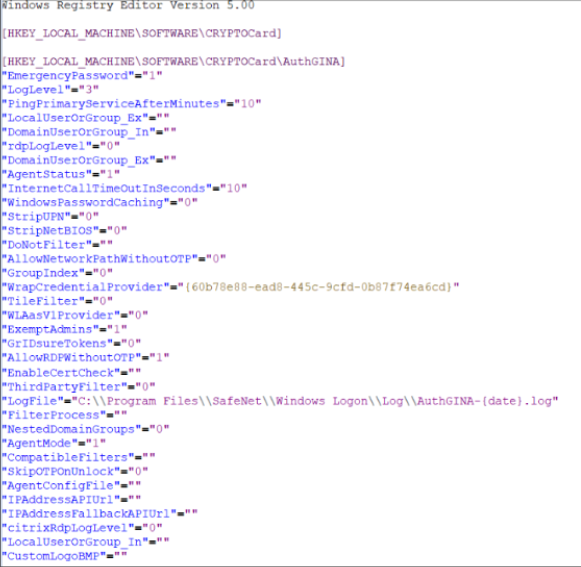
For example, if you want to change the LogLevel to 5, you can edit the registry file (DefaultConfiguration.reg) using any text editor.

-
Download the Microsoft Win32 Content Prep Tool as a .zip package. Under Intune-Deployment folder, unzip the package and then launch IntuneWinAppUtil.exe. The tool converts application installation files into the .intunewin format.
-
In the command prompt, enter the following details:
-
source folder - Enter the path of the folder where the .reg and setup file is present. For example, C:\Intune-Deployment\Configuration.
-
setup file - Enter the path of ConfigurationSetup.cmd. For example, C:\Intune-Deployment\Configuration\ConfigurationSetup.cmd.
-
output folder - Enter the path of the ConfigurationOutput folder to save the .IntuneWin package. For example, C:\Intune-Deployment\ConfigurationOutput.
-
catalog folder - Enter N.

-
Now, a .IntuneWin package (ConfigurationSetup.intunewin) is ready for deployment under Intune-Deployment\ConfigurationOutput as a Win32 application in Intune.
Deploying the IntuneWin package
Perform the following steps to deploy SafeNet Agent for Windows Logon via Intune:
Deploying the IntuneWin package of WLA Installer
-
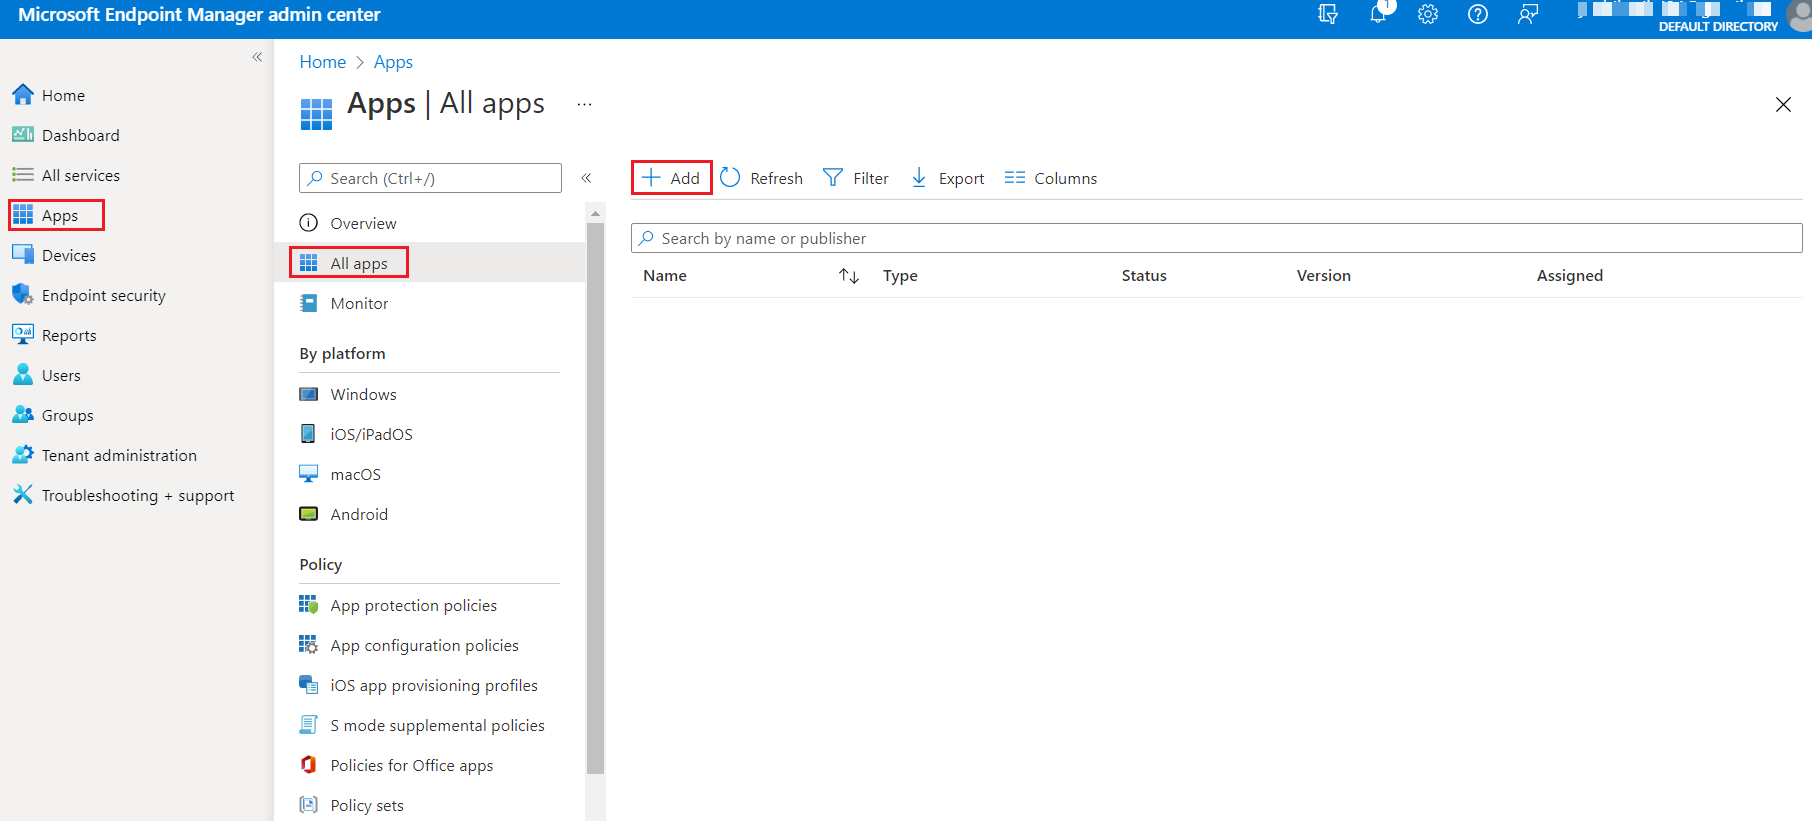
Login to the Microsoft Endpoint Manager admin center using https://intune.microsoft.com.
-
In the left pane, select Apps > All apps > Add.
-
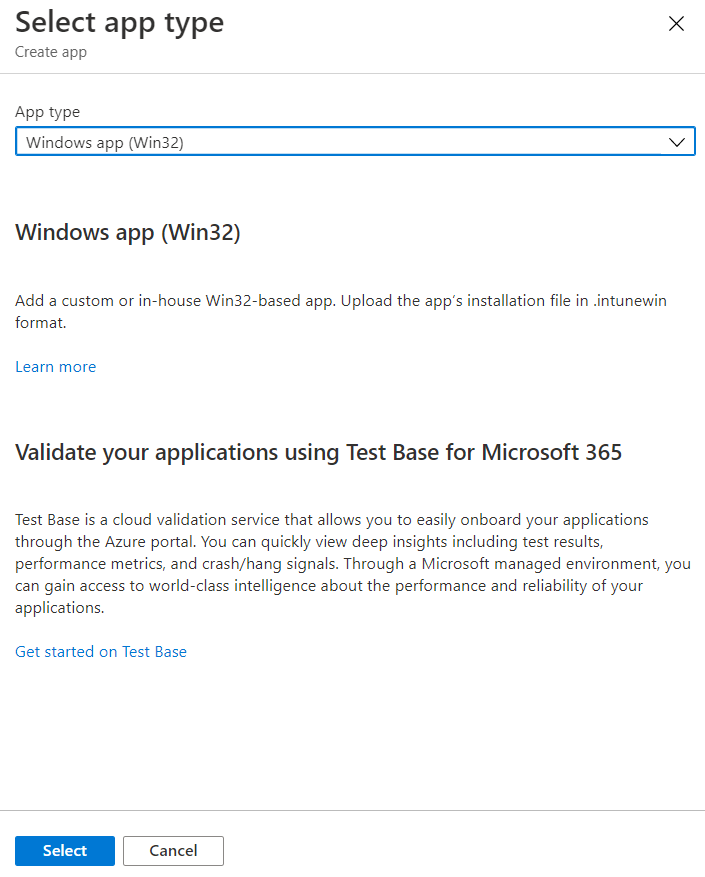
In the Select app type window, under the App type drop-down, select Windows app (Win32), and then click Select.
-
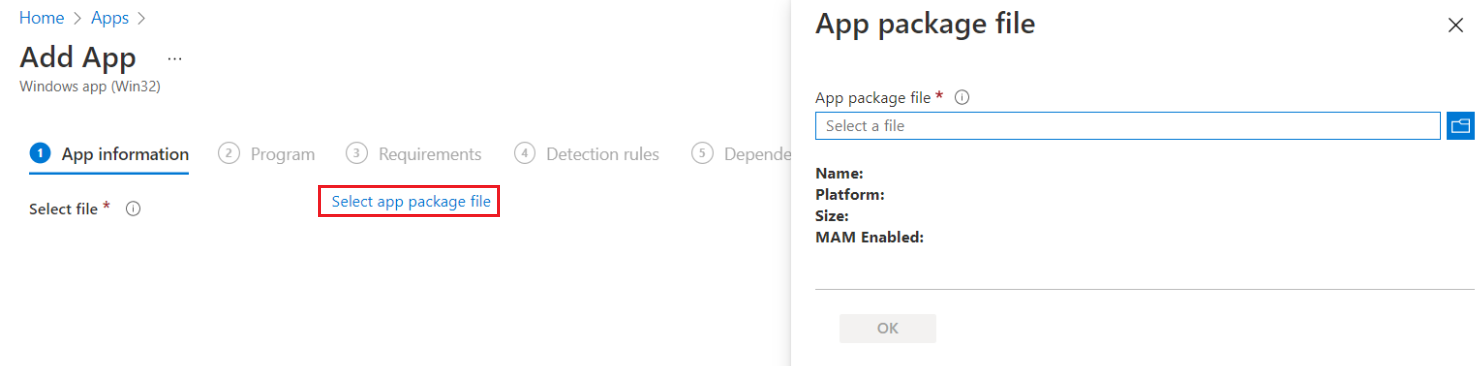
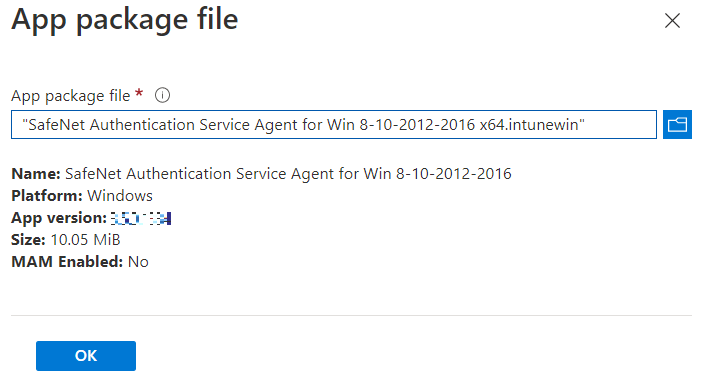
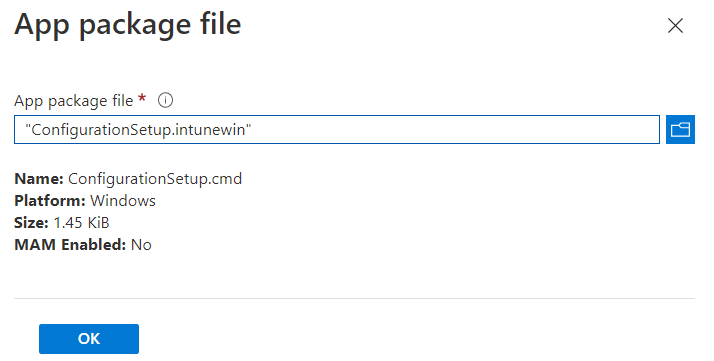
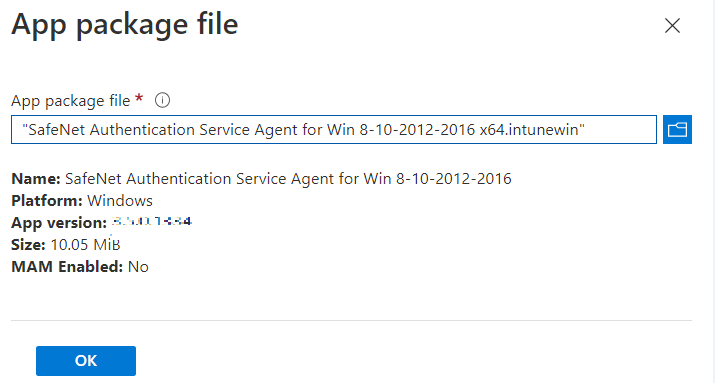
Click Select app package file. The App package file window appears.
-
In the App package file window, perform the following steps:
-
Click
 to select the App package file, that is, SafeNet Authentication Service Agent for Win 8-10-2012-2016 x64.intunewin, which you have previously created in Creating an IntuneWin package of WLA Installer section.
 -
Click OK.
-
-
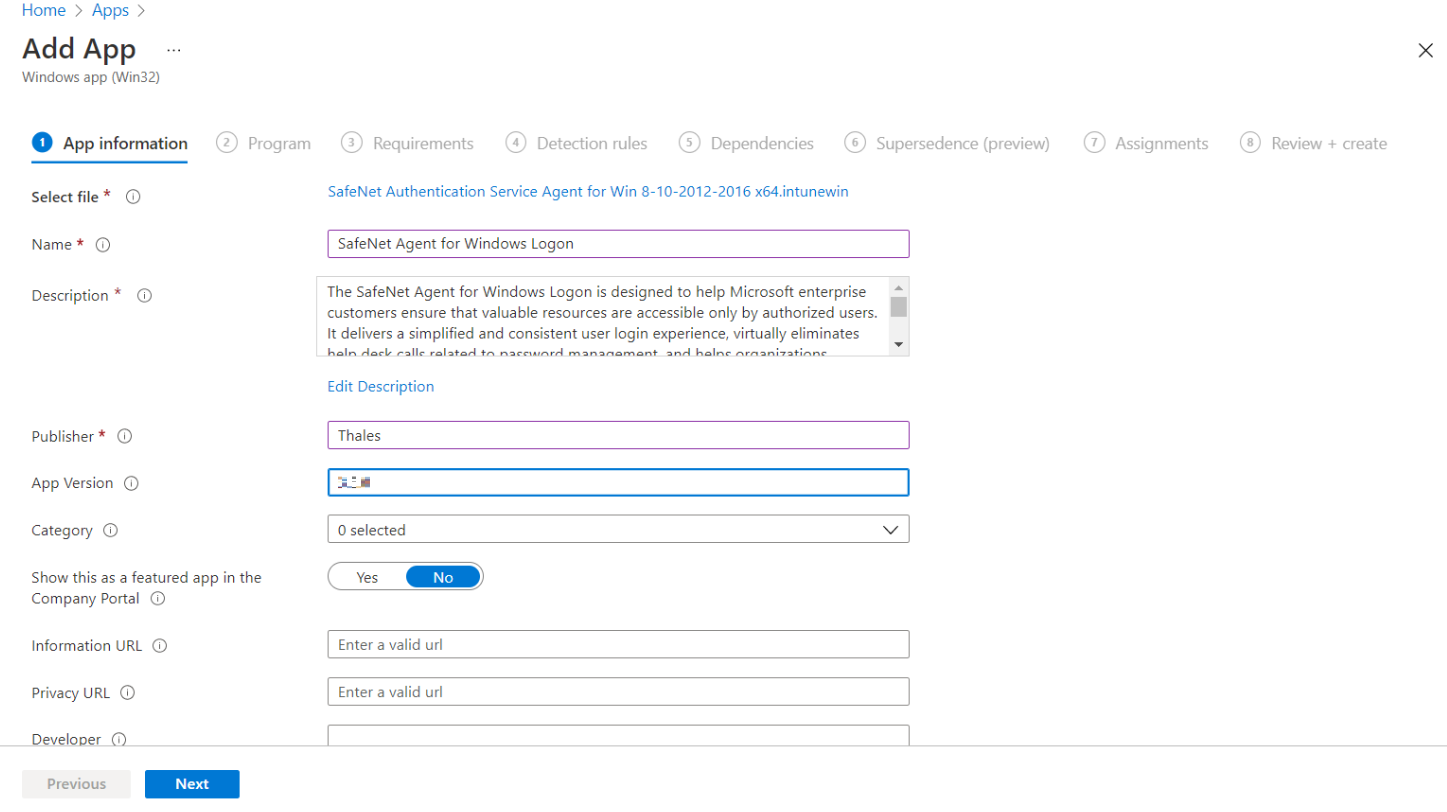
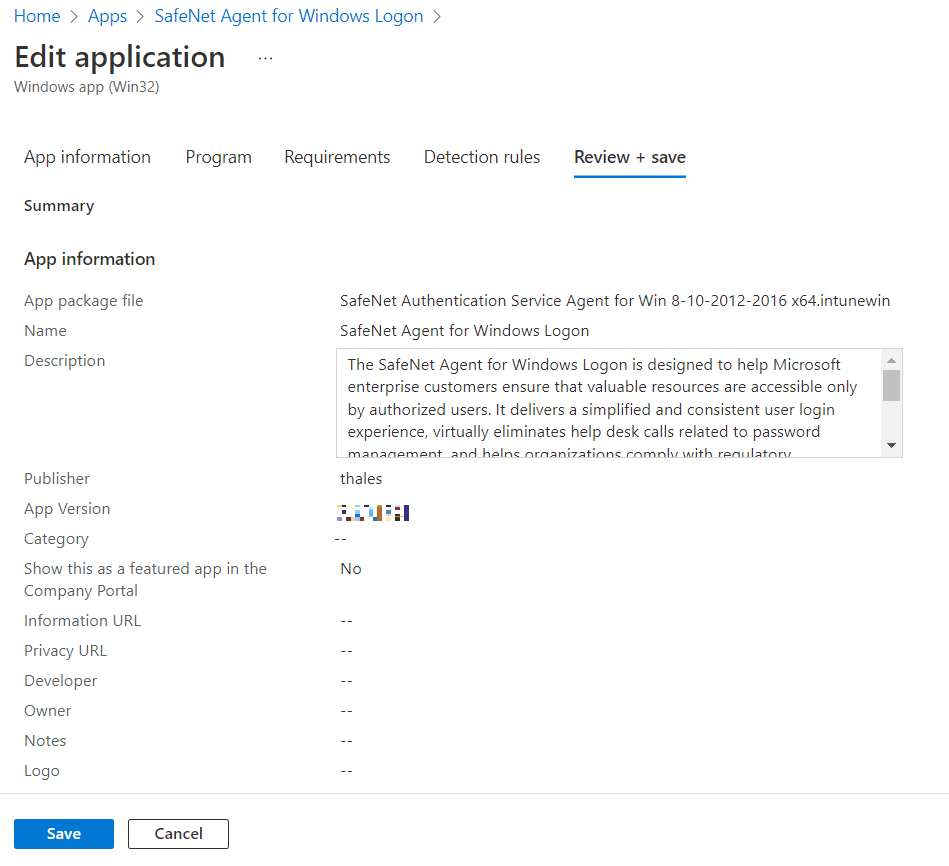
In the Add App window, under the App information tab, enter the following details for your app:
-
Name: Enter name of the app. Ensure the app names that you use are unique. For example, SafeNet Agent for Windows Logon.
-
Description: Click Edit Description to enter a small description of the app and then click OK.
-
Publisher: Enter the name of the publisher of the app. For example, Thales.
-
App Version: Depicts the app version. For example, 3.5.0.
You can also update the other fields as per your requirement.
-
Click Next to display the Program page.
-
-
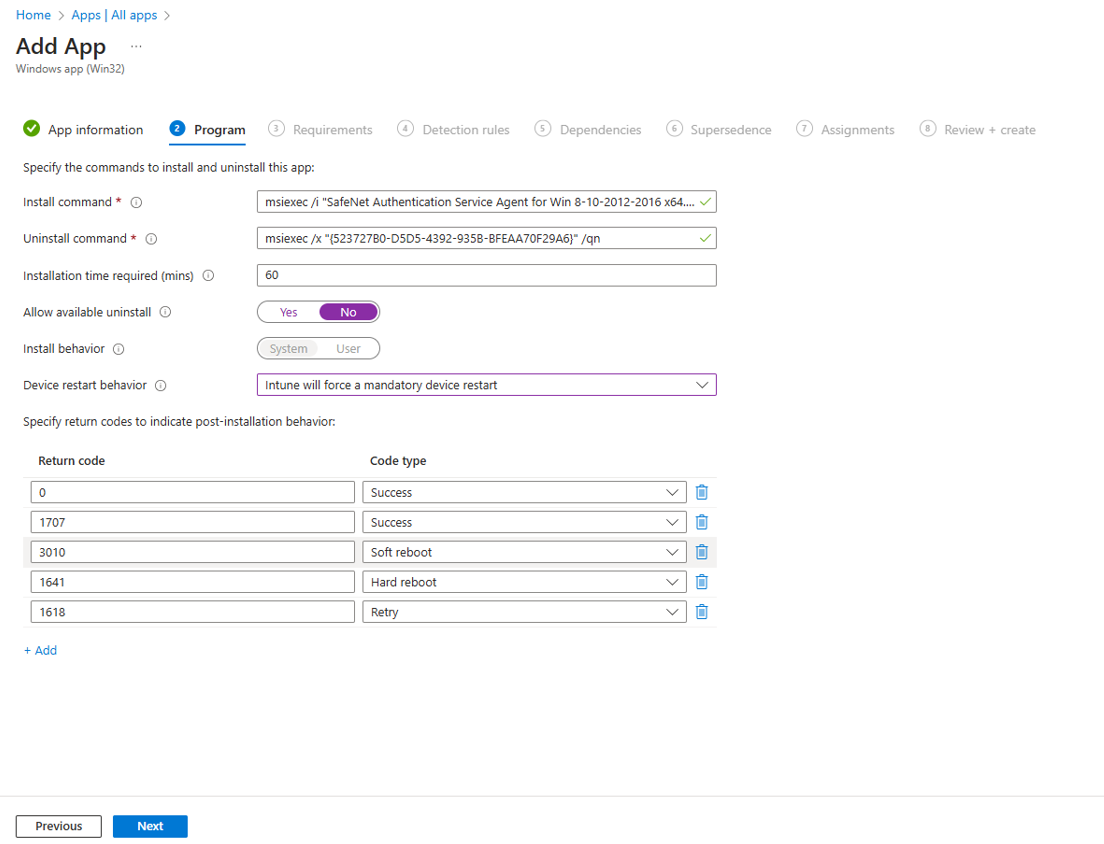
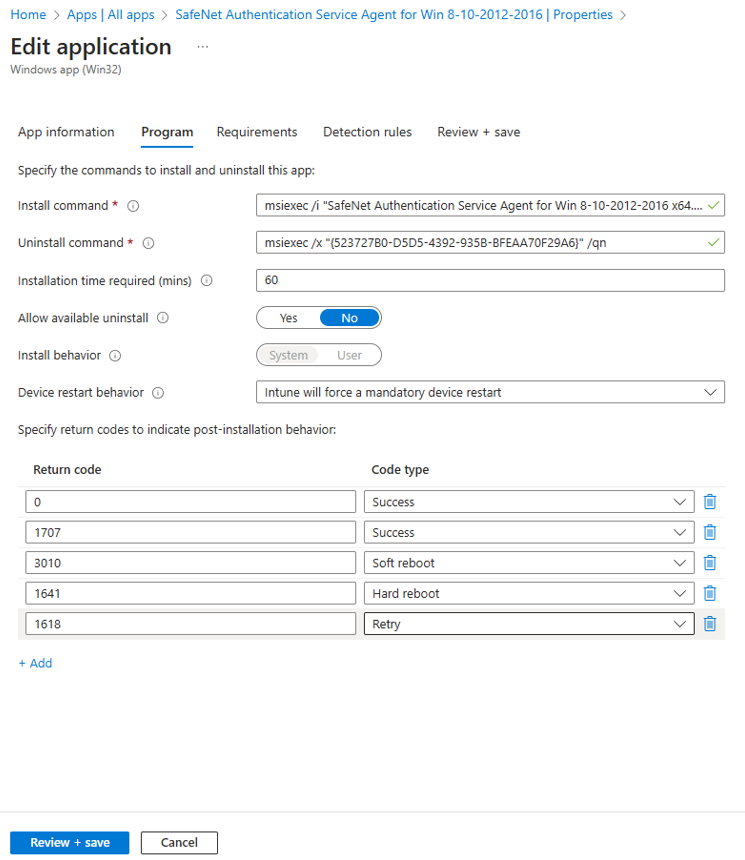
Under the Program tab, enter the following details to configure the app installation and removal commands for the app:
-
Install command: Remove the auto-populated command and enter msiexec /i "SafeNet Authentication Service Agent for Win 8-10-2012-2016 x64.msi" /quiet AGENTMODE=1 as the installation command to install the app.
-
Uninstall command: Enter msiexec /x "{523727B0-D5D5-4392-935B-BFEAA70F29A6}" /qn as the command to uninstall the app.
-
Device restart behavior: Select Intune will force a mandatory restart option from the drop-down to always restart the device after a successful app installation.
-
Click Next to display the Requirements page.
-
-
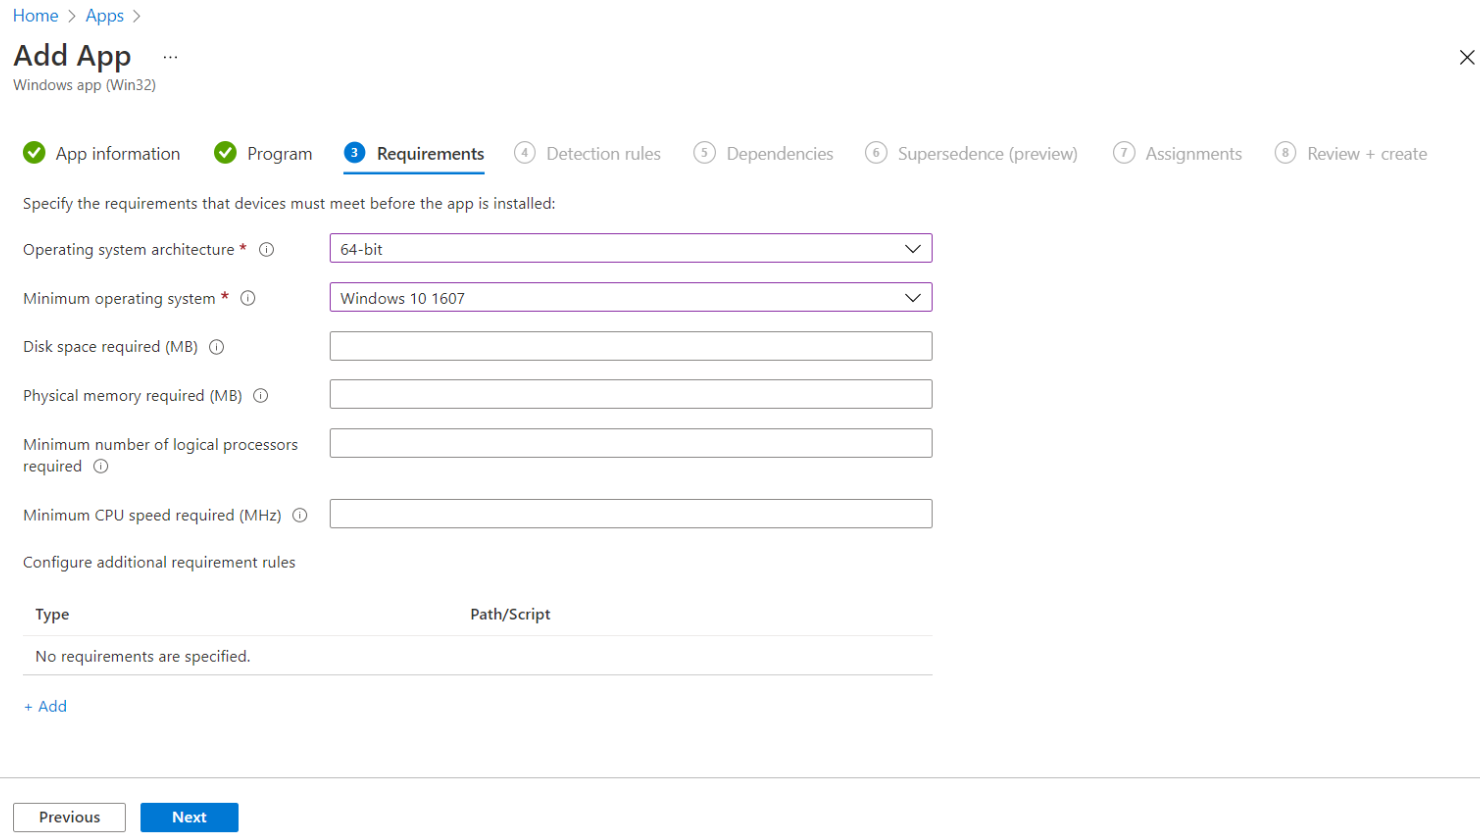
Under the Requirements tab, specify the following requirements that the device must meet before the app is installed:
-
Operating system architecture: Select 64-bit as the architecture needed to install the app.
-
Minimum operating system: Select the minimum operating system needed to install the app. For example, Windows 10 1607.
-
Click Next to display the Detection rules page.
-
-
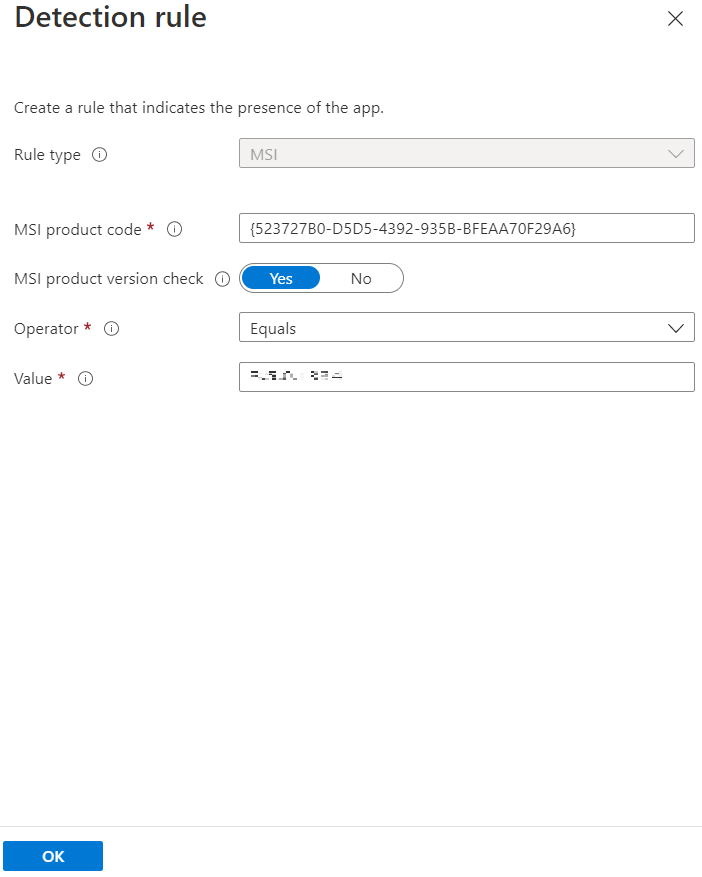
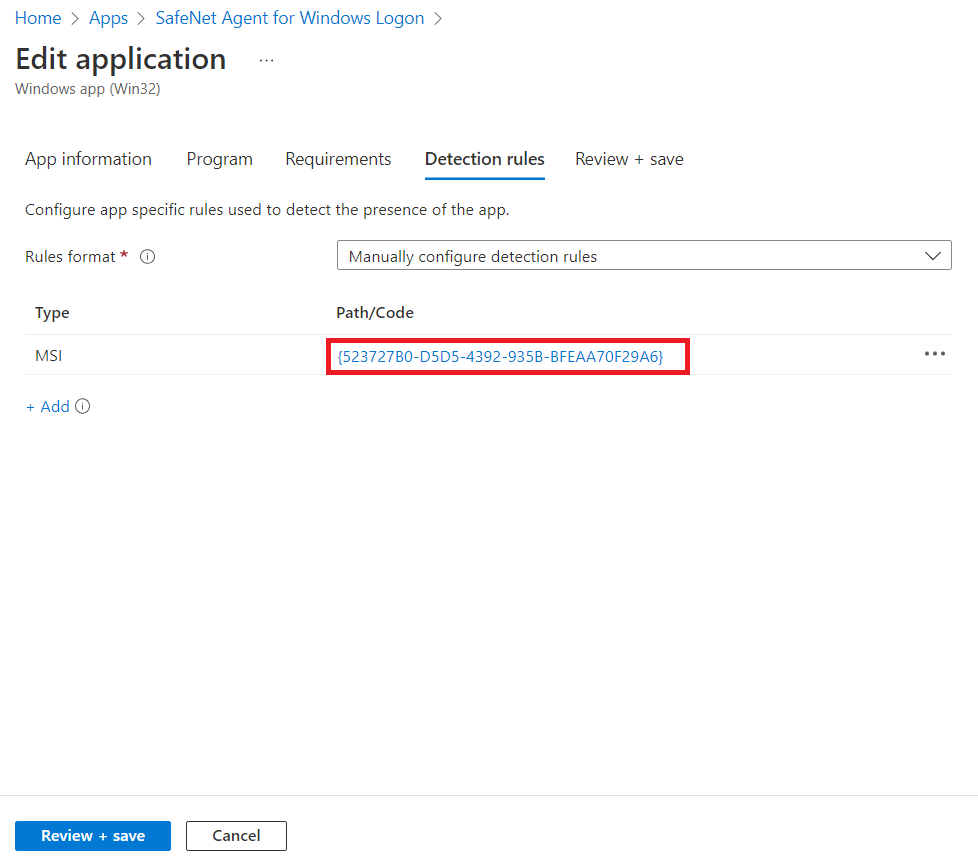
Under the Detection rules tab, specify the rules to detect the presence of the app:
-
Rules format: Select Manually configure detection rules from the drop-down.
-
Click Add.

Detection rule window appears. Enter the following details to create a detection rule:
-
Rule type: Select MSI from the drop-down.
-
MSI product code: Enter {523727B0-D5D5-4392-935B-BFEAA70F29A6} as the MSI product code.
-
MSI product version check: Select Yes.
-
Operator: Select Equals from the drop-down.
-
Value: Enter the Build Number mentioned in the CRN, associated with this release.
-
Click OK.
After adding your rules, click Next to display the Dependencies page.
-
-
In the Dependencies tab, click Next.
-
In the Supersedence (preview) tab, click Next.
-
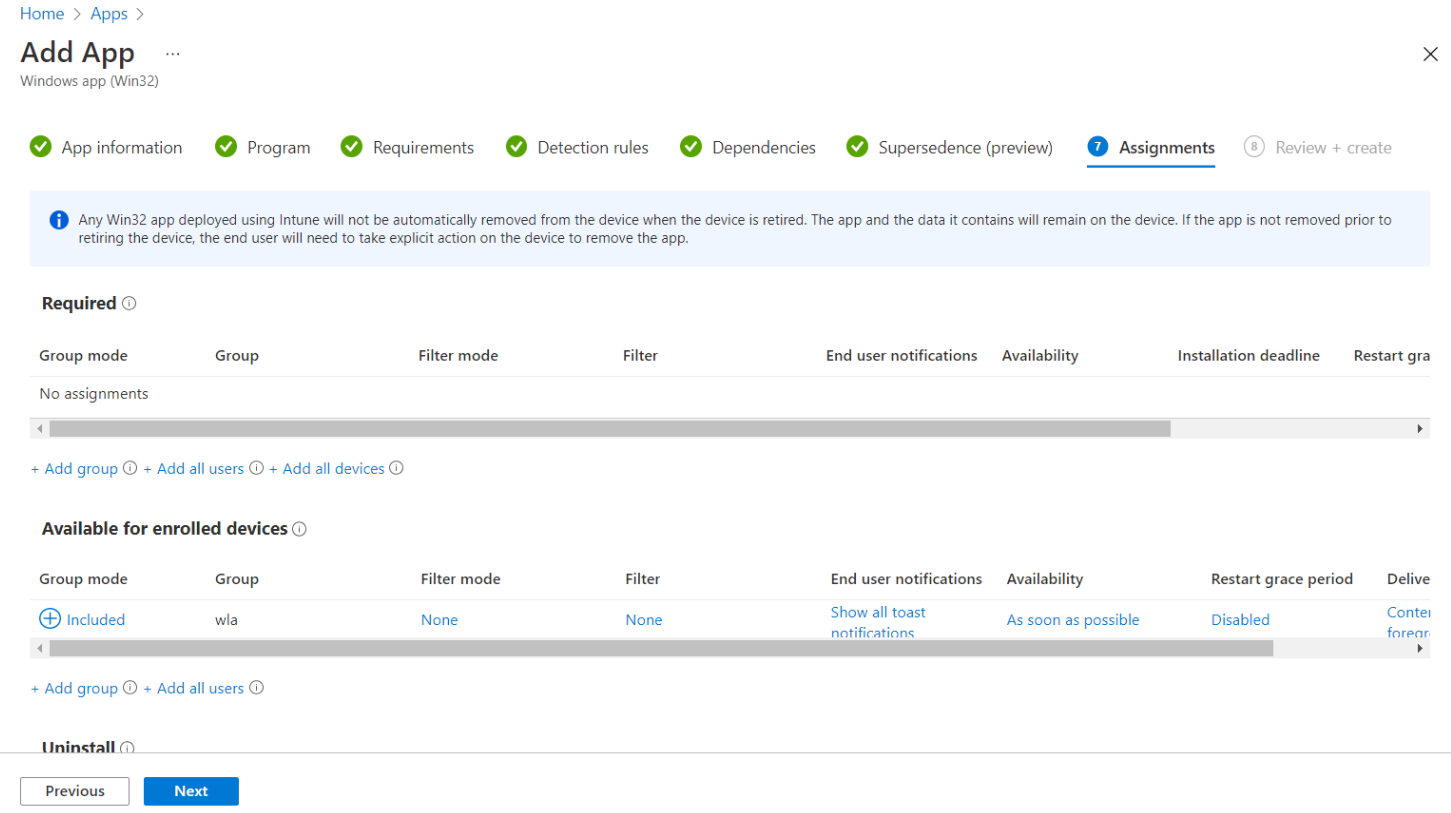
Under the Assignments tab, you can select the Required, Available for enrolled devices, or Uninstall group assignments for the app.
-
Select an assignment type for the app:
-
Required: The app is installed on devices in the selected groups. In this section,
-
Click Add group to assign the groups that will use the app.
-
Click Add all users to assign app access to all the users.
-
Click Add all devices to install the app in all Azure AD joined devices.
-
-
Available for enrolled devices: Users install the app from the company portal app or the company portal website. In this section,
-
Click Add group to assign the groups for which you want to make the app available.
-
Click Add all users to assign app access to all the users.
-
-
Uninstall: The app is uninstalled from devices in the selected groups.
-
-
Click Next to display the Review + create page.
-
-
In the Review + create tab, review the values and settings that you entered for the app, and then click Create.
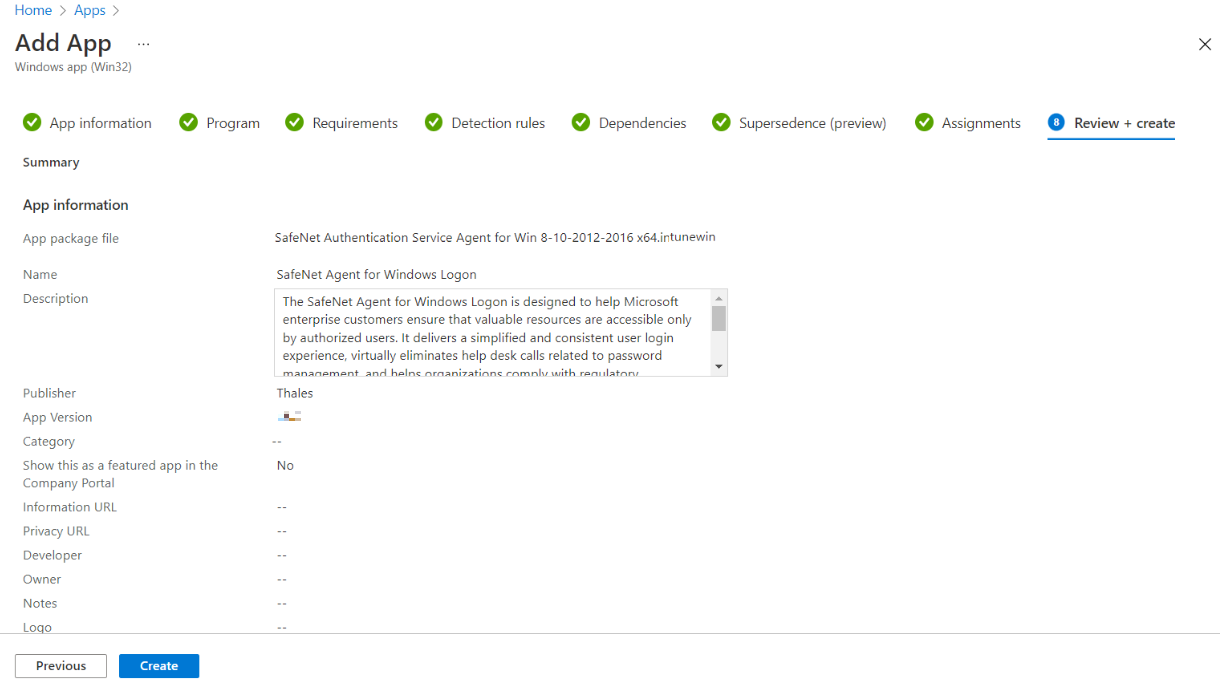
After completing the above steps, the SafeNet Agent for Windows Logon app will be deployed successfully.
Deploying the IntuneWin package for configuring the Settings
Perform the following steps to deploy the IntuneWin package for configuring the Settings of WLA in Intune. After performing all the steps, the DefaultConfiguration.reg file will be copied in the client system.
-
Repeat the steps from Step 1 to Step 4 in the above section.
-
In the App package file window, perform the following steps:
-
Click
to select the App package file, that is,
ConfigurationSetup.intunewin, which you have previously created in Creating an IntuneWin package for configuring the Settings section. -
Click OK.
-
-
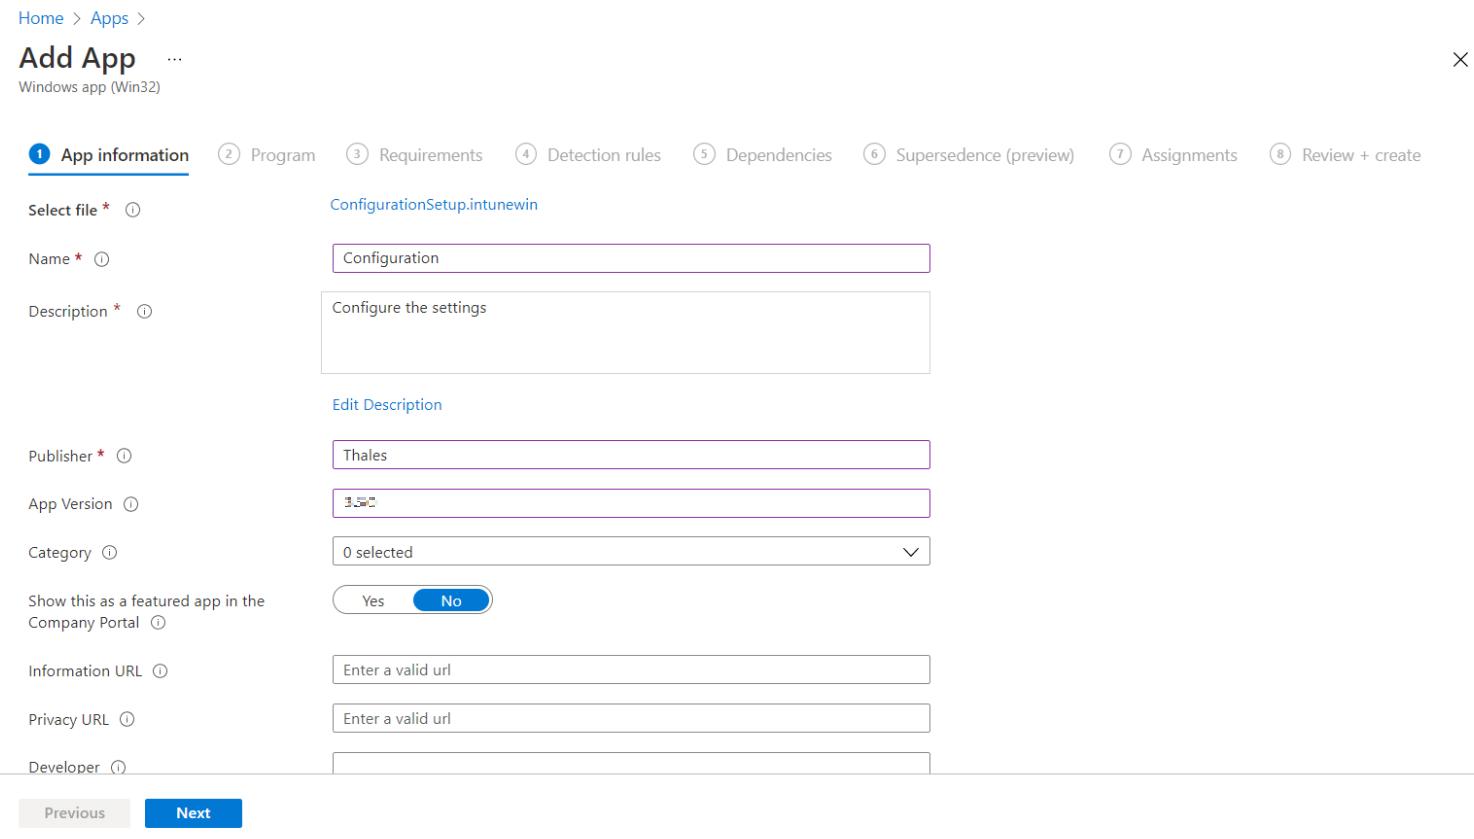
In the Add App window, under App information tab, enter the following details for your app:
-
Name: Enter name of the app. Ensure the app names that you use are unique. For example, Configuration.
-
Description: Click Edit Description to enter a small description of the app and then click OK.
-
Publisher: Enter the name of the publisher of the app as Thales.
-
App Version: Depicts the app's version as 3.5.0.
You can also update the other fields as per your requirement.
-
Click Next to display the Program page.
-
-
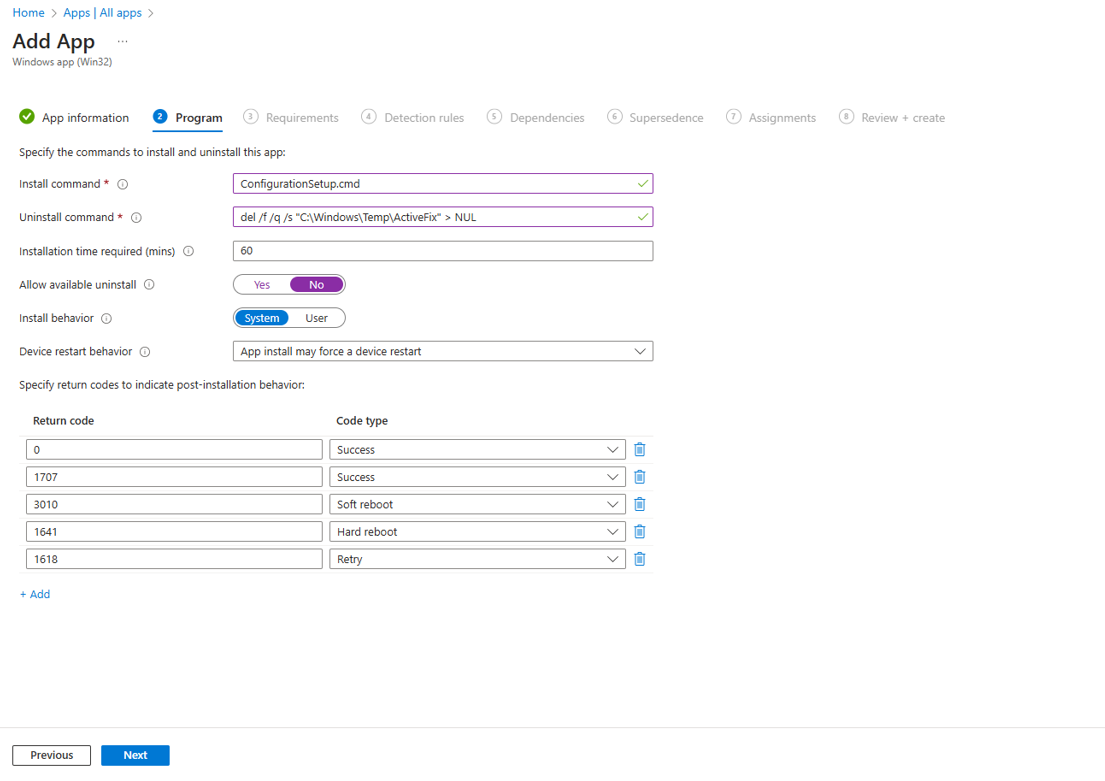
Under the Program tab, enter the following details to configure the app installation and removal commands for the app:
-
Install command: Enter ConfigurationSetup.cmd as the installation command to install the app..
-
Uninstall command: Enter del /f /q /s "C:\Windows\Temp\ActiveFix" > NUL as the command to uninstall the app.
-
Device restart behavior: Select App install may force a device restart option from the drop-down.
-
Click Next to display the Requirements page.
-
-
Repeat Step 8 in the above section.
-
Under the Detection rules tab, specify the rues to detect the presence of the app:
-
Rules format: Select Manually configure detection rules from the drop-down.
-
Click Add.

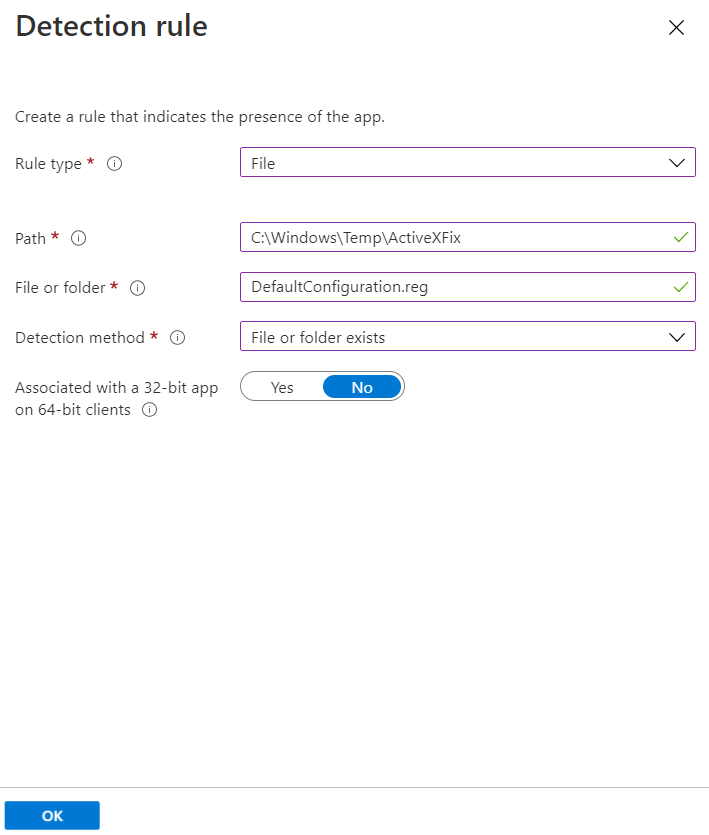
Detection rule window appears. Enter the following details to create a detection rule:
-
Rule type: Select File from the drop-down.
-
Key path: Enter C:\Windows\Temp\ActiveXFix as the full path of the file that contains the value to detect.
-
Value name: Enter DefaultConfiguration.reg as the name of the file value to detect.
-
Detection method: Select File or Folder Exists from the drop-down to validate the presence of the app.
-
Click OK.
After adding your rules, click Next to display the Dependencies page.
-
After completing the above steps, the SafeNet Agent for Windows Logon app will be deployed successfully. The DefaultConfiguration.reg file will be copied in the client system.
Deploying PowerShell Script to configure the Settings
Perform the following steps to deploy the PowerShell script using Intune:
-
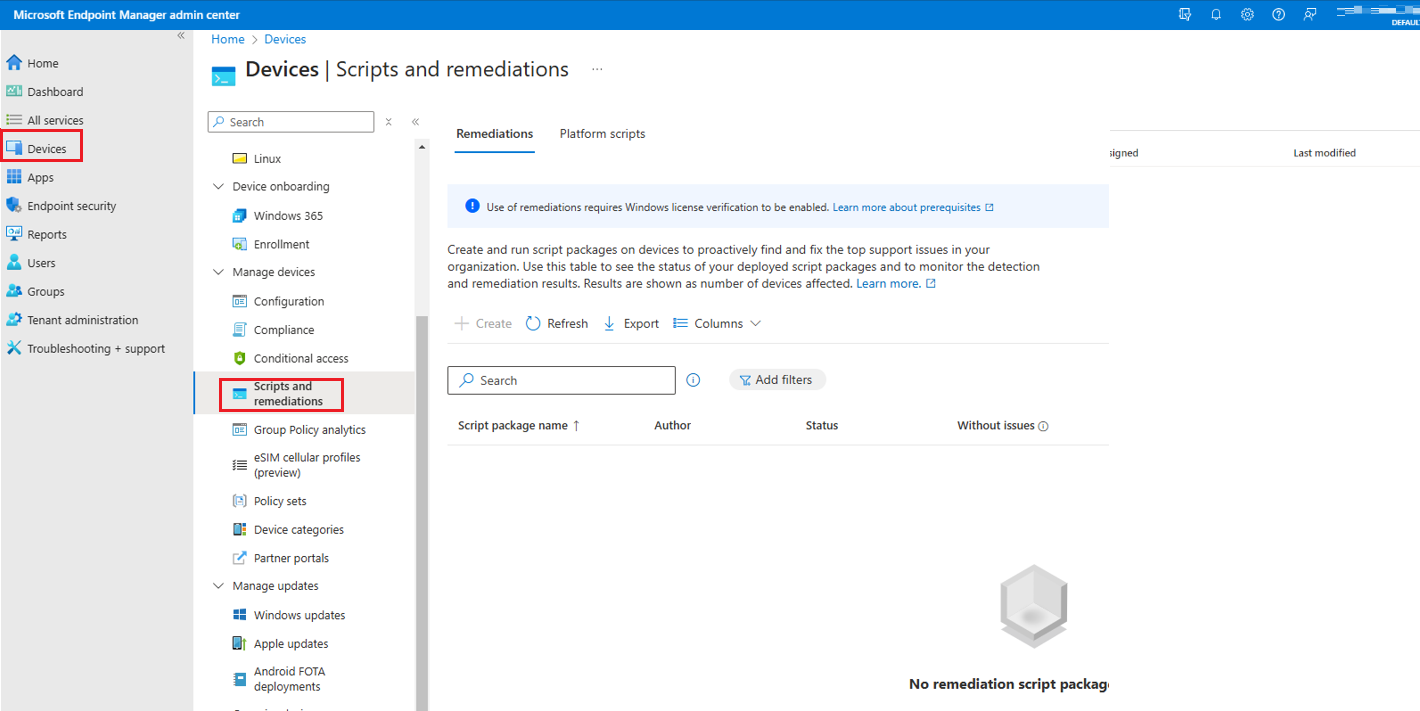
In the left pane of the Microsoft Endpoint Manager admin center, select Devices > Scripts.
-
Click Add to add a new PowerShell script, and then select Windows 10 and later to deploy it to Windows 10 (and later) devices.

-
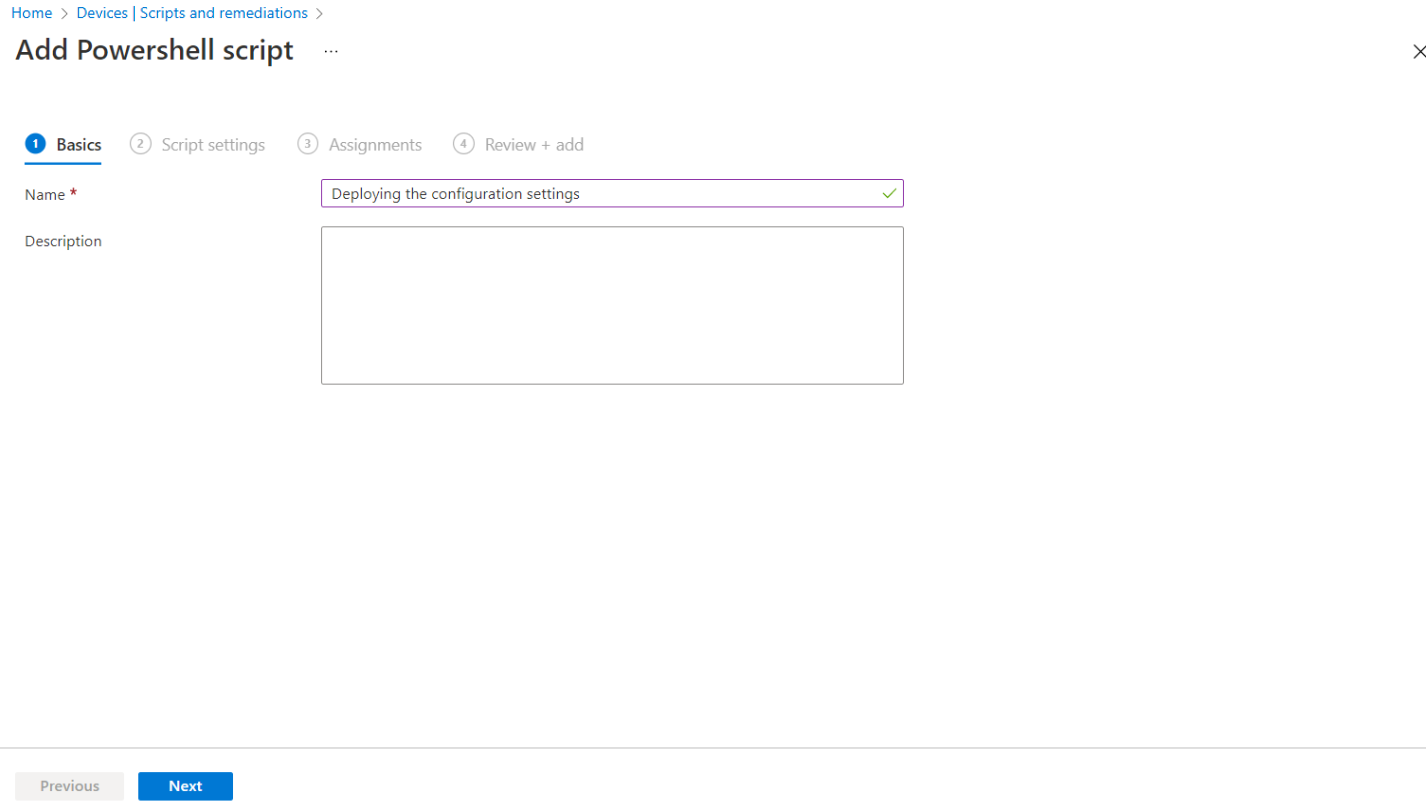
In the Add Powershell script window, under the Basics tab, enter the following properties:
-
Name: Enter a name for the PowerShell script. For example, Deploying the configuration settings.
-
Description: [Optional] Enter a description for the PowerShell script.
-
Click Next.
-
-
Under the Script settings tab, enter the following properties:
-
Script location: Browse to the PowerShell script (ConfigurationScript.ps1) that is present in the Intune-Deployment folder. For example, C:\Intune-Deployment\ConfigurationScript.ps1
-
Run script in 64-bit PowerShell host: Select Yes to run the script in a 64-bit PowerShell host on a 64-bit client architecture.
-
Click Next.

-
-
Under the Assignments tab,
-
Click Add Group to select groups to include the users whose devices receive the PowerShell script.
-
Click Next.

-
-
In the Review + add tab, a summary is shown of the settings that you have configured. Click Add to save the script.

After selecting Add, the policy is deployed to the groups you chose.
Upgrading SafeNet Agent for Windows Logon
To upgrade the SafeNet Agent for Windows Logon with the latest version, perform the following steps:
-
Perform all the steps in Creating an IntuneWin package.
-
Login to the Microsoft Endpoint Manager admin center using https://intune.microsoft.com.
-
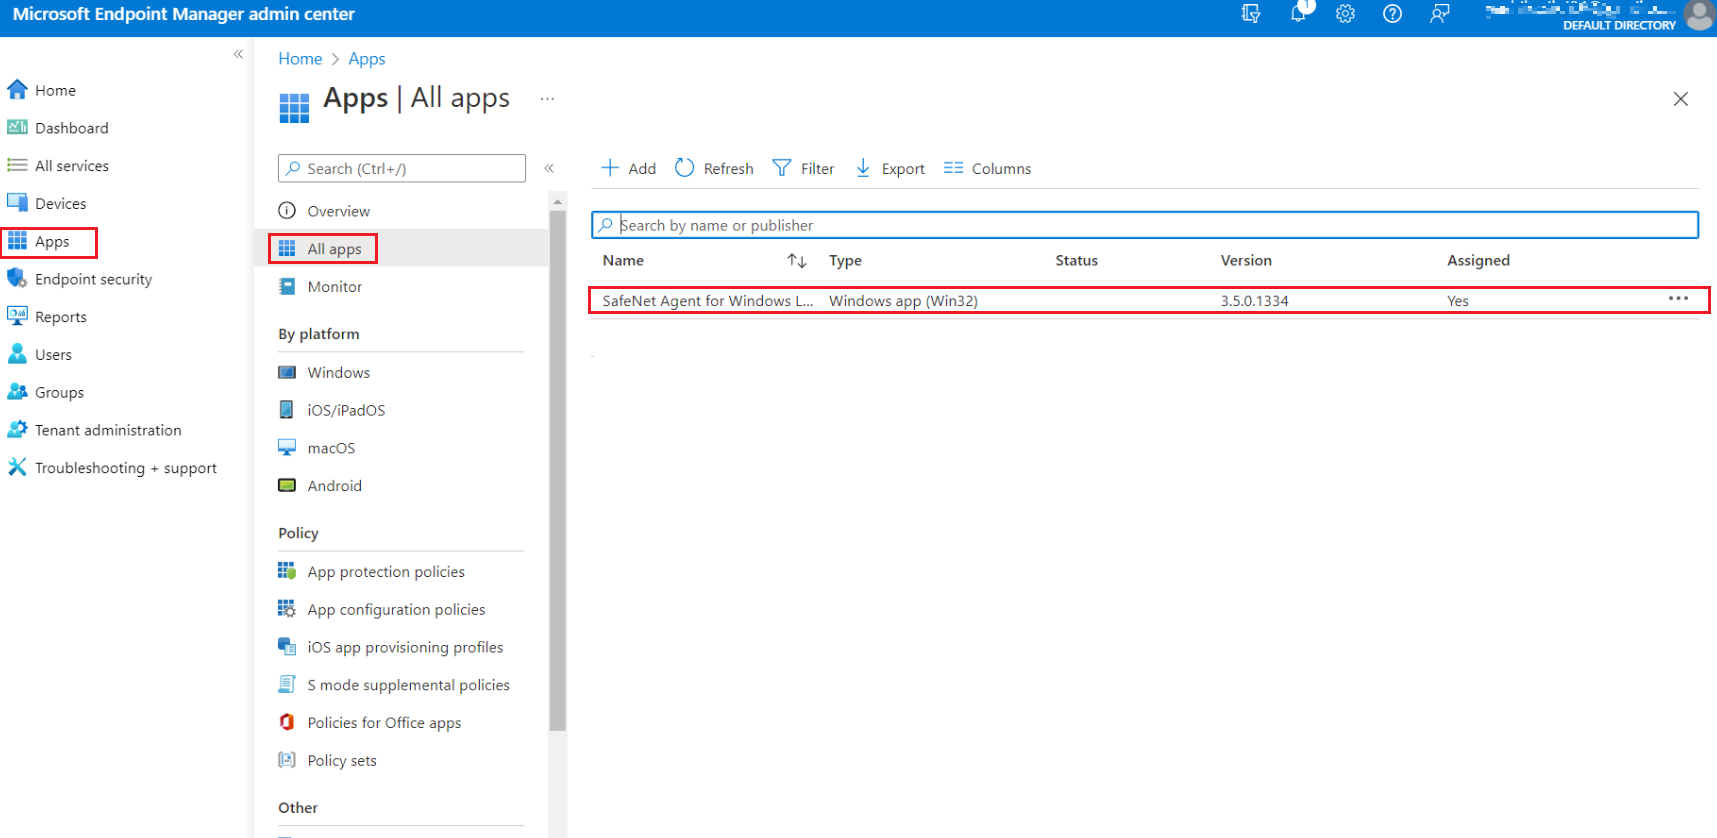
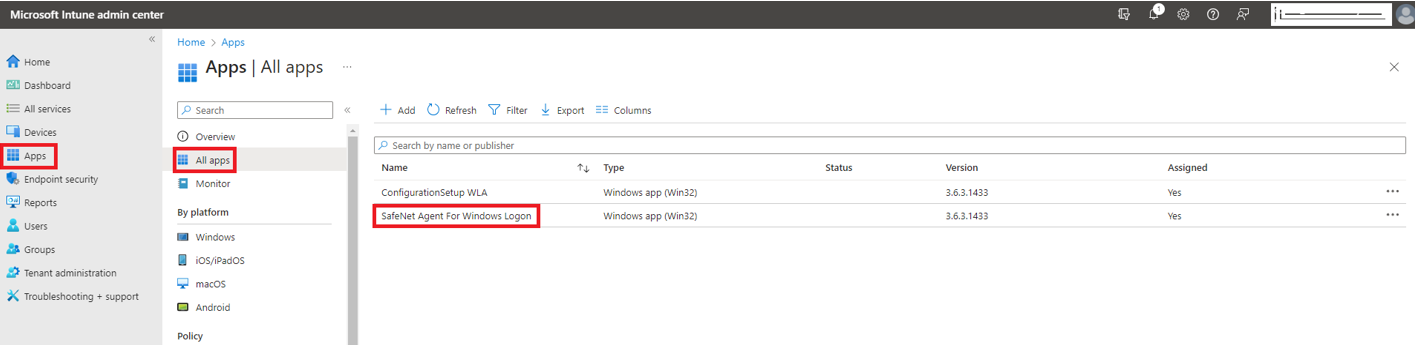
In the left pane, select Apps > All apps. Select the previously created app.
-
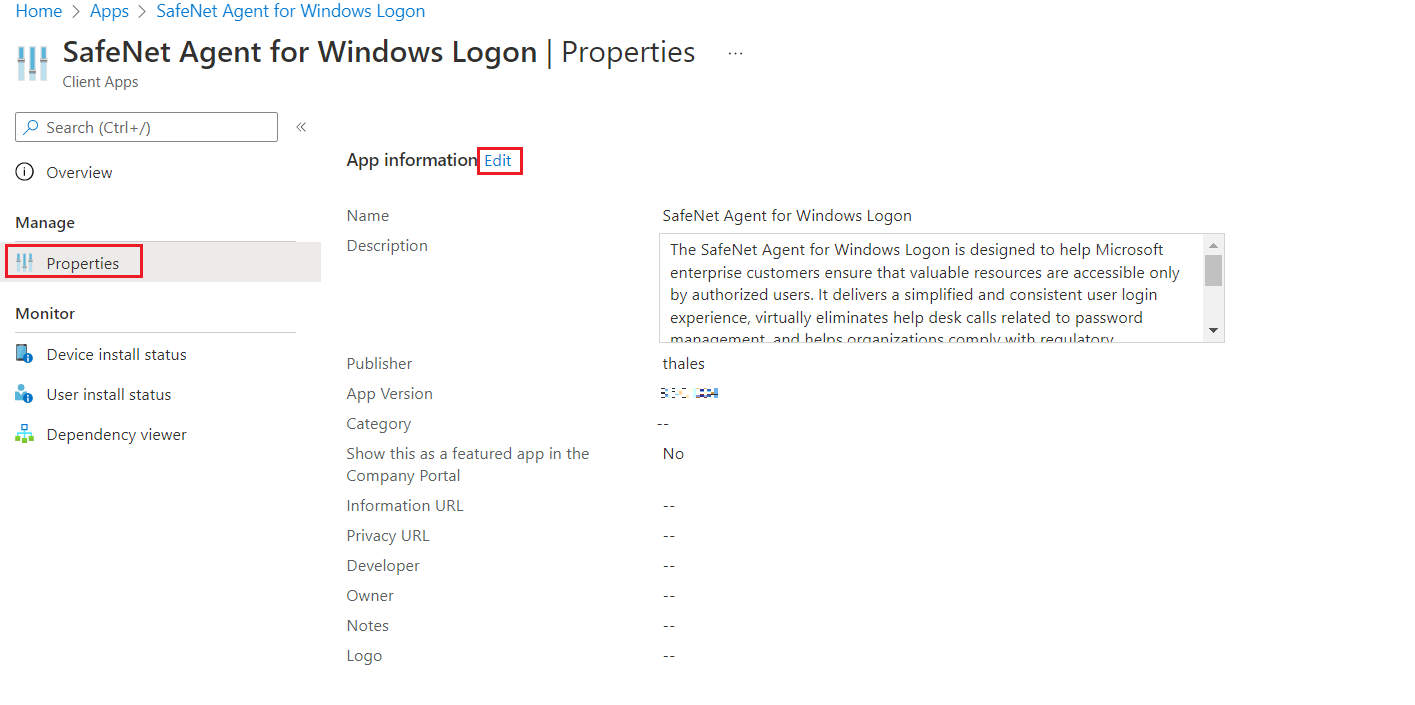
In the right pane, under Manage, click Properties and then click Edit (next to App information).
-
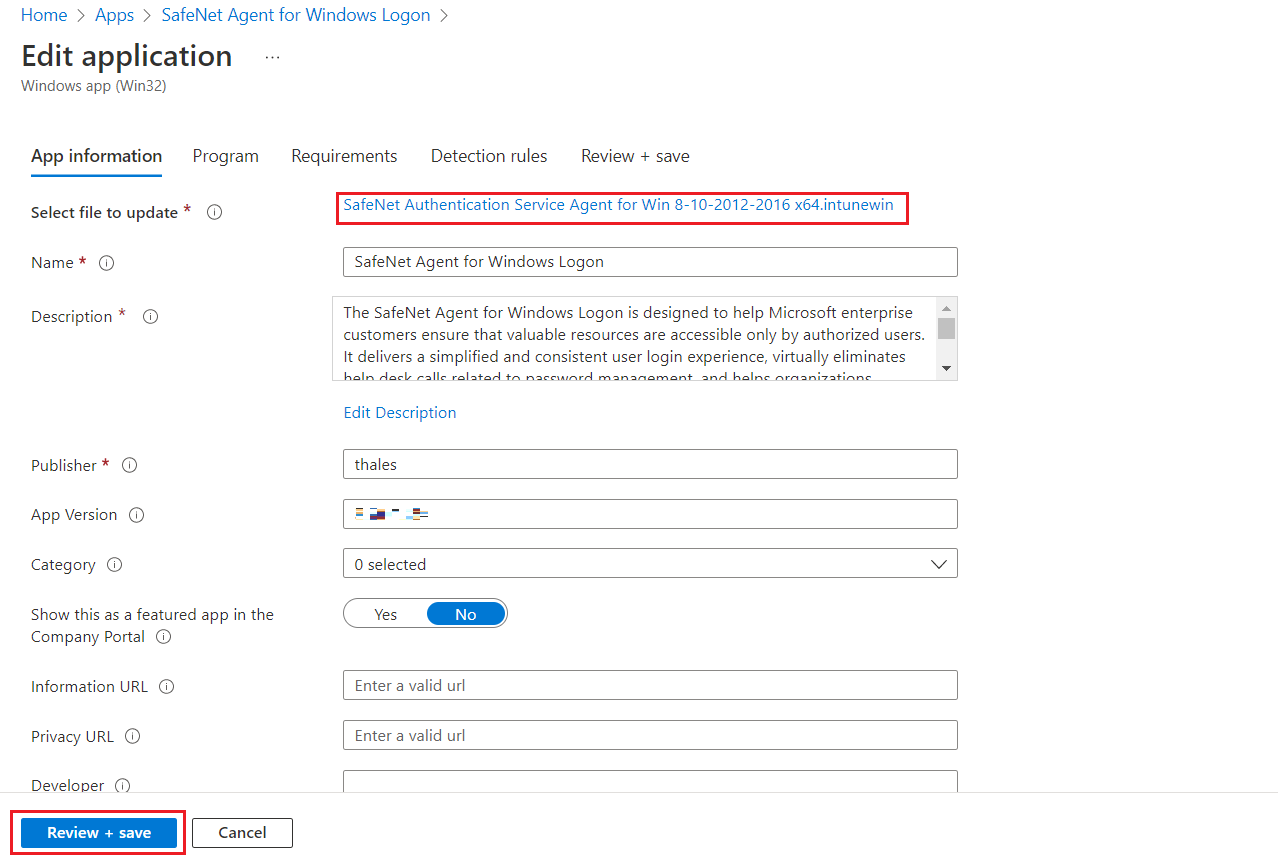
Under the App information tab, click the previously created app from the Select file to update field.
The App package file window appears. Perform the following steps:
-
Click
 to select the newly created App package file, that is, SafeNet Authentication Service Agent for Win 8-10-2012-2016 x64.intunewin, which you have previously created in Step 1.
 -
Click OK.
Click Review + save on the App information page to display the Program page.
-
-
Under the Program tab, enter msiexec /i "SafeNet Authentication Service Agent for Win 8-10-2012-2016 x64.msi" /quiet REINSTALLMODE=vomus REINSTALL=ALL as the Install command to upgrade the app to its latest version.
Click Review + save to display the Requirements page.
-
Under the Requirements tab, click Review + save to display the Detection rules page.
-
Under the Detection rules tab, select the value of Path/Code of the previously created detection rule.
Detection rule window appears. Perform the following steps:
-
In the Value field, enter the latest Build number as mentioned in the CRN.
-
Click OK.

Click Review + save.
-
-
Under the Review + save tab, click Save.
After performing the above steps, SafeNet Agent for Windows Logon will be upgraded to its latest version. WLA will not be installed on the newly added devices through the upgrade process.
IMPORTANT: For an ongoing upgrade, you must wait until all the devices are successfully upgraded before installing the agent on the newly added devices.
To install the agent on newly added devices, perform the following steps:
-
Perform all the steps in Creating an IntuneWin package.
-
Perform all the steps in Deploying the IntuneWin package, except Step 11. Instead, in the Supersedence (preview) tab, perform the following steps:
-
Click Add.
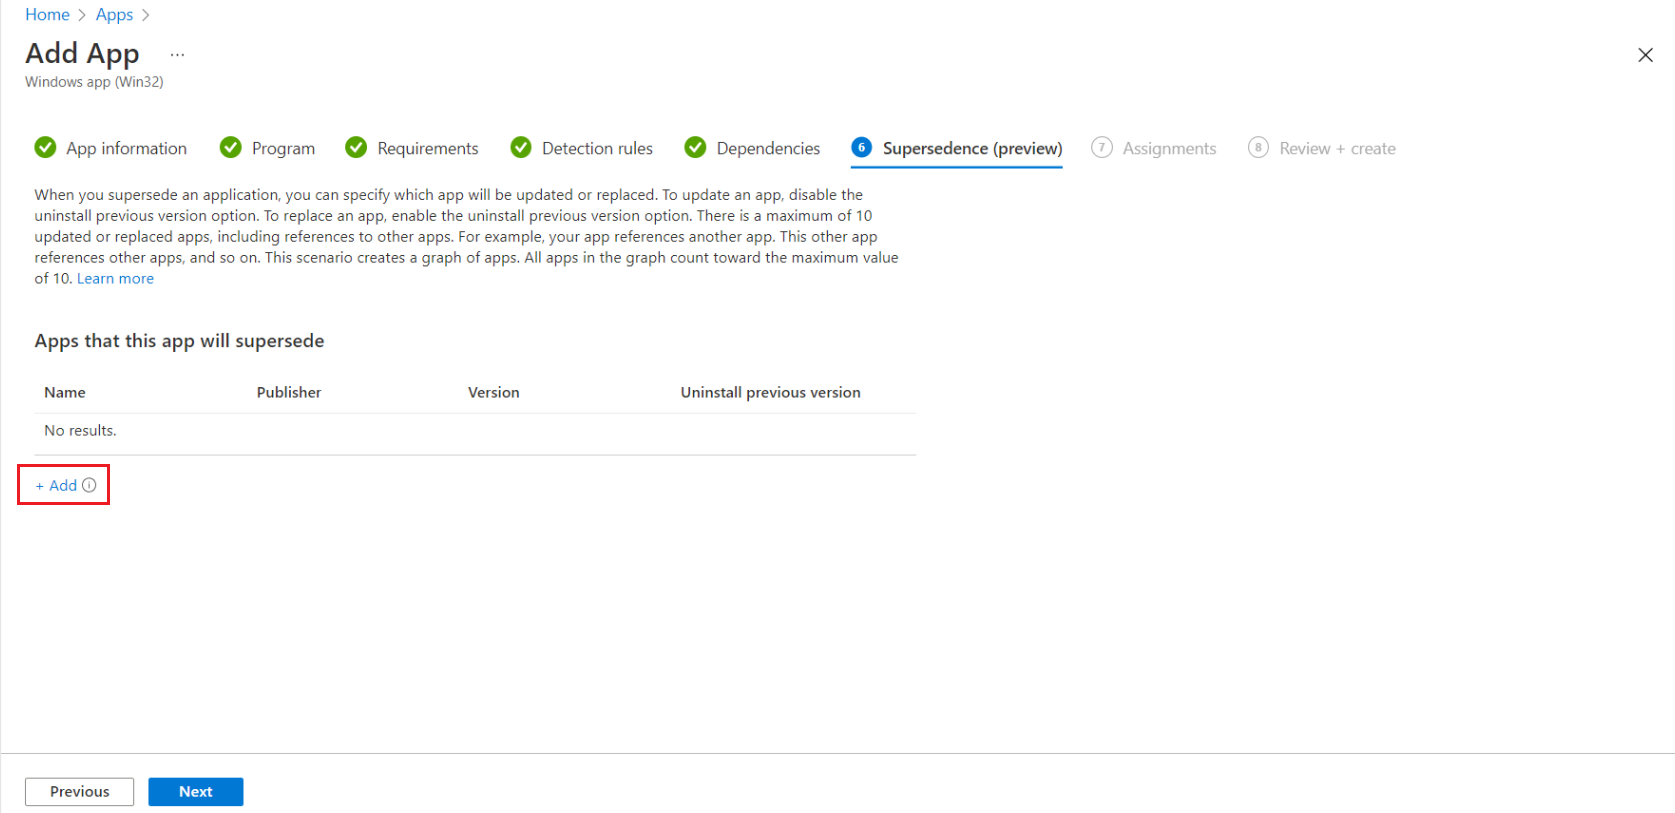
The Add Apps window appears. Select the app and then click Select.

-
Click Next.
The latest app will be successfully installed on the newly added devices.
-
Uninstalling the agent
Perform the following steps to uninstall the agent via Intune:
-
Login to the Microsoft Endpoint Manager admin center using https://intune.microsoft.com.
-
In the left pane, select Apps > All apps.
-
Click the application name that you want to uninstall. For example SafeNet Agent For Windows Logon.
-
Click Properties, scroll down and click Edit displayed next to Assignments.

-
Under Uninstall assignment type,
-
Click Add group to assign the groups that will uninstall the app.
-
Click Add all users to assign app access to all the users.
-
Click Add all devices to uninstall the app from all Azure AD joined devices.
-
-
Click Review+save.