
Attribute schema
Attributes represent the individual pieces of information stored within an identity in the identity store. The attributes that you add are custom, or non-system, attributes. You can edit and delete custom attributes. All system attributes are read-only and cannot be changed.
You can create the attributes in your current schemas in the identity store. The attributes that you create are stored in a custom schema. After you create the attributes, you map the attributes in the OneWelcome Identity Platform schemas to the attributes in this custom schema.
You can create and manage two types of custom attributes:
-
Simple attributes are basic key-value pairs such as strings, numbers, or dates.
-
Complex attributes are structured data that can contain multiple nested elements or collections.
The identity store adds the attributes that you create to a custom SCIM schema extension.
Simple attributes
Simple attributes consist of straightforward data types with a single value per attribute. Examples include first name, last name, email, phone number, and date of birth.
You can add, edit, or delete a simple attribute.
Add a simple attribute
-
On the OneWelcome Identity Platform console, select Identities > Attribute schema.
-
Select Add attribute and then select Add simple attribute.
-
On the Add simple attribute page, enter the Basic information:
-
Attribute name: Enter the attribute name as it is used in APIs. The attribute name is required and cannot be changed after you save the attribute.
-
Display name: (Optional) Enter a friendly name for the attribute.
-
Description: (Optional) Enter a description.
-
Active: Select the check box to make the attribute available when you save it.
-
Possible values: (Optional) Select or enter the possible valid values for the attribute. When specified, only these values are accepted.
-
Default value: (Optional) Enter the default value. The value must be the same data type that you specify under Attribute configuration. For example, if the Data type is dateTime, then the default value must be a date-time value. If you specify the default value and list the possible values, you must include the default value in the list of possible values. The default value is not supported for the boolean data type.
-
-
Under Attribute configuration, select the Metadata options:
-
Select the Data type:
- string (default)
- boolean
- decimal
- integer
- dateTime
Each data type has different restrictions and storage options.
-
If the attribute contains an array, select the Multi-valued check box. The boolean data type cannot be multi-valued.
When you select the Multi-valued check box, only the the following options are available:
-
Restrictions:
- Required
- Case-sensitive (String only)
-
Storage: Searchable
-
-
-
Select the Restrictions for the data type that you selected:
Option string boolean decimal integer dateTime Description Identifier Yes, unless Multi-valued No Yes, unless Multi-valued Yes, unless Multi-valued Yes, unless Multi-valued The Unique, Case-sensitive, and Searchable check boxes are selected by default. Required Yes Yes Yes Yes Yes The attribute value cannot be empty (null). Unique Yes, unless Multi-valued No Yes, unless Multi-valued Yes, unless Multi-valued Yes, unless Multi-valued The attribute value must be unique across all identity profiles for your tenant. Case-sensitive Yes No No No No Attribute values are case-sensitive, which means OneWelcome and onewelcome are different values. Access level Yes, unless Multi-valued Yes, unless Multi-valued Yes, unless Multi-valued Yes, unless Multi-valued Yes, unless Multi-valued The type of access for the attribute can be read-only, read-write, immutable, or write-only. -
If the data type is string and Multi-valued is not selected, select the Validation options:
-
Min length: Enter the minimum length for the attribute value.
-
Max length: Enter the maximum length for the attribute value.
-
Expected format: Use a regular expression to define and validate the expected format of the string. Leave empty to disable validation. For example, for an email attribute, the format to validate the email address might be:
/^\S+@\S+\.\S+$/
-
-
Select the Storage options for the data type that you selected:
Option string boolean decimal integer dateTime Description Hashed Yes, unless Multi-valued No Yes, unless Multi-valued Yes, unless Multi-valued Yes, unless Multi-valued The attribute contains an encoded form of the value, not the actual value. Select this option when data is used only for validation, because the original data cannot be retrieved. Supports only full value search. An attribute can be hashed, encrypted, or both. Encrypted Yes, unless Multi-valued Yes, unless Multi-valued Yes, unless Multi-valued Yes, unless Multi-valued Yes, unless Multi-valued The attribute value is secured and unreadable without decryption. Search is disabled when selected. An attribute can be hashed, encrypted, or both. Searchable Yes Yes Yes Yes Yes Allows letter-to-letter search. Encryption restricts search functionality. -
To add metadata for the attribute, in the Attribute value metadata section, select Add attribute value metadata and then select the Attribute value.
The attribute metadata focus on the asserted value for the attribute (also called the secondary aspects of the data). It is the additional set of properties that describe, define, or form the reference for an attribute value. The following attribute value metadata are available:
Attribute value metadata Description acceptableUses The allowed uses for entities that receive the attributes cacheTimeToLive The length of time for which an attribute value can be cached classification The security classification level of the attribute.The possible values are: ["Unclassified", "Controlled Unclassified", "Confidential", "Secret", "Top Secret", "Company Confidential"]Default: UnclassifiedconsentType Indicates the type of consent dateConsented The date and time when consent was acquired for releasing the attribute value expirationDate The date and time when an attribute's value is no longer valid lastRefresh The date and time when the attribute was last refreshed lastVerification The date and time when the attribute value was verified as true and belonging to the specified user origin The name of the entity that issues or creates the initial attribute value pedigree The description of the attribute value's relationship to the authoritative source of the valueThe possible values are: ["Authoritative","Sourced","Self-Asserted","Derived"]Default: Authoritativeprovider The name of the entity that is providing the attribute releasability The restrictions on who can receive an attribute valueThe possible values are: ["None", "NATO", "NOFORN", "FVEY", "Public Release", "Externally Releasable for Business Purposes", "Do Not Release"]Default: NoneverificationMethod The method by which the attribute value was verified as true and belonging to the specified userThe possible values are: ["Not Verified", "Document Verification", "Record Verification", "Document Verification with Record Verification", "Proof of Possession", "Probabilistic Verification"]Default: Not Verifiedverifier The entity that verified the attribute's valueThe possible values are: ["Origin", "Provider", "Not Verified"]Default: Not Verified -
Save the attribute.
Simple attribute options
On the Attributes page, simple custom attributes are listed below the System attributes and don't have an expand or collapse icon next to the Display name.
The following menu options are available for each simple custom attribute:
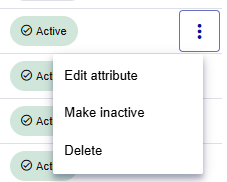
-
Edit attribute: Opens the attribute details page in edit mode. However, you cannot change some metadata after the attribute is used or the value is set.
If the Unique check box is selected and you deselect it, you cannot select it again later.
-
Make active or inactive: Changes the Status to inactive or active.
-
Delete attribute: Deletes the attribute.
Complex attributes
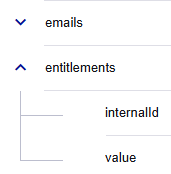
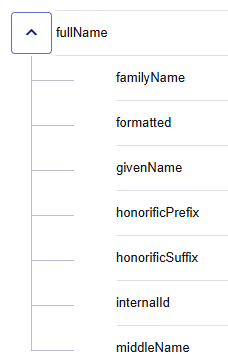
A complex attribute is a container that organizes one or more sub-attributes. Use complex attributes to structure related data, such as multiple address lines, city, postal or ZIP code, and country.
Complex attributes can have a single level of sub-attributes. In other words, sub-attributes cannot have sub-attributes.
Complex attributes have the data type complex.
Multi-valued complex attributes
Complex attributes can be multi-valued. It's recommended that multi-valued complex attributes have a sub-attribute named primary with the boolean data type. If there is no primary sub-attribute, all other sub-attributes have limited access to metadata. For example, you cannot set the attribute value as unique, cannot set it as an identifier, and so on.
Add a complex attribute
A complex attribute must have at least one sub-attribute.
-
On the OneWelcome Identity Platform console, select Identities > Attribute schema.
-
Select Add attribute and then select Add complex attribute.
-
On the Add complex attribute page, enter the Basic information:
-
Attribute name: Enter the attribute name as it is used in APIs. The attribute name is required and cannot be changed after you save the attribute.
-
Display name: (Optional) Enter a friendly name for the attribute.
-
Description: (Optional) Enter a description.
-
Active: Select the check box to make the attribute available when you save it. If the complex attribute is inactive, then all the sub-attributes are also inactive, even if they are set to Active. If the complex attribute is Active, all sub-attributes are also active, unless their Active check box is not selected.
-
-
If the attribute contains an array of values, in the Attribute configuration section, under Metadata, select the Multi-valued check box.
The system automatically adds the primary sub-attribute to the top of the Sub-attributes list. The primary sub-attribute has the boolean data type. You cannot enable or disable the primary attribute. It always remains consistent with its parent attribute.
When you clear the Multi-valued check box, the primary sub-attribute is automatically deleted.
You can delete the primary attribute if you think it's unnecessary. However, if the primary sub-attribute is missing, all other sub-attribute have limited access to metadata, such as cannot set the attribute value as unique, or cannot be set as an identifier.
-
If the attribute cannot have an empty (null) value, under Restrictions, select the Required check box.
-
To add a sub-attribute, select Add sub-attribute.
The Add sub-attribute screen opens, where you complete the information to add a simple attribute.
Note
You cannot create a sub-attribute named primary, because that name is reserved for a system-generated sub-attribute.
-
Save the complex attribute.
Complex attribute options
On the Attributes page, you can identify the complex attributes because they are listed below the System attributes and they have an expand or collapse icon next to the Display name.
Complex attributes have the same menu options as simple attributes, plus an additional option for sub-attributes:
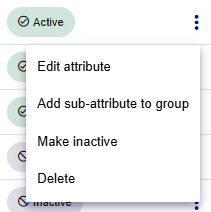
- Add sub-attribute to group: Opens the Add sub-attribute page.
Add a sub-attribute
You can add a sub-attribute from the complex (parent) attribute page or from the main Attributes page:
-
On the complex attribute page, scroll to the Sub-attributes list at the bottom and select Add sub-attribute.
-
On the main Attributes page, select the menu for the complex (parent) attribute and select Add sub-attribute to group.
Edit or delete a sub-attribute
You can view the sub-attributes for a complex custom attribute on the Attributes page or on the details page for the complex attribute:
-
On the Attributes page, expand the complex (parent) attribute.
In the menu for the sub-attribute, select Edit attribute or Delete.
-
On the details page for the complex (parent) attribute, scroll to the bottom of the page. In the Sub-attributes list, select Edit attribute or Delete for the sub-attribute.
Make an attribute active or inactive
You can make an attribute active or inactive from the main Attributes page or from the attribute details page:
-
On the main Attributes page, select the menu for the attribute and then select Make active or Make inactive.
-
On the attribute details page, on the Attributes page, select the menu for the attribute and select Edit attribute. On the attribute details page, select or clear the Active check box.
Delete an attribute
You can delete an attribute from the main Attributes page or from the attribute details page:
-
On the main Attributes page, select the menu for the attribute and then select Delete attribute.
-
On the attribute details page, select the menu in the top-right, and then select Delete.
