
SAML applications
The OneWelcome Identity Platform implements the OpenID Connect and the Security Assertion Markup Language (SAML) 2.0 protocols to enable secure single sign-on (SSO) authentication and single logout (SLO) across multiple applications and services. SAML is an XML-based standard that allows users to authenticate once with the identity provider (IDP) and then access multiple service providers (SP) without needing to re-enter their credentials.
Think of the IDP as a trusted authentication service that acts as a central hub for user identity verification. When a user tries to access a protected application (or service provider), instead of logging in directly to that application, they are redirected to this IDP to authenticate. After the IDP authenticates the user, the IDP provides the application with a secure assertion that confirms the user's identity and authentication status.
Integrated OIDC and SAML logout
The OneWelcome Identity Platform's IDP features deep integration between the SAML and OIDC protocols. When a user authenticates through either SAML or OIDC, they establish a unified session that spans both protocols.
SLO needs some additional configuration. For SAML applications, the SP metadata needs to define a SingleLogoutService binding. Web clients with an OIDC scope need to define a front-channel logout URL.
Unified logout behavior:
-
A logout initiated through any SAML application terminates sessions across all SAML applications and all OIDC relying parties (RPs).
-
A logout initiated through any OIDC relying party terminates sessions across all OIDC RPs and all SAML applications.
This behavior ensures complete session cleanup, regardless of which protocol or application initiated the logout.
This integration prevents session leakage and security vulnerabilities that could occur if users remained logged in to applications using different protocols.
Add a SAML application
You can configure IDPs in the OneWelcome Identity Platform to provide user authentication services for your SAML applications.
This configuration has two main parts:
-
Configure the application at its source: You need the IDP metadata document, which you get from the Add SAML application page on the OneWelcome Identity Platform.
-
Configure the OneWelcome Identity Platform: You need the application metadata file, which you get from the application vendor or generate from the application's configuration.
To start, go to the Add SAML application page on the OneWelcome Identity Platform console:
-
Browse to Applications > SAML applications.
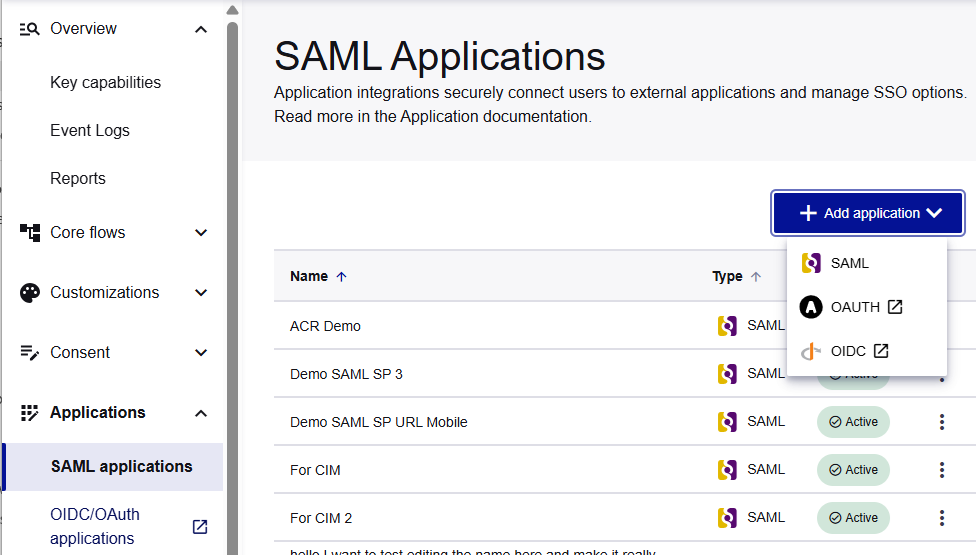
-
Select Add Application, and then select SAML.
The Add SAML application page opens.
Configure the application
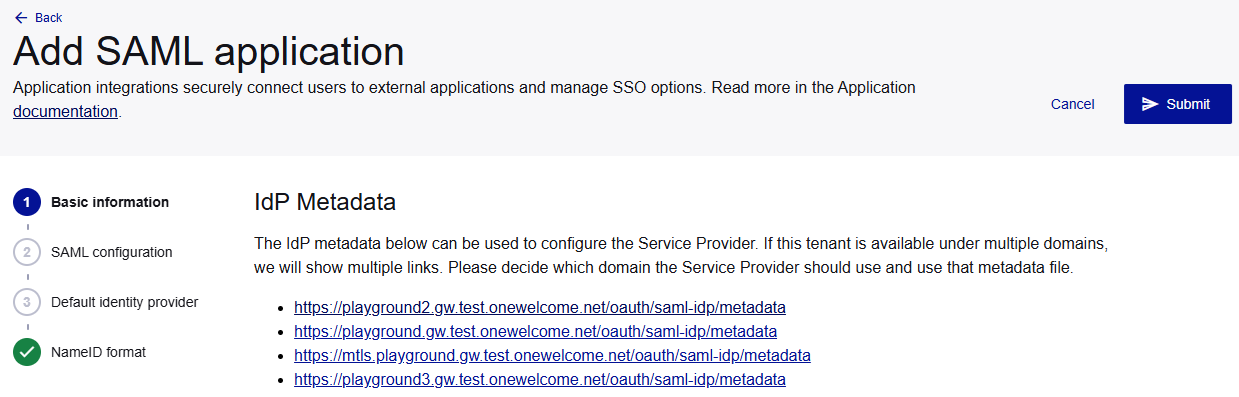
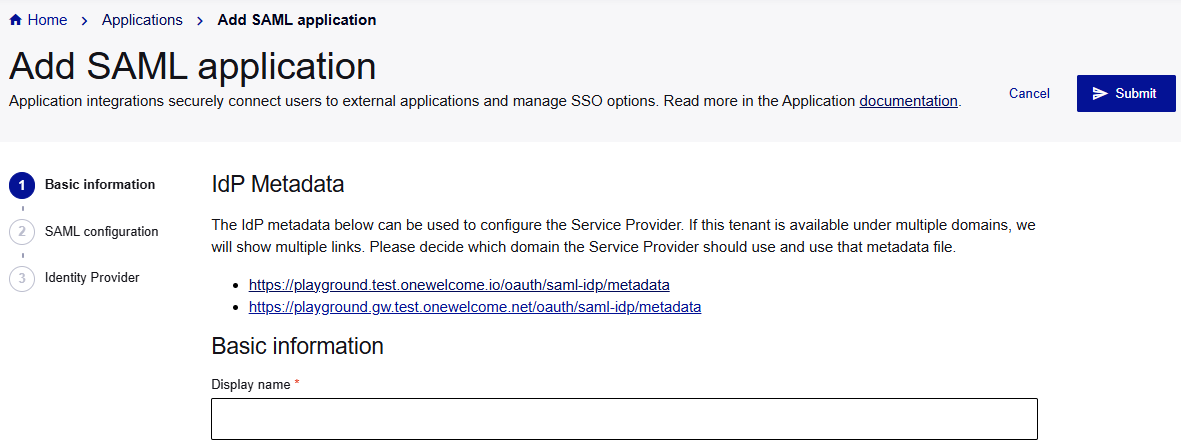
To configure the application, you need to get the IDP metadata file from the OneWelcome Identity Platform console.
The IDP publishes its metadata document at an endpoint that contains all the technical information that applications need to establish trust and communication.
When you add a SAML application in the OneWelcome Identity Platform, the Add SAML application page shows the location for the IdP Metadata. If your tenant has multiple domains, such as a domain for each brand, there is a metadata document for each domain. Choose the metadata document for the domain that the application needs.
The IDP metadata document includes the following metadata:
-
Entity ID is a unique identifier for this IDP.
-
SSO service endpoints are URLs for different binding types (POST, Redirect, Artifact).
-
Single logout service endpoints are URLs for coordinating logout operations.
-
Signing certificates are public keys used to verify SAML assertion signatures.
-
Supported name ID formats are types of user identifiers that the IDP can provide. The
NameIDformats are included here if at least one application has a (default) mapping. -
Metadata location is where you can access the IDP metadata:
https://your-idp-domain.com/oauth/saml-idp/metadata
For details about how to use the metadata to configure the application, refer to the application's documentation (search for topics such as configuring an IDP or SSO).
SAML binding support
In the IDP metadata document, the SSO service endpoints refer to the different binding types. SAML bindings define how SAML messages are transported between the IDP and applications. The OneWelcome Identity Platform's IDP supports multiple binding types to ensure compatibility with various applications:
-
HTTP-POST binding: SAML messages are embedded in HTML forms and transmitted via HTTP POST requests. This method can handle larger SAML assertions and provides better security because the SAML data is not visible in browser URL bars or server logs.
-
HTTP-redirect binding: SAML messages are encoded and transmitted as URL parameters through HTTP redirects. This method is simpler to implement but has size limitations due to browser URL length restrictions.
-
Artifact binding: This is a two-step process where a small artifact (reference token) is first sent via HTTP redirect, and then the application uses a separate back-channel SOAP request to retrieve the actual SAML assertion from the IDP. This method provides enhanced security and can handle large assertions while keeping browser interactions lightweight.
Add basic information
On the Add SAML application page, under Basic information, enter a Display name for your application.
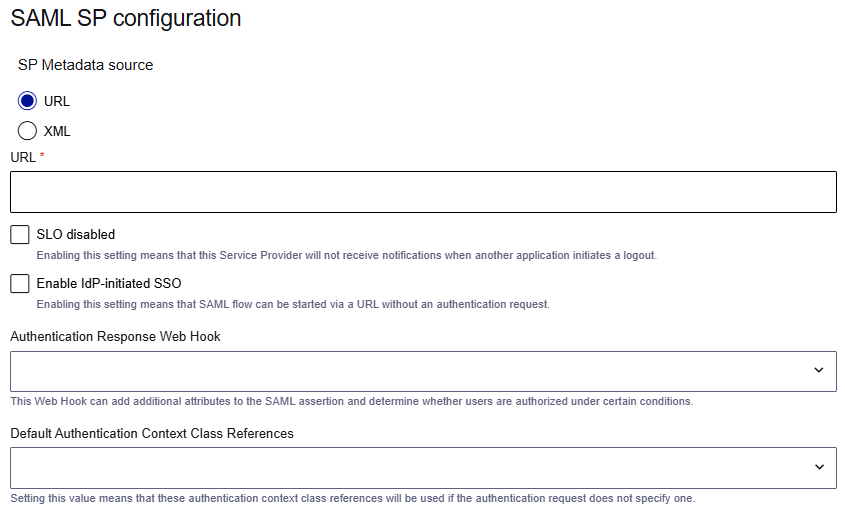
Provide application metadata
To establish a new application connection, you must upload or configure the metadata document that you which you get from the application (SP) vendor or generate from the application's configuration.
-
On the Add SAML application page, under SAML SP configuration, provide the application metadata endpoint or application metadata.
-
To provide the application metadata endpoint, select URL and enter the URL.
-
To provide the application metadata, select XML and enter the metadata XML.
The application metadata includes the following essential information:
-
Entity ID is a unique identifier for the application.
-
Assertion consumer service URLs determine where the IDP should send SAML assertions.
-
Single logout URLs are endpoints for logout coordination.
-
Required attributes provide user information that the application needs to function.
-
Certificate information provides public keys for encryption and signature verification.
-
Choose the SLO behavior
Applications can have different SLO behavior, according to their requirements:
-
Application-initiated SLO: Applications can initiate logout requests to terminate user sessions across all connected applications. When a user logs out from one application, the IDP coordinates logout across all other applications where the user has active sessions.
-
Selective logout control: You can configure specific applications to be excluded from SLO operations. This is useful for applications that need to maintain persistent sessions or that have special logout requirements.
By default, the application participates in coordinated SLO.
-
To exclude the application from SLO, select the SLO disabled check box. The application maintains its session even when other applications initiate SLO.

Choose the SSO flow
The OneWelcome Identity Platform's IDP supports the two main SSO initiation patterns:
-
SP-initiated SSO
-
IDP-initiated SSO
SP-initiated SSO
SP-initiated SSO is the more common flow where users attempt to access a protected application directly. The application (SP) detects that the user is not authenticated and redirects them to the IDP for authentication. After successful authentication at the IDP, the user is automatically redirected back to the original application with proper authentication credentials.
Use case: SP-initiated SSO is suitable for scenarios where users bookmark or navigate directly to the specific applications that they need to use.
Example: Basic SP-initiated authentication request
<samlp:AuthnRequest
    xmlns:samlp="urn:oasis:names:tc:SAML:2.0:protocol"
    xmlns:saml="urn:oasis:names:tc:SAML:2.0:assertion"
    ID="_8e8dc5f69a98cc4c1ff3427e5ce34606fd672f91e6"
    Version="2.0"
    IssueInstant="2024-12-01T10:39:34Z"
    Destination="https://your-idp-domain.com/saml/sso"
    AssertionConsumerServiceURL="https://sp.example.com/saml/acs"
    ProtocolBinding="urn:oasis:names:tc:SAML:2.0:bindings:HTTP-POST">

    <saml:Issuer>https://sp.example.com</saml:Issuer>
</samlp:AuthnRequest>
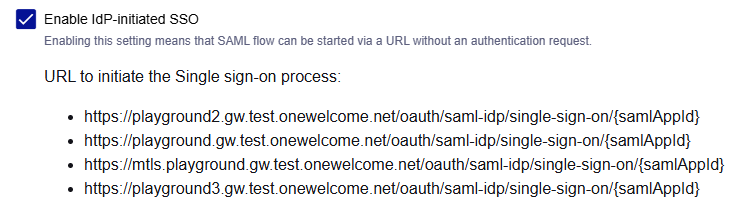
IDP-initiated SSO
With IDP-initiated SSO, users start their session by logging in to the IDP directly (for example, through a user portal or dashboard). After authentication, they can click links to access various applications without additional login prompts. The IDP generates and sends SAML assertions to the target service providers on behalf of the authenticated user.
Use case: IDP-initiated SSO is suitable for organizations with a central user portal where employees access all their applications from one location.
-
To allow IDP-initiated SSO flows, select the Enable IDP-initiated SSO check box.
SP-initiated SSO flows are always allowed.

Link an authentication response web hook
The SAML authentication response web hook is executed just before the SAML assertion is generated and returned. This web hook allows you to add additional attributes to the SAML assertion and determine whether users are authorized under certain conditions.
-
To link a web hook, select an Authentication Response Web Hook.

You define these web hooks on the Access admin console.
Specify the assurance level
Assurance levels, also known as levels of assurance (LOA) or service levels, indicate the degree of confidence in the trustworthiness of a user or transaction. They define the strength of the identity proofing, credential management, and authentication processes that are used. Higher assurance levels imply a greater degree of certainty that a user is who they claim to be.
The IDP evaluates authentication requests that specify an assurance level and either satisfies the requirement with an appropriate authentication method or denies access if the requested level cannot be met.
Example: Authentication request with a specific authentication context
The level of authentication assurance corresponds to the RequestedAuthnContext element in authentication requests. To request specific authentication methods or strength levels, applications can include a RequestedAuthnContext element in their authentication requests. The OneWelcome Identity Platform allows only an exact comparison (Comparison="exact"). However, your application can request multiple levels that it accepts.
<samlp:AuthnRequest
    xmlns:samlp="urn:oasis:names:tc:SAML:2.0:protocol"
    xmlns:saml="urn:oasis:names:tc:SAML:2.0:assertion"
    ID="_8e8dc5f69a98cc4c1ff3427e5ce34606fd672f91e6"
    Version="2.0"
    IssueInstant="2024-12-01T10:39:34Z"
    Destination="https://your-idp-domain.com/saml/sso"
    AssertionConsumerServiceURL="https://sp.example.com/saml/acs"
    ProtocolBinding="urn:oasis:names:tc:SAML:2.0:bindings:HTTP-POST">

    <saml:Issuer>https://sp.example.com</saml:Issuer>

    <samlp:RequestedAuthnContext Comparison="exact">
        <saml:AuthnContextClassRef>
            urn:onewelcome:broker:v1:apple:auth
        </saml:AuthnContextClassRef>
    </samlp:RequestedAuthnContext>
</samlp:AuthnRequest>
-
To specify the assurance level to use if the authentication request doesn't specify one, select the Default Authentication Context Class References.
The SAML protocol uses the Authentication Context Class Reference (ACR) to communicate the assurance level.

You define these assurance levels on the Applications > Assurance levels page.
Select the IDPs
You can link multiple IDPs to a single SAML SP, so that you can use the same SAML SP for both business-to-customer and employee logins.
The authentication request can overwrite the default IDP. This is only possible if the requested IDP is one of the additional IDPs that you define when you add a SAML application.
Example: Authentication request with an additional IDP
To request one of these additional IDPs, the authentication request uses the Scoping element:
<samlp:Scoping>
    <samlp:IDPList>
        <samlp:IDPEntry ProviderID="https://idp.example.com/entity"/>
    </samlp:IDPList>
</samlp:Scoping>
-
Under Identity provider, select the Default identity provider that you want to use for this application.

You configure these identity providers on the Access admin console.
-
Under Additional identity providers, select any additional IDPs that the SP can select in the authentication request.

Configure the NameID format
The NameID is the attribute that represents the user to the external portal or application. It is similar to the subject claim in the OIDC protocol.
You can configure the default NameID format and map different formats to claims.
NameID format in authentication requests
For the NameIDPolicy element in authentication requests, the IDP supports only the Format attribute.
Example: Authentication request with specific NameID format
The following example demonstrates how an application can request a specific NameID format.
<samlp:AuthnRequest
    xmlns:samlp="urn:oasis:names:tc:SAML:2.0:protocol"
    xmlns:saml="urn:oasis:names:tc:SAML:2.0:assertion"
    ID="_8e8dc5f69a98cc4c1ff3427e5ce34606fd672f91e6"
    Version="2.0"
    IssueInstant="2024-12-01T10:39:34Z"
    Destination="https://your-idp-domain.com/saml/sso"
    AssertionConsumerServiceURL="https://sp.example.com/saml/acs"
    ProtocolBinding="urn:oasis:names:tc:SAML:2.0:bindings:HTTP-POST">

    <saml:Issuer>https://sp.example.com</saml:Issuer>

    <samlp:NameIDPolicy Format="urn:oasis:names:tc:SAML:1.1:nameid-format:emailAddress"/>
</samlp:AuthnRequest>
NameID format in authentication responses
The IDP provides flexible user identification through support for multiple NameID formats, which allows applications to request the user identifier format that best suits their requirements.
Supported NameID formats
The IDP supports the following NameID formats in authentication responses:
| NameID format | Default attribute mapping |
|---|---|
| urn:oasis:names:tc:SAML:2.0:nameid-format:persistent | sub (user UUID) |
| urn:oasis:names:tc:SAML:2.0:nameid-format:transient | No default |
| urn:oasis:names:tc:SAML:2.0:nameid-format:encrypted | No default |
| urn:oasis:names:tc:SAML:2.0:nameid-format:entity | No default |
| urn:oasis:names:tc:SAML:2.0:nameid-format:kerberos | No default |
| urn:oasis:names:tc:SAML:1.1:nameid-format:WindowsDomainQualifiedName | No default |
| urn:oasis:names:tc:SAML:1.1:nameid-format:emailAddress | email |
| urn:oasis:names:tc:SAML:1.1:nameid-format:X509SubjectName | No default |
| urn:oasis:names:tc:SAML:1.1:nameid-format:unspecified | sub (user UUID) |
NameID format selection logic
The IDP determines which NameID format to use based on the order of priority:
┌──────────────────────────────────────────────────────────┐
│ 1. Explicit NameID in the authentication request         │
│    Does the application request a specific format via    │
│    the NameIDPolicy in the authentication request?       │
└───────────────────────────┬──────────────────────────────┘
                            │ No
                            ▼
┌──────────────────────────────────────────────────────────┐
│ 2. First match from the application metadata             │
│    Use the first format from the application metadata    │
│    list that the IDP supports and has a mapping for      │
└───────────────────────────┬──────────────────────────────┘
                            │ No match or not available
                            ▼
┌──────────────────────────────────────────────────────────┐
│ 3. Use the Default NameID that is specified in the       │
│    NameID section on the SAML application page           │
└───────────────────────────┬──────────────────────────────┘
                            │ No default
                            ▼
┌──────────────────────────────────────────────────────────┐
│ 4. Fallback to unspecified                               │
│    For the final fallback, use:                          │
│    urn:oasis:names:tc:SAML:1.1:nameid-format:unspecified │
└──────────────────────────────────────────────────────────┘
Configure the NameID format and mappings
-
Under NameID Format, select the Default NameID Format to use when the format is not specified in the authentication request or application metadata.
The list includes the support NameID formats.
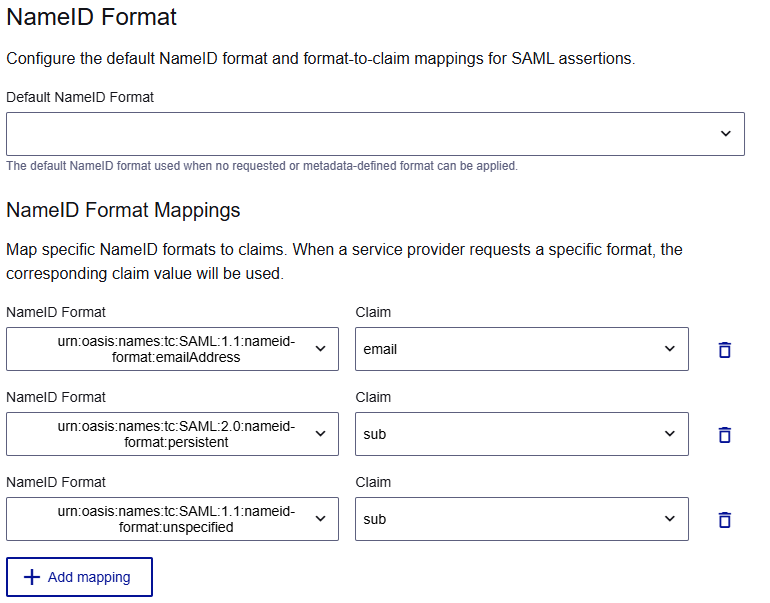
-
Under NameID Format Mappings, select a NameID Format to map, and then select the Claim or enter a custom claim name.
The selected NameID format must have a configured attribute mapping (either default or custom). The mapped attribute must be available during authentication.
Example: NameID in SAML assertion
<saml:Subject>
    <saml:NameID Format="urn:oasis:names:tc:SAML:2.0:nameid-format:persistent">
        a1b2c3d4-e5f6-7890-ab12-cd34ef567890
    </saml:NameID>
    <saml:SubjectConfirmation Method="urn:oasis:names:tc:SAML:2.0:cm:bearer">
        <saml:SubjectConfirmationData
            NotOnOrAfter="2024-12-01T11:39:34Z"
            Recipient="https://sp.example.com/saml/acs"/>
    </saml:SubjectConfirmation>
</saml:Subject>
The claim can be an identity store attribute, an attribute that is returned for the SAML authentication response web hook, or a custom claim.
-
To add another mapping, select Add mapping.
Save and test the SAML integration
-
After you finish configuring the SAML application, select Submit.

-
Test the integration using both IDP-initiated and SP-initiated flows.
Troubleshooting SAML integrations
The IDP provides detailed logging and diagnostic information to help identify and resolve integration issues quickly.
When troubleshooting SAML integration issues, check the following common issues:
-
Clock synchronization between the IDP and SP systems
-
Certificate validity and proper configuration
-
Expired or outdated application (SP) or IDP metadata
-
Correct URL configuration for SSO and SLO endpoints
-
Attribute mapping and name ID format compatibility
-
Network connectivity for back-channel communications (especially for artifact binding)
Passive authentication requests
In passive mode, the IDP only authenticates the user if they already have an active session. If no active session exists, the IDP does not prompt for credentials, but instead returns an authentication failure response. To make passive authentication requests, applications set the IsPassive attribute to true.
Use case: Passive authentication requests are useful for background authentication checks or when applications want to verify user authentication status without interrupting the user experience with login prompts.
Example: Passive authentication request
<samlp:AuthnRequest
    xmlns:samlp="urn:oasis:names:tc:SAML:2.0:protocol"
    xmlns:saml="urn:oasis:names:tc:SAML:2.0:assertion"
    ID="_8e8dc5f69a98cc4c1ff3427e5ce34606fd672f91e6"
    Version="2.0"
    IssueInstant="2024-12-01T10:39:34Z"
    Destination="https://your-idp-domain.com/saml/sso"
    AssertionConsumerServiceURL="https://sp.example.com/saml/acs"
    ProtocolBinding="urn:oasis:names:tc:SAML:2.0:bindings:HTTP-POST"
    IsPassive="true">

    <saml:Issuer>https://sp.example.com</saml:Issuer>
</samlp:AuthnRequest>
Authorization extensions
The OneWelcome Identity Platform supports optional request parameters for SAML authorization endpoints. These parameters enhance flexibility and enable richer integrations by passing custom context data through both SAML SP-initiated and IDP-initiated SSO flows.
Optional parameters in SAML flows
Optional parameters in SP-initiated SSO
To use optional parameters in an SAML flows, take the SSO URL from the <SingleSignOnService> element of your SAML metadata and append your parameters as query string arguments.
Example: SAML SP-initiated SSO:
https://your-idp-domain.com/oauth/saml-idp/single-sign-on?hook_context_custom_param.key1=val1
Optional parameters in IDP-initiated SSO
After you select the Enable IDP-initiated SSO check box, SAML application page lists the URLs to initiate SSO:
Supported parameters
hook_context_custom_param
Use the hook_context_custom_param parameter to populate the contextCustomParams key value map in the SAML authentication response web hook.
Example value:
hook_context_custom_param.key1=val1&hook_context_custom_param.key2=val2&hook_context_custom_param.key2=val3
This example shows the ability to pass multiple keys: key1 and key2. It also shows multiple values for a single key: key2 has values val2 and val3. The contextCustomParams key value map for the above example value, has the following entries:
| Key | Value |
|---|---|
| key1 | ["val1"] |
| key2 | ["val2", "val3"] |
Example use case: Provide context like on_behalf_of and on_behalf_of_type to make integration with our Externalized Authorization product possible.