Red Hat Single Sign-On
Red Hat Single Sign-On (RH-SSO) provides a streamlined solution for securing web applications and RESTful services using open standards such as OpenID Connect and SAML 2.0. It enables developers to implement single sign-on without building custom security mechanisms. This guide explains how to generate and manage RH-SSO realm signing keys using Luna HSM. These keys are used to sign access tokens and XML documents exchanged between the authentication server and client applications. Integrating Luna HSM with Red Hat SSO for key generation and storage provides several key benefits:
-
Secure generation, storage, and protection of the identity signing private keys using either FIPS 140-2 or FIPS 140-3 Level 3 validated hardware.
-
Full life cycle management of the keys to ensure their integrity and reliability throughout their usage.
-
Maintenance of a comprehensive HSM audit trail for transparency and accountability in key operations. It's important to note that Luna Cloud HSM service does not have access to this secure audit trail.
-
Significant performance enhancements by offloading cryptographic operations from application servers.
Supported Platforms
This integration has been tested on the following environment:
| HSM Type | Operating System | JDK Version | Red Hat Single Sign-On Version |
|---|---|---|---|
| Luna HSM | RHEL 8 | OpenJDK 11 | RH-SSO 7.6 |
To integrate with Red Hat Single Sign-On, ensure that you are using Luna Client version 10.4 or newer.
A patch is available from Thales Support that includes the Luna SPI plugin, allowing Red Hat Single Sign-On to create and manage signing keys using Luna HSM. While the patch may reference Keycloak, it is fully compatible with Red Hat Single Sign-On.
Prerequisites
The prerequisites for this integration are:
Set up On-Premise Luna HSM
Follow these steps to set up your on-premise Luna HSM:
Ensure that the HSM is set up, initialized, provisioned, and ready for deployment. For more information, refer to Luna HSM documentation.
Create a partition that will be later on used by Red Hat Single Sign-On.
Create and exchange certificate between the Luna Network HSM and client system. Register client and assign partition to create an NTLS connection.
Initialize Crypto Officer and Crypto User roles for the registered partition.
Run the following command to verify that the partition has been successfully registered and configured:
C:\Program Files\SafeNet\LunaClient>lunacm.exe
Upon successful execution, you should observe an output similar to the example provided below:
lunacm.exe (64-bit) v10.4.0-417. Copyright (c) 2021 SafeNet. All rights reserved.
Available HSMs:
Slot Id ->                           0
Label ->                             TPA01
Serial Number ->                     1312109861412
Model ->                             LunaSA 7.7.1
Firmware Version ->                  7.7.1
Bootloader Version ->                1.1.2
Configuration ->                     Luna User Partition With SO (PW) Key Export With Cloning Mode
Slot Description ->                  Net Token Slot
FM HW Status ->                      Non-FM
Current Slot Id: 0
Refer to Luna HSM documentation for detailed steps on creating NTLS connection, initializing the partitions, and assigning various user roles.
Set up Luna HSM High-Availability Group
Refer to Luna HSM documentation for HA steps and details regarding configuring and setting up two or more HSM boxes on host systems. You must enable the HAOnly setting in HA for failover to work so that if the primary goes down due to any reason, all calls get automatically routed to the secondary until the primary recovers and starts up.
This integration has undergone testing in both HA and FIPS modes.
Managing User Access to Your HSM
Initially, only the root user can access the Hardware Security Module (HSM). However, you can grant access to specific non-root users by including them in the hsmusers group. This group is automatically created when you install the client software. Even if you later uninstall the client software, the hsmusers group remains intact, ensuring you can upgrade your software without losing your user access settings.
To add users to the hsmusers group
If you wish to permit non-root users or applications to interact with the HSM device, you must assign these users to the hsmusers group. Make sure that the users you intend to add to the hsmusers group are already established on the client workstation. Only users added to the hsmusers group will be granted access to the HSM device. Follow these steps to add a user to the hsmusers group:
Ensure that you possess sudo privileges on the client workstation.
Add a user to the hsmusers group using the command:
sudo gpasswd --add <username> hsmusers
Replace username with the actual username you want to include in the hsmusers group.
To remove users from the hsmusers group
If you need to withdraw a user's authorization to access the HSM device, you can remove them from the hsmusers group. Carry out the following steps to remove a user from the hsmusers group:
Confirm that you hold sudo privileges on the client workstation.
Eliminate a user from the hsmusers group using the command:
sudo gpasswd --add <username> hsmusers
Replace username with the specific username you want to exclude from the hsmusers group. To observe the changes, you will need to log in again.
Any user you remove will retain access to the HSM device until the client workstation is rebooted.
Download the Red Hat Single Sign-On Luna SPI Patch
Red Hat Single Sign-On does not natively support the Luna HSM Keystore. However, integration is possible using a custom plugin built through the Signature Provider Interface (SPI). To obtain this plugin, contact Thales Customer Support, which will provide a patch containing the Luna SPI plugin. This plugin enables Red Hat Single Sign-On to interact with the Luna Keystore and use signing keys generated on Luna HSM.
The README included with the patch may refer to a specific version of Keycloak. However, this guide takes precedence regarding the supported versions of Red Hat Single Sign-On.
Install Java Development Kit
Ensure that the Java Development Kit (JDK) is installed on the system where you plan to run the configuration commands. You can execute the commands outlined in this guide on any machine where the keytool utility is available.
Set Up Red Hat Single Sign-On Server
Ensure that the Red Hat Single Sign-On (RH-SSO) server is properly installed and running. You must also create the initial Admin user to access the Admin Console and perform key management operations. For setup instructions, refer to the official Red Hat Single Sign-On 7.6 Getting Started Guide. Once the server is up, access the Admin Console via the Administration Console link on the Welcome page or by navigating to http://<hostname>:8080/auth/admin/, replacing <hostname> with your server’s actual hostname or IP address.
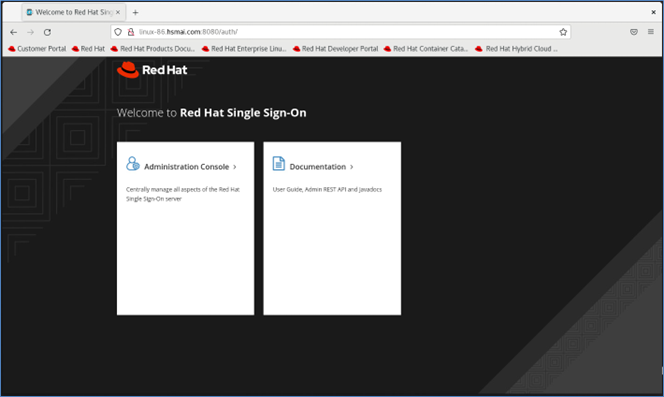
Configuring Red Hat Single Sign-On to Use Luna HSM
This section outlines the steps required to generate realm signing keys and certificates on a Luna HSM, and to configure Red Hat Single Sign-On (RH-SSO) to use these HSM-backed keys for signing access tokens and XML documents. The integration involves the following high-level steps:
Configure Java for Luna Keystore
To generate signing keys on Luna HSM through Java, you must first configure your Java environment to use the Luna Provider, as follows:
Set the environment variables for JAVA_HOME and PATH.
export JAVA_HOME=/path/to/JDK_installation_directory
export PATH=$JAVA_HOME/bin:$PATH
Copy the required Luna libraries to the Java extension directory.
cp //jsp/lib/libLunaAPI.so $JAVA_HOME/jre/lib/ext cp / /jsp/lib/LunaProvider.jar $JAVA_HOME/jre/lib/ext
Note: This step is required for JDK 8 only. Skip this step for JDK 11.
Edit the Java security provider list to register the Luna Provider.
- For JDK 11, edit the file:
$JAVA_HOME/conf/security/java.security
Update the list of providers as follows:
  security.provider.1=SUN
  security.provider.2=SunEC
  security.provider.3=SunJSSE
  security.provider.4=SunJCE
  security.provider.5=SunJGSS
  security.provider.6=SunSASL
  security.provider.7=XMLDSig
  security.provider.8=SunPCSC
  security.provider.9=JdkLDAP
  security.provider.10=JdkSASL
  security.provider.11=SunPKCS11
  security.provider.12=com.safenetinc.luna.provider.LunaProvider
  security.provider.13=SunRsaSign
- For JDK 8, edit the file:
$JAVA_HOME/jre/lib/security/java.security
Update the list of providers as follows:
  security.provider.1=sun.security.provider.Sun
  security.provider.2=sun.security.rsa.SunRsaSign
  security.provider.3=sun.security.ec.SunEC
  security.provider.4=com.sun.net.ssl.internal.ssl.Provider
  security.provider.5=com.sun.crypto.provider.SunJCE
  security.provider.6=sun.security.jgss.SunProvider
  security.provider.7=com.sun.security.sasl.Provider
  security.provider.8=org.jcp.xml.dsig.internal.dom.XMLDSigRI
  security.provider.9=sun.security.smartcardio.SunPCSC
  security.provider.10=com.safenetinc.luna.provider.LunaProvider
Save and close the java.security file after adding the Luna Provider entry.
Create a text file with a custom name (e.g., lunastore) and add the following content:
tokenlabel:
Replace <partition_label> with the actual name of your Luna HSM partition.
Save the lunastore file in your current working directory. For example, you may store it in a path such as /opt.
Generate Signing Keys and Certificate on Luna Keystore
The signing key pair and certificate must be generated on Luna HSM using the keytool utility provided with the Java Development Kit (JDK). Follow the steps below to create and prepare the key material.
Generate a signing key and self-signed certificate using the keytool utility. This stores the key pair directly in the Luna keystore.
- For JDK 11:
keytool -genkeypair -alias lunakey -keyalg RSA -keysize 2048 -sigalg SHA256withRSA \
-keypass userpin1 -keystore lunastore -storetype luna -storepass userpin1 \
-providerpath "/usr/safenet/lunaclient/jsp/lib/LunaProvider.jar" \
-providerclass com.safenetinc.luna.provider.LunaProvider \
-J-Djava.library.path=/usr/safenet/lunaclient/jsp/lib/ \
-J-cp -J/usr/safenet/lunaclient/jsp/lib/LunaProvider.jar
- For JDK 8:
keytool -genkeypair -alias lunakey -keyalg RSA -keysize 2048 -sigalg SHA256withRSA \
-keypass userpin1 -keystore lunastore -storetype luna -storepass userpin1
When prompted, enter certificate details such as Common Name, Organization, and Country. A new RSA key pair will be securely generated and stored in the Luna HSM.
Both -storepass and -keypass refer to the Crypto Officer (CO) password set during partition initialization.
Generate a Certificate Signing Request (CSR) for the key stored in the Luna keystore.
- For JDK 11:
keytool -certreq -alias lunakey -sigalg SHA256withRSA -file certreq_file \
-keystore lunastore -storetype luna \
-providerpath "/usr/safenet/lunaclient/jsp/lib/LunaProvider.jar" \
-providerclass com.safenetinc.luna.provider.LunaProvider \
-J-Djava.library.path=/usr/safenet/lunaclient/jsp/lib/ \
-J-cp -J/usr/safenet/lunaclient/jsp/lib/LunaProvider.jar
- For JDK 8:
keytool -certreq -alias lunakey -sigalg SHA256withRSA -file certreq_file \
-keystore lunastore -storetype luna
When prompted, enter the keystore password. A CSR file named certreq_file will be generated in the current working directory.
Submit the CSR to your internal or external CA. Request signing using the Code Signing certificate template. Once approved, the CA will return a signed certificate or certificate chain. Save both the signed certificate (e.g., signing.p7b) and the CA root certificate (e.g., root.cer) in your current working directory.
Import the CA root certificate and signed certificate chain into the Luna keystore.
- For JDK 11:
To import the CA root certificate:
keytool -trustcacerts -importcert -alias rootca -file root.cer \
-keystore lunastore -storetype luna \
-providerpath "/usr/safenet/lunaclient/jsp/lib/LunaProvider.jar" \
-providerclass com.safenetinc.luna.provider.LunaProvider \
-J-Djava.library.path=/usr/safenet/lunaclient/jsp/lib/ \
-J-cp -J/usr/safenet/lunaclient/jsp/lib/LunaProvider.jar
To import the signed certificate or certificate chain:
keytool -importcert -trustcacerts -alias lunakey -file signing.p7b \
-keystore lunastore -storetype luna \
-providerpath "/usr/safenet/lunaclient/jsp/lib/LunaProvider.jar" \
-providerclass com.safenetinc.luna.provider.LunaProvider \
-J-Djava.library.path=/usr/safenet/lunaclient/jsp/lib/ \
-J-cp -J/usr/safenet/lunaclient/jsp/lib/LunaProvider.jar
- For JDK 8:
To import the CA root certificate:
keytool -trustcacerts -importcert -alias rootca -file root.cer \
-keystore lunastore -storetype luna
To import the signed certificate or certificate chain:
keytool -importcert -trustcacerts -alias lunakey -file signing.p7b \
-keystore lunastore -storetype luna
Replace root.cer and signing.p7b with the actual filenames of your CA root certificate and signed certificate chain. When prompted, enter the keystore password.
Verify the keystore contents to confirm successful key and certificate import.
- For JDK 11:
keytool -list -v -keystore lunastore -storetype luna \
-providerpath "/usr/safenet/lunaclient/jsp/lib/LunaProvider.jar" \
-providerclass com.safenetinc.luna.provider.LunaProvider \
-J-Djava.library.path=/usr/safenet/lunaclient/jsp/lib/ \
-J-cp -J/usr/safenet/lunaclient/jsp/lib/LunaProvider.jar
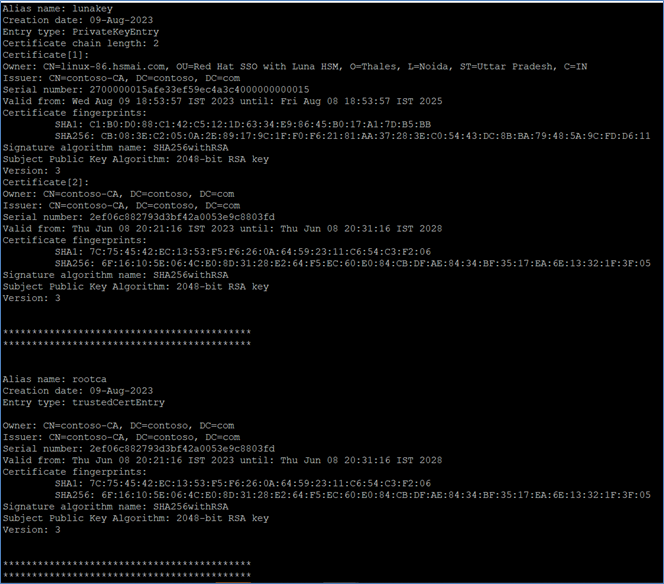
- For JDK 8:
keytool -list -v -keystore lunastore -storetype luna
Configure Red Hat Single Sign-On for Luna Plugin
To enable Red Hat Single Sign-On (RH-SSO) to use the Luna Keystore and signing keys generated on Luna HSM, you must install the Luna SPI plugin provided by Thales.
Contact Thales Customer Support to obtain the Luna plugin patch for RH-SSO integration. This patch contains the Luna SPI plugin required for enabling Luna Keystore support within Red Hat Single Sign-On.
Extract the patch archive and copy the plugin ZIP file to the RH-SSO modules directory.
tar -xvf 630-000621-001_SW_Patch_keycloak_integration_Custom_Release.tar
cp 630-000621-001_SW_Patch_keycloak_integration_Custom_Release/keycloak-spi-luna-keystore-1.1-assemblyModule.zip /opt/rh-sso/modules/
Navigate to the RH-SSO modules directory and extract the plugin ZIP file.
cd /opt/rh-sso/modules/
unzip keycloak-spi-luna-keystore-1.1-assemblyModule.zip

Navigate to the plugin directory and create the required subdirectory structure for native libraries.
cd /opt/rh-sso/modules/com/safenetinc/luna/
mkdir -p main/lib/linux-x86_64
Copy the LunaProvider.jar file into the main folder.
cp /usr/safenet/lunaclient/jsp/lib/LunaProvider.jar main/
Copy the libLunaAPI.so file into the main/lib/linux-x86_64 directory.
cp /usr/safenet/lunaclient/jsp/lib/libLunaAPI.so main/lib/linux-x86_64/
Create a module.xml file in the main directory and define the module configuration as shown below.
cd main
vi module.xml
Add the following content to module.xml:
<module name="com.safenetinc.luna" xmlns="urn:jboss:module:1.9">
  <resources>
    <resource-root path="LunaProvider.jar"/>
  </resources>
  <dependencies>
    <module name="java.logging"/>
  </dependencies>
</module>
Verify that the following files are now present in the directory /opt/rh-sso/modules/com/safenetinc/luna/main:
LunaProvider.jarmodule.xmllib/linux-x86_64/libLunaAPI.so

Navigate to the Luna plugin provider directory created within the RH-SSO modules path.
cd /opt/rh-sso/modules/com/safenetinc/luna/keycloak/provider/
Create a main subdirectory under the provider directory.
mkdir main
Move the plugin JAR file and its corresponding module.xml into the main directory.
mv keycloak-spi-luna-keystore-1.1.jar module.xml main/
Verify that both keycloak-spi-luna-keystore-1.1.jar and module.xml are now located in the following directory:
/opt/rh-sso/modules/com/safenetinc/luna/keycloak/provider/main

Ensure that the module.xml file within the main folder contains the following configuration, including the correct JAR filename:
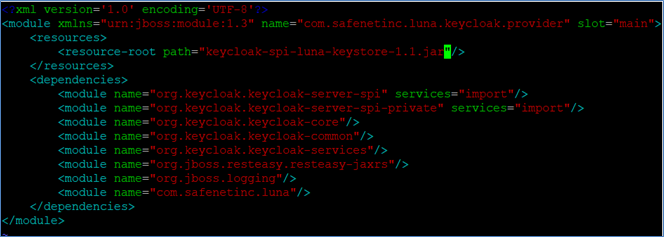
Edit the RH-SSO configuration file (standalone.xml) to register the Luna plugin provider and enable the SPI.
vi /opt/rh-sso/standalone/configuration/standalone.xml
Insert the following entries into their respective sections in the XML file:
- Under the
<providers>section:
  <provider>
    module:com.safenetinc.luna.keycloak.provider
  </provider>
- Under the
<spi name="keys">section:
  <spi name="keys">
    <provider name="luna-keystore" enabled="true"/>
  </spi>
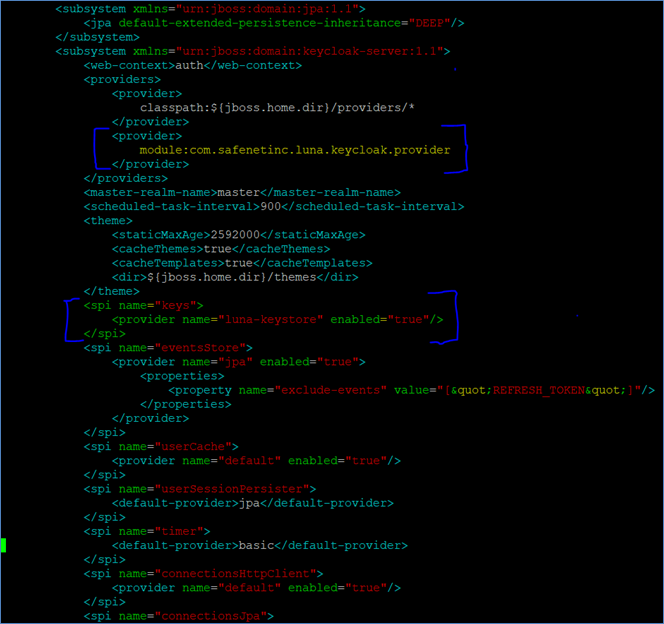
Ensure that the luna-keystore SPI is listed as the first <spi> block under the <subsystem> to prioritize Luna integration. Do not remove any existing SPIs.
Save and exit the standalone.xml file. If the RH-SSO server is currently running, stop it. Then, start the server using the following command:
/opt/rh-sso/bin/standalone.sh
On successful startup, the server logs will display a confirmation message indicating that the Luna plugin has been enabled.

Configure Red Hat Single Sign-On to Use Signing Keys from Luna Keystore
Use the Red Hat Single Sign-On Admin Console to configure the Luna Keystore as a provider. This allows RH-SSO to use signing keys generated and stored securely on Luna HSM.
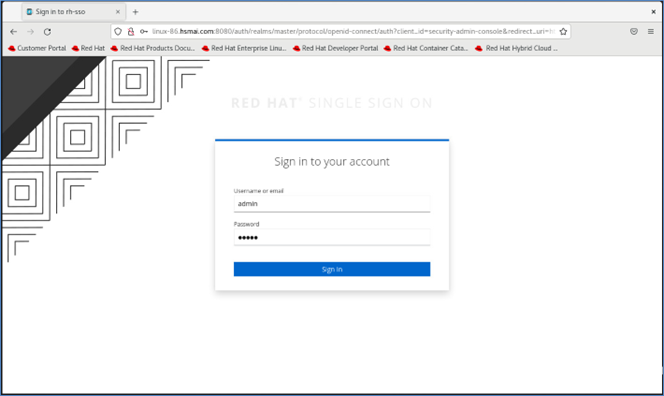
Log in to the RH-SSO Admin Console. Open a browser and navigate to http://<hostname>:8080/auth/admin/.
Navigate to the Realm Settings > Keys page.
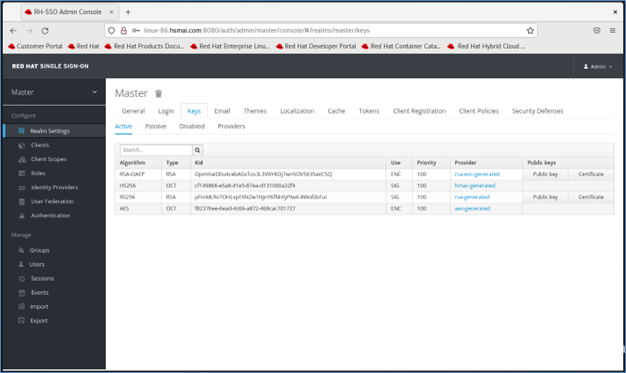
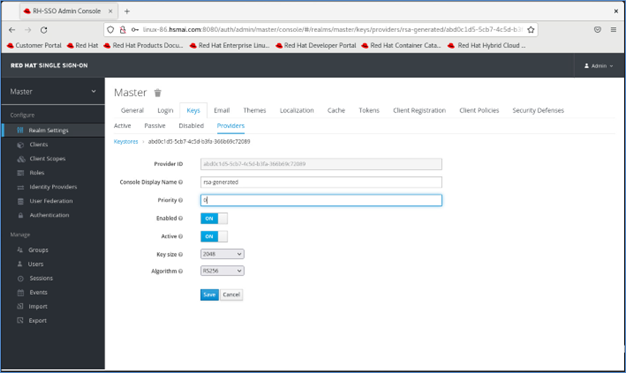
Under the Keys tab, locate the entry where the Provider is rsa-generated. Click it and change its Priority from 100 to 0. Click Save to apply the changes.
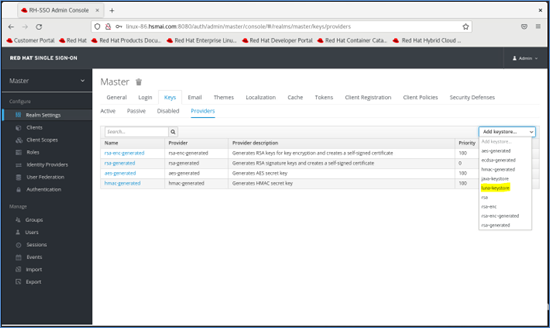
Go to the Providers tab under Realm Settings > Keys, then click Add keystore... and select luna-keystore.
Fill in the required configuration fields for the Luna Keystore provider:
- Priority:
100 - Keystore: Full path to the
lunastorefile - Keystore Password: Crypto Officer password for the Luna partition
- Key Alias: Label of the key created in Luna HSM
- Key Password: Password used when generating the key pair
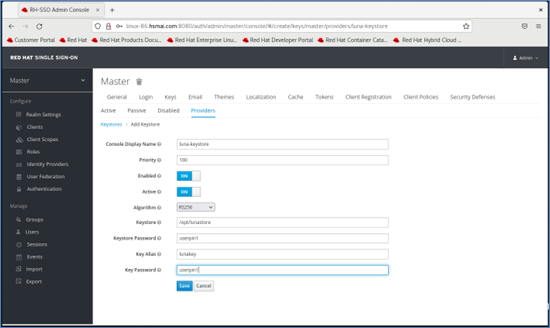
Click Save. A confirmation message will appear once the provider is successfully added, and related fields will become read-only.
Verify that the Luna keystore is active.
Return to Realm Settings > Keys. Ensure that the luna-keystore provider and the key stored on Luna HSM are now listed with the highest priority (100). This ensures that the Luna-based key is used for token signing.
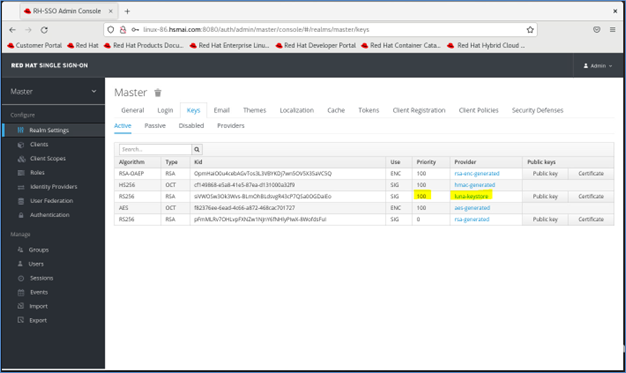
Restart the RH-SSO server to activate the new keystore configuration.
/opt/rh-sso/bin/standalone.sh
After the restart, RH-SSO will begin using the signing key stored on Luna HSM. This key will be used to sign all authentication tokens issued during login sessions. You can now proceed to create users, roles, and clients securely using RH-SSO.
If the Luna HSM is unavailable or if NTLS connectivity fails, RH-SSO will be unable to retrieve the signing key. As a result, login to the Admin Console will fail, and token signing operations will be disrupted.
This completes the integration of Red Hat Single Sign-On with Luna HSM, ensuring secure generation, storage, and use of signing keys and certificates.

