
Security Orchestration with Cortex XSOAR
The SafeNet Trusted Access (STA) integration with Cortex XSOAR from Palo Alto Networks enables you to process alerts received from STA that indicate security risk to end-user accounts, and applies security remediation actions on STA alerts through Cortex XSOAR Security Orchestration Playbooks. The integration comes with an example playbook that you can use as part of your automated security response mechanisms. The playbook can also be a starting point for the creation of your own custom playbooks that may be triggered by alerts from STA or other systems, and include remediation actions on STA.
This integration is configured through the SafeNet Trusted Access Pack available on the Cortex XSOAR marketplace.
This integration documentation is divided into the following three parts:
-
Invoking remediation action on STA from the Cortex XSOAR playbook
-
Integrating alerts from STA to trigger incidents in Cortex XSOAR
-
Example use cases integrating a STA alerts and remediation actions on STA
Invoking Remediation Actions on STA
As a prerequisite, you must have Cortex XSOAR installed and running on your machine.
Cortex XSOAR can invoke remediation actions on STA as part of response playbooks. This is achieved by invoking Rest API calls from STA. The following table lists the remediation actions that can be applied on STA and the steps to configure Cortex XSOAR and STA for the invocation of the remediation actions:
| Remediation Action | Steps to Configure Cortex XSOAR and STA for the Invocation of the Remediation Actions |
|---|---|
- Terminate users’ SSO sessions - Any other action |
|
Add users to an Unusual Activity group |
Generating an API Key
An API key allows Cortex XSOAR to communicate with STA Rest APIs to perform the remediation action. Perform the following steps to generate the API key:
-
Log in to the STA Access Management console as an administrator.
-
On the console, in the left pane, at the bottom, click the Settings icon
 .
. -
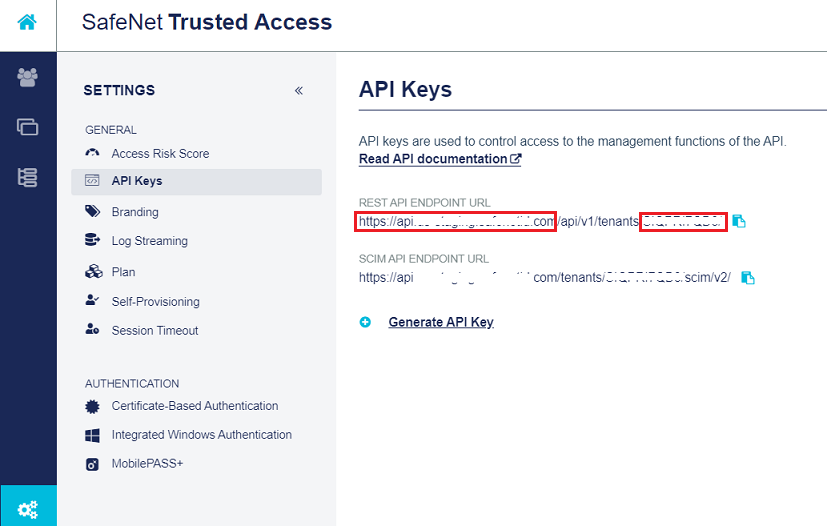
In the right pane, under API Keys, perform the following steps:
-
From the REST API ENDPOINT URL field, copy the End Point Base URL that is in the https://api.[name].com format (for example, https://api.safenet.com) and paste it in a text editor. The base URL is highlighted in the below screenshot.
-
From the REST API ENDPOINT URL field, copy the Tenant Code (for example, HOESABCHA9) and paste it in the text editor. The tenant code is highlighted in the below screenshot.
You will need the End Point Base URL and Tenant Code while configuring Cortex XSOAR.
-
Click on the Generate API Key link.
-
-
On the Generate New API Key window, perform the following steps:
-
Under Name, enter a name for the key (for example, Cortex XSOAR API Key) that you can easy identify and manage.
-
Under Service Account, search for the service account user ID that you want to associate with the API key.
Each API key can be associated with only one service account.
-
Click Next. The API key will be generated.

-
-
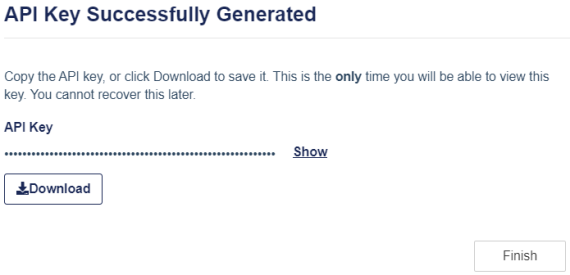
On the API Key Successfully Generated window, perform the following steps:
-
Click Download to download the API key and save it on your local machine. You will need the API key while configuring Cortex XSOAR.
Ensure to download the API key here while performing this step because API keys are not stored on the STA Access Management console, and you cannot view or download API keys later.
-
Click Finish.
This API key can be used for invoking both the remediation actions:
- Adding a user to the unusual activity group after receiving a push reject notification alert.
- Terminating a user’s single sign on session after receiving an account lockout alert. -
Installing and Configuring SafeNet Trusted Access Integration Instance
Install the SafeNet Trusted Access content pack and configure the integration instance to establish a communication between STA and Cortex XSOAR. Perform the following steps:
-
Log in to Cortex XSOAR as an administrator using the https://<Fully Qualified Domain Name>/#/login URL.
Where, <Fully Qualified Domain Name> is the fully qualified domain name of the machine on which Cortex XSOAR is installed.
For example, https://cortex.safenet.com/#/login
-
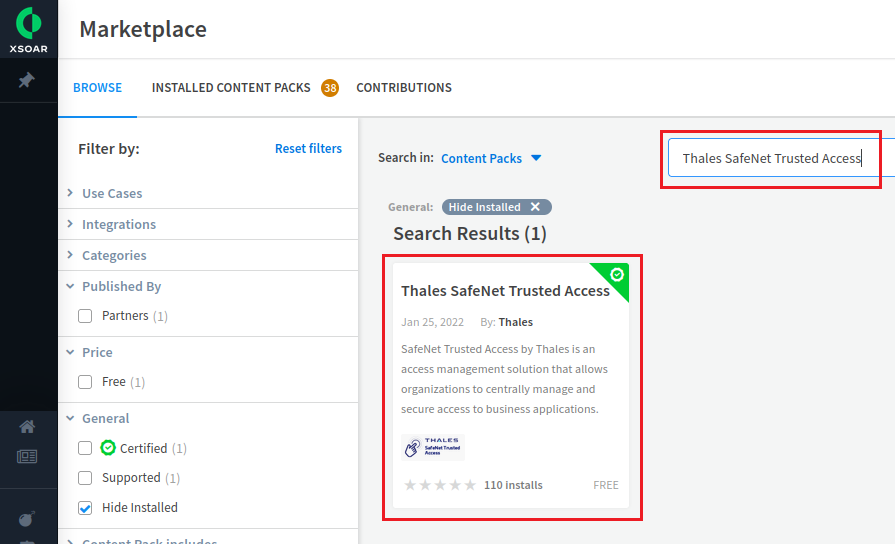
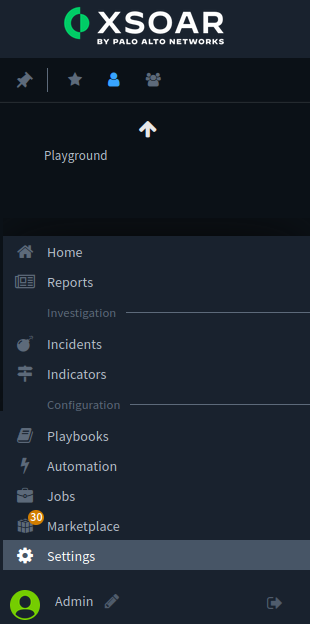
On the Cortex XSOAR dashboard, in the left pane, click Marketplace.
-
In the right pane, search for SafeNet Trusted Access and from the search results, click the SafeNet Trusted Access content pack.
-
On the top right-hand side of the window, click Install.
-
Under Cart, at the bottom, click Install.

-
After successful installation of the STA content pack, click Refresh Content.
If the Refresh Content button is not displayed after few seconds, refresh the page.
After successful installation, the Installed message is displayed.

-
In the left pane, click Settings.
-
In the right pane, under Settings, on the INTEGRATIONS tab, on the Servers & Services subtab, search for SafeNet Trusted Access.
-
Under Authentication, the SafeNet Trusted Access content pack is displayed. Click Add instance to create a new integration instance.

-
Under Thales SafeNet Trusted Access (Partner Contribution), under Instance Settings, perform the following steps:
-
In the Name field, enter an instance name of your choice (for example, SafeNet Trusted Access_instance_1). Copy the instance name and paste it in a text editor for future purpose.
The instance name will be used as an input by the playbook to communicate with your tenant using the configured API key.
This instance can be used for invoking both use cases:
- Adding a user to the unusual activity group after receiving a push reject notification alert.
- Terminating a user’s single sign on session after receiving an account lockout alert. -
In the URL field, enter the Endpoint Base URL that you copied in Step 3(a) of Generating an API Key.
-
In the Tenant Code field, enter the tenant code that you copied in Step 3b of Generating an API Key.
-
In the API Key field, enter the API key that you downloaded in Step 5 of Generating an API Key.
-
Click Test to validate the connection.
-
Click Save & exit.
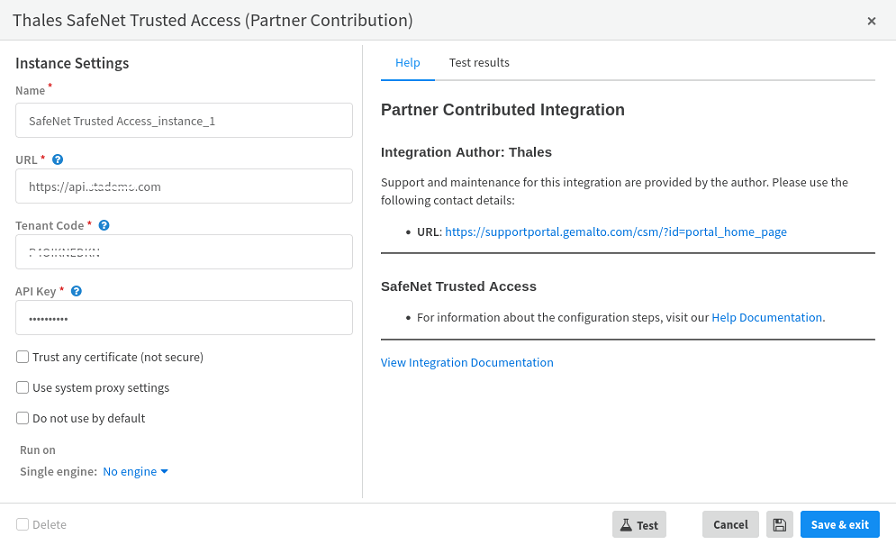
The instance (for example, SafeNet Trusted Access_instance_1) is added.

-
Creating a User Group in STA
Users who reject the Push Notification can be added in a group. Perform the following steps to create a group in STA:
-
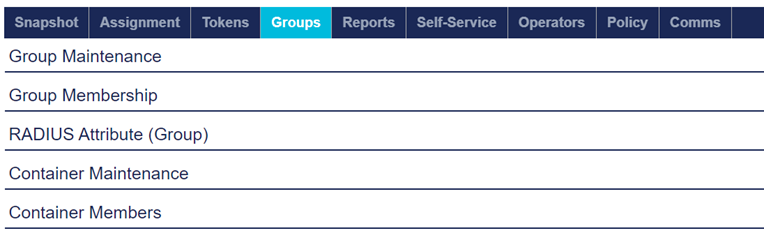
On the STA Token Management console, click the Groups tab, and then click Group Maintenance.
-
Under Group Maintenance, click New.
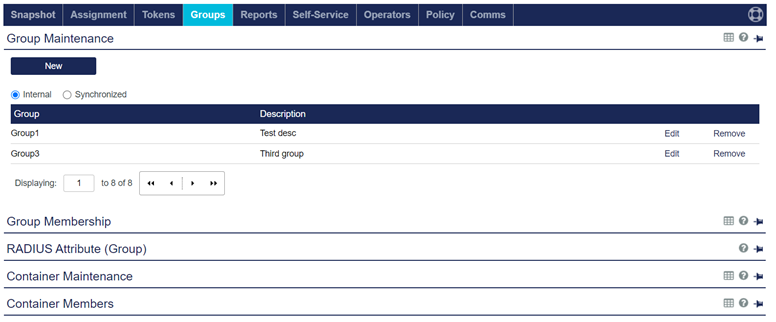
Ensure that the Internal option is selected.
-
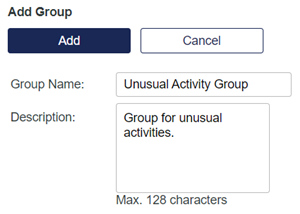
Under Add Group, perform the following steps:
-
In the Group Name field, enter a name for the group (for example, Unusual Activity Group).
Copy the group name and paste it in a text editor. You will need the group name while configuring Cortex XSOAR.
-
In the Description field, enter a description of the group.
-
Click Add.
-
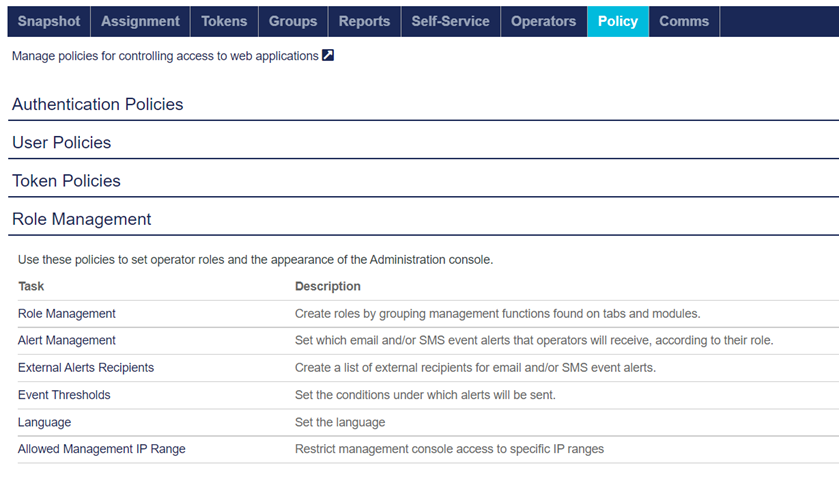
Configuring Group Policies
After receiving a Push Notification Rejection alert, you will need to impose stronger authentication on the next user login attempt by configuring stringent policies on the Unusual Activity group as per your requirements.
Perform the following steps to configure a policy for the user group:
-
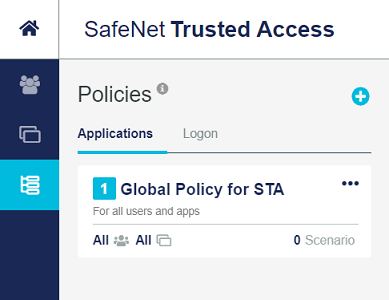
On the STA Access Management console, in the left pane, click the Policies
 icon.
icon. -
In the middle pane, under Policies, click the Add icon
 .
.
-
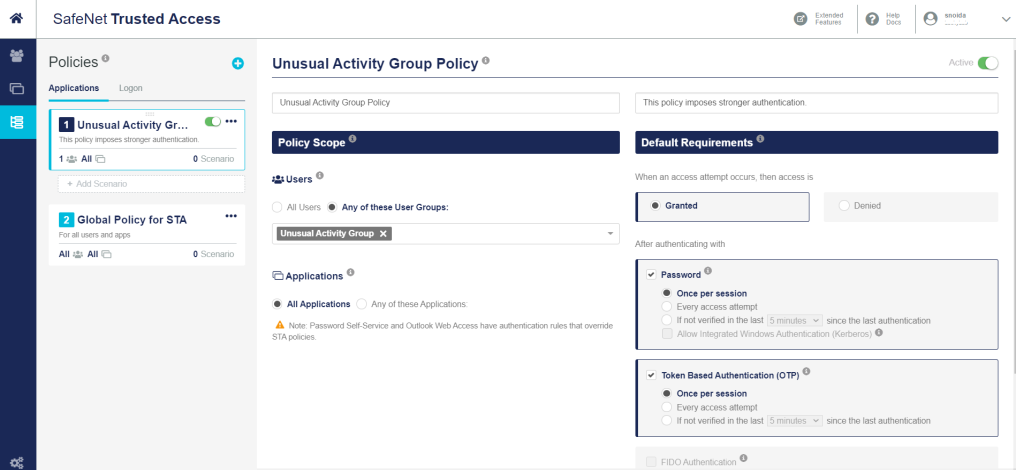
In the right pane, under Create Policy, perform the following steps:
-
In the New Policy text box, enter a name for the policy (for example, Unusual Activity Group Policy).
-
In the New Policy Description text box, enter a description of the policy (for example, This policy imposes stronger authentication).
-
Under Default Requirements, configure the policy as per your preferred configuration.
Click here to get more information on policies.
-
Under Policy Scope, ensure that the Any of these User Groups option is selected and select the group name (for example, Unusual Activity Group) that you created in Step 3 (a) of Creating a User Group in STA.
-
-
At the bottom of the window, click Save.
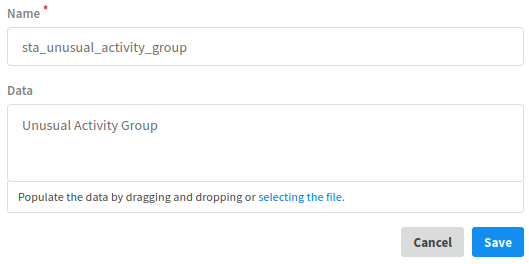
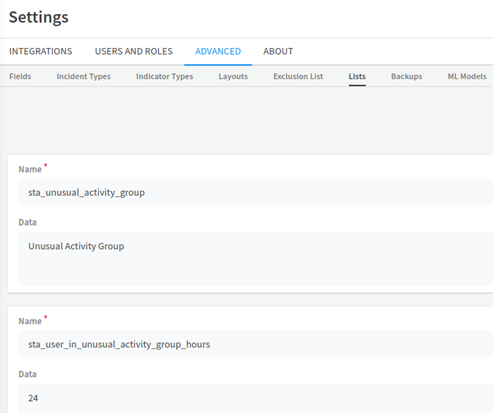
Configuring a Group and Time Duration Using XSOAR Lists
XSOAR Lists are created to configure a group and the time duration after which users will automatically be removed from the group. Group and time duration parameters are used as inputs in Playbooks to orchestrate a security remediation action.
Perform the following steps to configure a group and time duration in Cortex XSOAR:
-
On the Cortex XSOAR dashboard, in the left pane, click Settings.
-
In the right pane, under Settings, click the ADVANCED tab, and then click the Lists subtab.

-
Click Add a List and perform the following steps:
-
In the Name field, enter sta_unusual_activity_group.
-
In the Data field, enter the name of the group (for example, Unusual Activity Group) that you created earlier in Step 3 (a) of Creating a User Group in STA.
-
Click Save.
-
-
Click Add a List to create another list and perform the following steps:
-
In the Name field, enter sta_user_in_unusual_activity_group_hours.
-
In the Data field, enter the time duration (in hours) after which users will be automatically removed from the group.
-
Click Save.
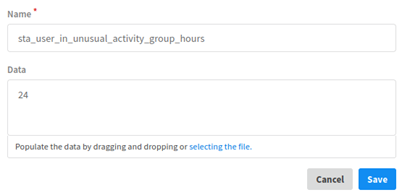
Both the newly added lists are displayed.
-
Integrating Alerts from STA
As a prerequisite, you must have an email address with IMAP settings enabled. The email address will be used to receive alerts from STA.
STA alerts can be received by Cortex XSOAR as trigger points for incidents. The following alerts are the indicators of security risks and are particularly relevant in this context:
-
Push notification rejection alert
-
Account lockout alert
This integration is configured through the SafeNet Trusted Access Pack available on the Cortex XSOAR marketplace.
For all types of remediation actions, integrating STA alerts in Cortex XSOAR requires:
-
Installing and configuring a mail listener integration instance
Configuring Alerts in STA
The alerts indicate an attempt of breaking into the user’s account. Perform the following steps to enable alerts for non-operator email recipients:
-
On the STA Token Management console, click the Policy tab and then click Role Management.
-
Under Role Management, in the Task column, click External Alerts Recipients.
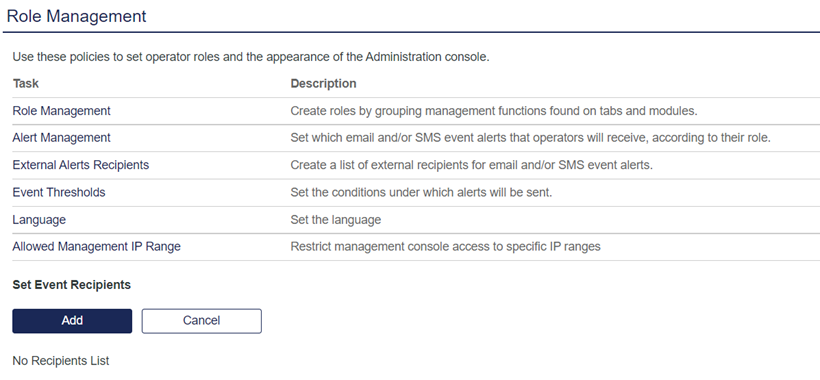
-
Under Set Event Recipients, click Add to add a new alert recipient.
-
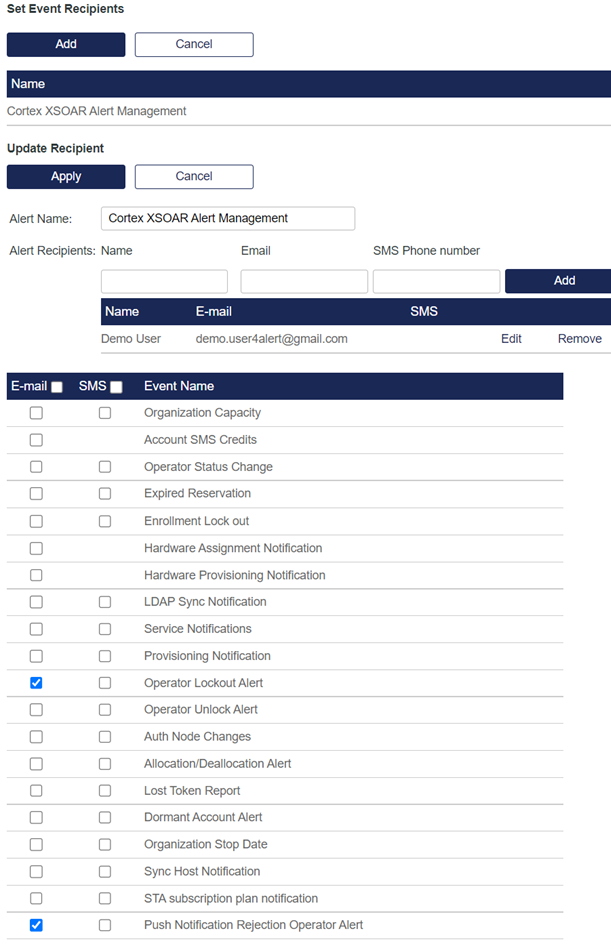
On the Add Recipient window, perform the following steps:
-
In the Alert Name field, enter a name to identify the type of the alert (for example, Cortex XSOAR Alert Management).
-
Under Alert Recipients, in the Name and Email fields, enter the name and email address of the alert recipient, respectively.
-
Copy the email address of the alert recipient and paste it in a text editor for future purpose.
-
Click Add.
-
In the table, in the Email column,
For Push Notification Rejection Alerts
-
Select the Push Notification Rejection Operator Alert check box.

For Account Lockout Alerts
-
Select the Operator Lockout Alert check box.

-
-
Click Apply.
-
Customizing the Email Message for STA Alert
Perform the following steps to customize the email message that will contain the information retrieved from STA alerts by Cortex XSOAR:
-
On the STA Token Management console, click the Comms tab, and then click Communications.
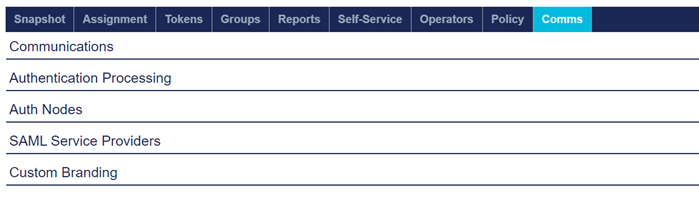
-
Under Communications, in the Task column, click Email Messages.
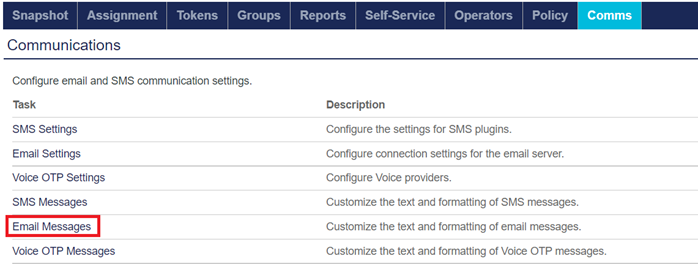
-
Under Customize Email Messages, select the Custom option.
For Push Notification Rejection Alert
-
Perform the following steps to customize email message for Push Notification Rejection alerts:
-
In the Email Message Type field, select Push Notification Rejection Internal Operator Alert.
-
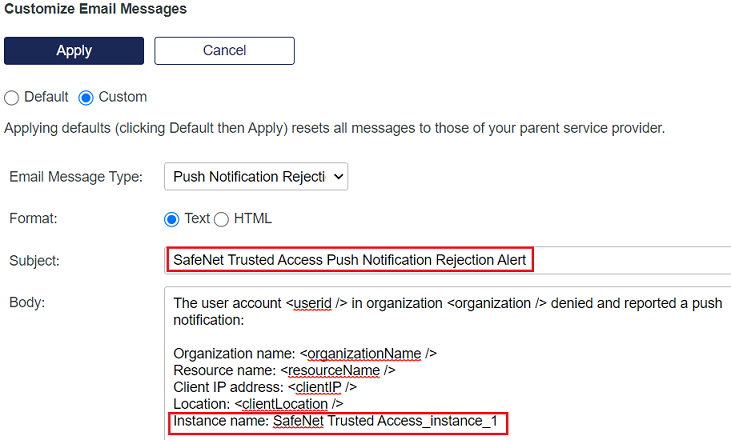
In the Subject field, change the value to SafeNet Trusted Access Push Notification Rejection Alert.
-
In the Body field, at the end, add Instance name: <instance name>.
For example, Instance name: SafeNet Trusted Access_instance_1
Ensure that the instance name is same as configured in Step10(a) of Installing and Configuring SafeNet Trusted Access Integration Instance.
-
For Account Lockout Alert
-
Perform the following steps to customize email message for Account Lockout alerts:
-
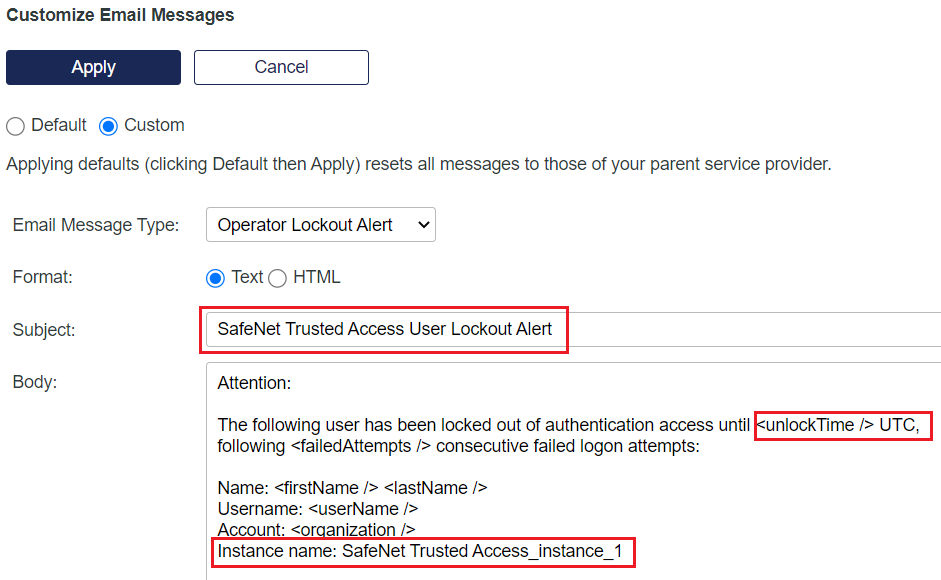
In the Email Message Type field, select Operator Lockout Alert.
-
In the Subject field, change the value to SafeNet Trusted Access User Lockout Alert.
-
In the Body field, perform the following steps:
-
After the <unlockTime /> tag, Add time zone as UTC.
-
At the end, add Instance name: <instance name> (for example, Instance name: SafeNet Trusted Access_instance_1).
Ensure that the instance name is same as configured in Step10(a) of Installing and Configuring SafeNet Trusted Access Integration Instance.
-
-
Click Apply.
-
Installing and Configuring a Mail Listener Integration Instance
You need to create and configure mail listener integration instances to allow Cortex to listen STA alerts from the email address that you configured in the Configuring Alerts in STA section. After the configuration, incidents for alerts are generated in Cortex XSOAR.
If a Mail Listener content pack is already installed, go to Configuring the Mail Listener Integration Instance to configure it.
Installing the Mail Listener Integration Instance
Perform the following steps to install the Mail Listener integration instance:
-
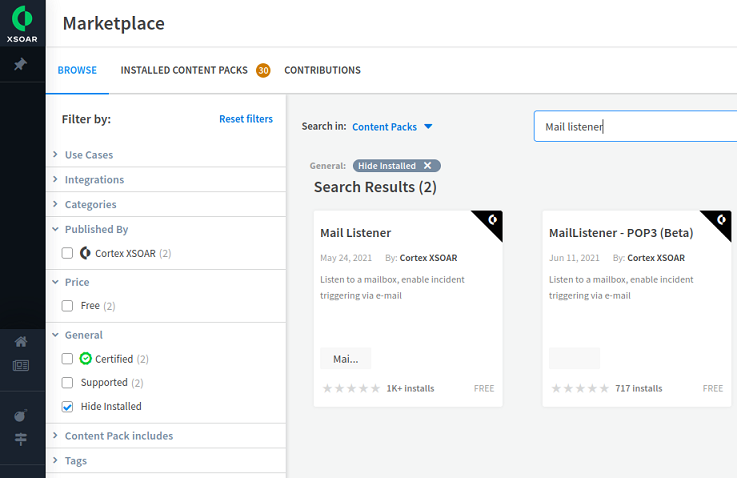
On the Cortex XSOAR dashboard, in the left pane, click Marketplace.
-
In the right pane, search for Mail listener and under Search Results, click the Mail Listener content pack.
-
On the top right-hand side, click Install.
-
In the Cart pane, click Install.
-
After successful installation of the content pack, click Refresh Content.
If the Refresh Content button is not displayed after few seconds, refresh the page.
After successful installation, the Installed message is displayed.
Configuring the Mail Listener Integration Instance
Perform the following steps to configure the Mail Listener integration instance:
-
In the left pane, click Settings.
-
In the right pane, under Settings, on the INTEGRATIONS tab, on the Servers & Services subtab, search for Mail Listener v2.
-
Under Messaging, next to Mail Listener v2, click Add instance to create and configure a new integration instance.

For Push Notification Rejection Alerts
-
Perform the following steps to configure the mail listener integration instance for Push Notification Rejection alerts:
-
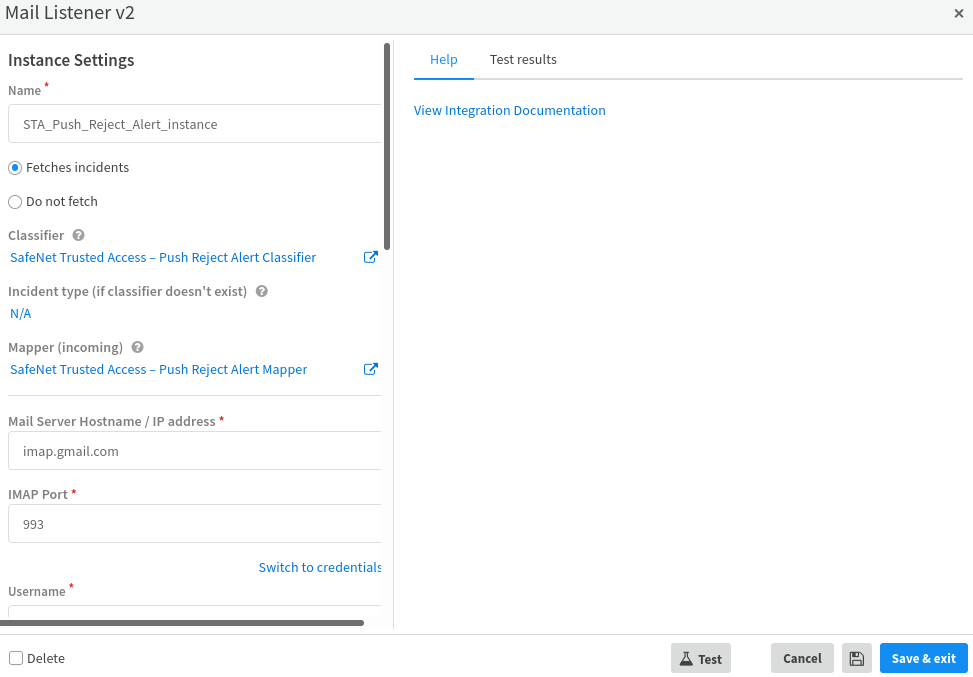
Under Mail Listener v2, in the Name field, enter a name (for example, STA_Push_Reject_Alert_instance) for the Mail Listener integration instance. Copy the name and paste it in a text editor for future purpose.
-
Select the Fetches incidents option.
-
Under Classifier, select SafeNet Trusted Access – Alert Classifier.
-
Under Incident type (if classifier doesn't exist), select SafeNet Trusted Access Push Reject Alert.
-
Under Mapper (incoming), select SafeNet Trusted Access – Alert Mapper.
-
In the Mail Server Hostname / IP address field, enter one of the following:
-
Mail server URL
-
Hostname
-
IP address
For example, imap.gmail.com for Gmail account.
-
-
In the IMAP Port field, enter the IMAP port number (for example, 993 for Gmail account).
-
In the Username field, enter the email address that you configured in Step 4(b) of Configuring Alerts in STA.
-
In the Password field, enter the password of the email address.
-
Click Test to validate the connection.
-
Click Save & exit.
The instance (for example, STA_Push_Reject_Alert_instance) is added.

-
For Account Lockout Alerts
-
Perform the following steps to configure the mail listener integration instance for Account Lockout alerts:
-
Under Mail Listener v2, click Add instance to create and configure a new integration instance.
-
In the Name field, enter a name (for example, STA_Account_Lockout_Alert_instance) for the Mail Listener integration instance. Copy the name and paste it in a text editor for future purpose.
-
Select the Fetches incidents option.
-
Under Classifier, select SafeNet Trusted Access – Alert Classifier.
-
Under Incident type (if classifier doesn't exist), select SafeNet Trusted Access Account Lockout Alert.
-
Under Mapper (incoming), select SafeNet Trusted Access – Alert Mapper.
-
In the Mail Server Hostname / IP address field, enter anyone of the following:
-
Mail server URL
-
Hostname
-
IP address
For example, imap.gmail.com for Gmail account.
-
-
In the IMAP Port field, enter the IMAP port number (for example, 993 for Gmail account).
-
In the Username field, enter the email address that you configured in Step 4(b) of Configuring Alerts in STA.
-
In the Password field, enter the password of the email address.
-
Click Test to validate the connection.
-
Click Save & exit.
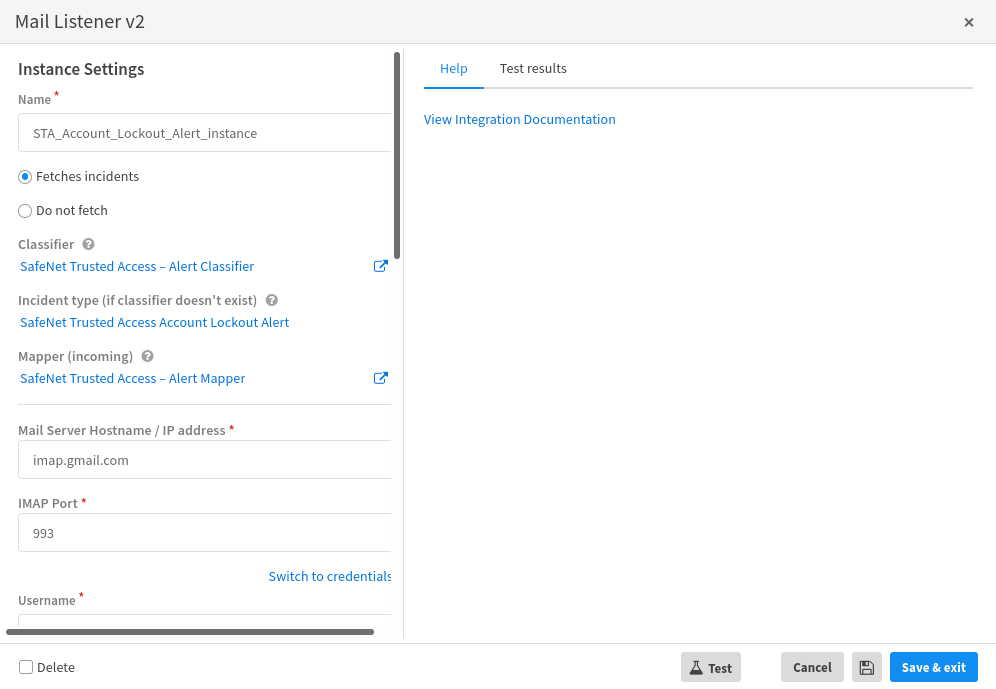
The instance (for example, STA_Account_Lockout_Alert_instance) is added.

-
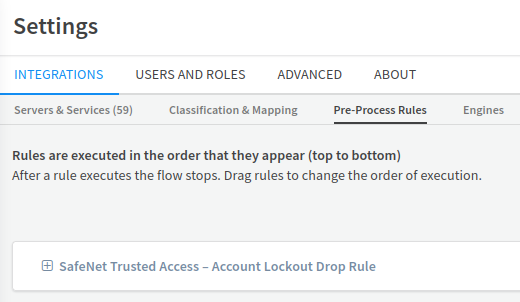
Creating a Pre-Process Rule
You need to create a pre-process rule for the instances created in the Installing and Configuring a Mail Listener Integration Instance section to drop unwanted incidents created at Cortex XSOAR. The rule will allow the creation of incidents only for the required STA alerts and will reject all other emails.
Perform the following steps to create a pre-process rule:
-
In the left panel, click Settings.
-
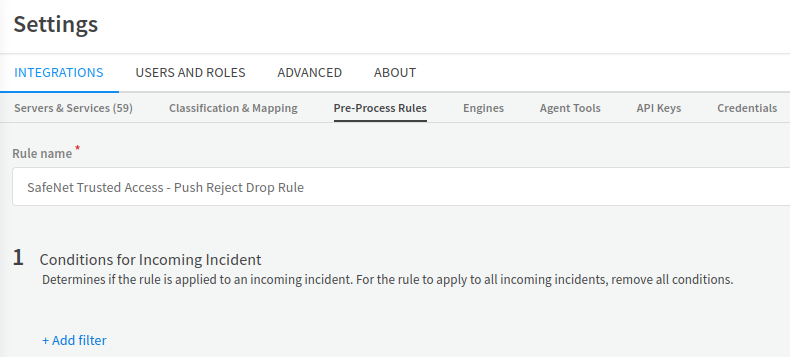
In the right pane, under Settings, on the INTEGRATIONS tab, click the Pre-Process Rules subtab.

For Push Notification Rejection Alerts
-
Perform the following steps to create a pre-process rule for Push Notification Rejection alert:
-
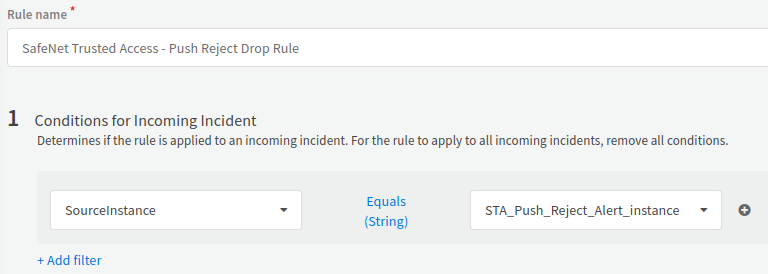
Click New Rule and in the Rule name field, enter a name for the rule (for example, SafeNet Trusted Access - Push Reject Drop Rule).
-
Under Conditions for Incoming Incident, click Add filter, and perform the following steps:
-
In the Choose an incident field text box, search and select SourceInstance.
-
Ensure that the Equal (Strings) condition is selected.
-
In the Type a value text box, search and select the name of the Mail Listener v2 Integration Instance (for example, STA_Push_Reject_Alert_instance) that you entered in step 4(a) of Configuring the Mail Listener Integration Instance.
-
-
Click Add Filter to add another filter and perform the following steps:
-
In the Choose an incident field text box, search and select Name.
-
Click Equals (String) condition and click on the Add icon
 .
. -
Search and select the Doesn't Contain (General) condition.
-
In the Type a value text box, enter Push Notification Rejection Alert.

-
-
Under Action, select Drop.

-
Click Save. The SafeNet Trusted Access - Push Reject Drop Rule is added under Pre-Process Rules.

-
For Account Lockout Alerts
-
Perform the following steps:
-
Click New Rule and in the Rule name field, enter a name for the rule (for example, SafeNet Trusted Access – Account Lockout Drop Rule).

-
Under Conditions for Incoming Incident, click Add filter, and perform the following steps:
-
In the Choose an incident field text box, search and select SourceInstance.
-
Ensure that the Equal (Strings) condition is selected.
-
In the Type a value text box, search and select the name of the Mail Listener v2 Integration Instance (for example, STA_Account_Lockout_Alert_instance) that you entered in step 5(b) of Configuring the Mail Listener Integration Instance.

-
-
Click Add Filter to add another filter and perform the following steps:
-
In the Choose an incident field text box, search and select Name.
-
Click Equals (String) condition and click on the Add icon
. -
Search and select the Doesn't Contain (General) condition.
-
In the Type a value text box, enter User Lockout Alert.

-
-
Under Action, select Drop.
-
Click Save. The SafeNet Trusted Access – Account Lockout Drop Rule is added under Pre-Process Rules.
-
Example Use-Cases
The following user cases for integrating a STA alerts and remediation actions on STA are explained below:
-
Adding a user to the unusual activity group after receiving a push reject notification alert
-
Terminating the user’s single sign on session after receiving an account lockout alert
Adding a User to the Unusual Activity Group after receiving a push reject notification alert
A user is added to the Unusual Activity group after a push notification rejection alert is generated.
The alert handling process involves the following steps:
-
STA sends an alert while rejecting a Push Notification event that indicates an attempt of breaking into the user’s account.
-
Cortex XSOAR listens to the alert received from STA and classify the same in order to perform a remediation action.
The remediation process involves the following steps:
-
Cortex XSOAR creates an incident, which automatically invokes a playbook that executes the security remediation steps.
-
The remediation action involves, adding the user to a group (for a configured period of time) on which STA policies with stronger authentication requirements are imposed.
Configuring the Alert
The following steps need to be performed to configure the alert:
-
Perform all the steps as mentioned in the Invoking Remediation Actions on STA section.
-
Integrate the Reject Push Authentication alert as described in the Integrating Alerts from STA section.
Validating the Use Case
-
Log in to the STA User Portal using the MobilePASS+ authentication.
-
On receiving the Push notification, tap Deny.
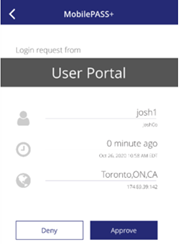
-
Tap Report.
-
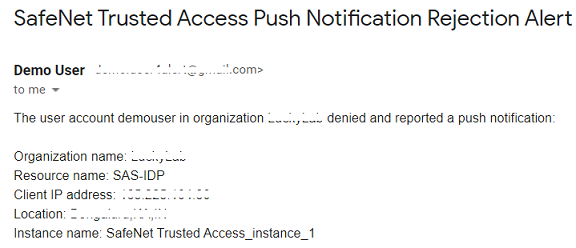
Log in to the configured email address to see the Push Notification Rejection alert email as shown below.
-
On the Cortex XSOAR dashboard, in the left pane, click Incidents.
-
In the right pane, click Refresh to refresh the window.

-
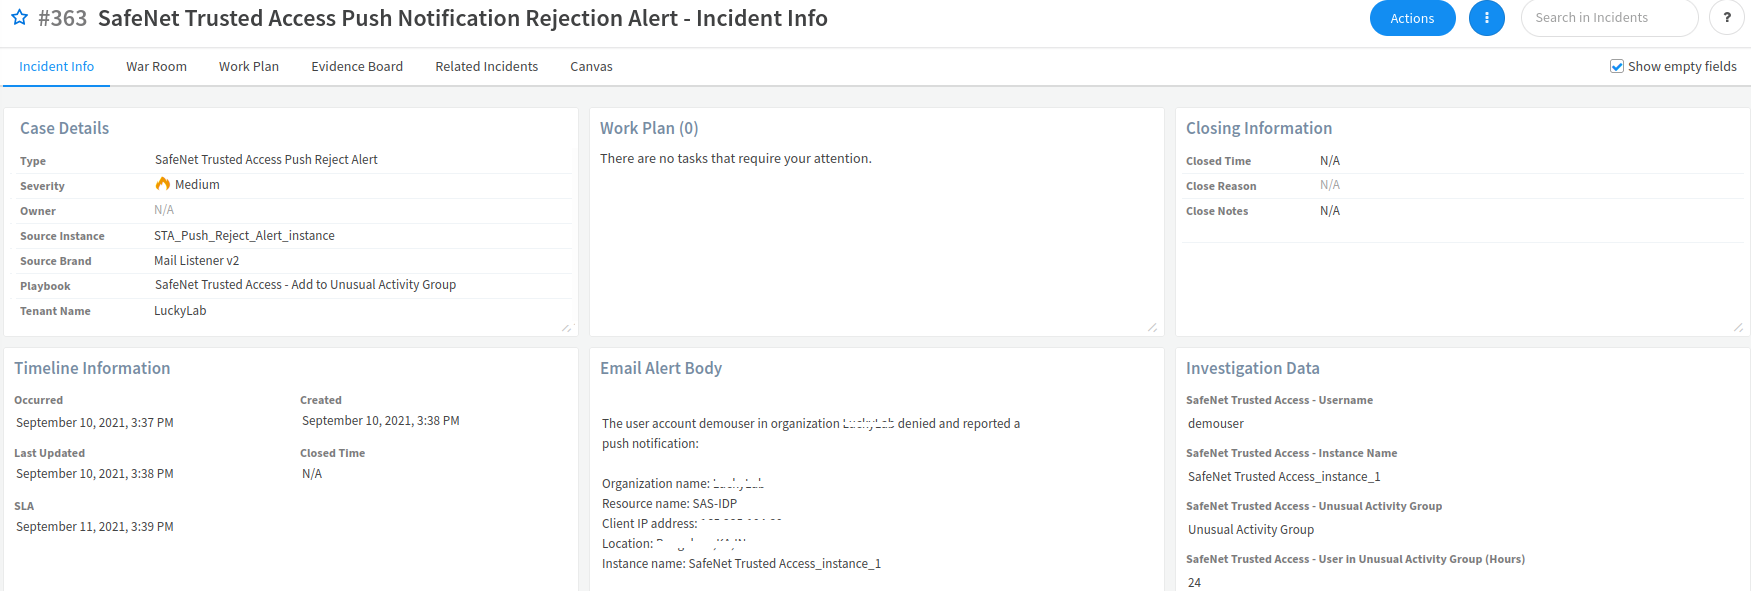
Under Incidents, a new incident is displayed. In the ID column, click the incident ID (for example, #363).
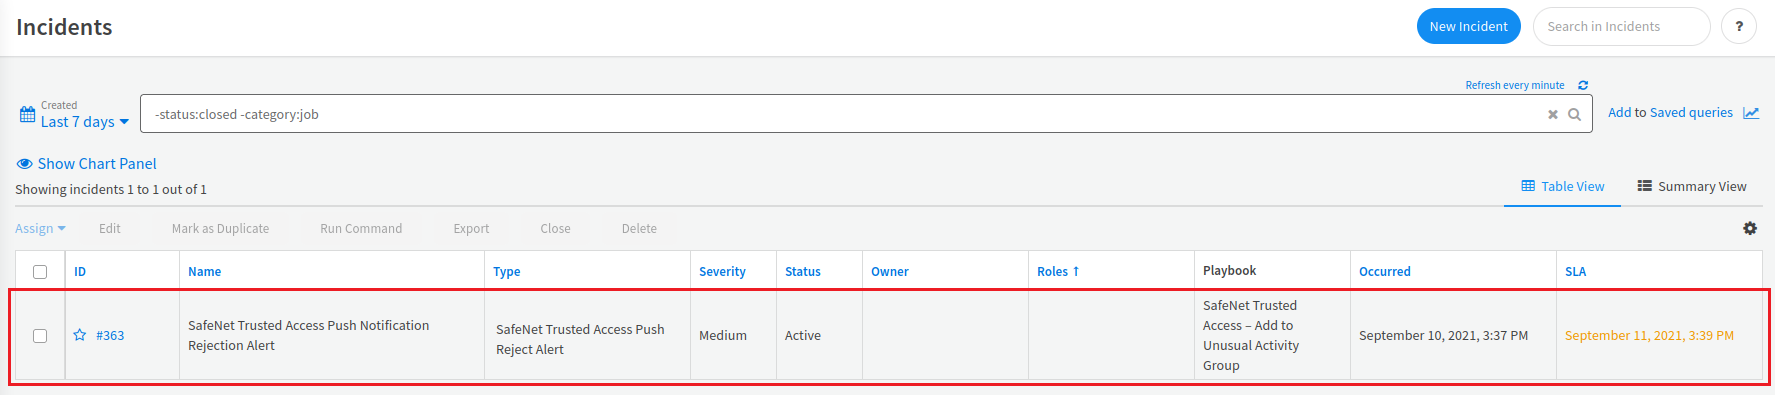
On the Incident Info window, on the Incident Info tab, details of the incident are displayed.
-
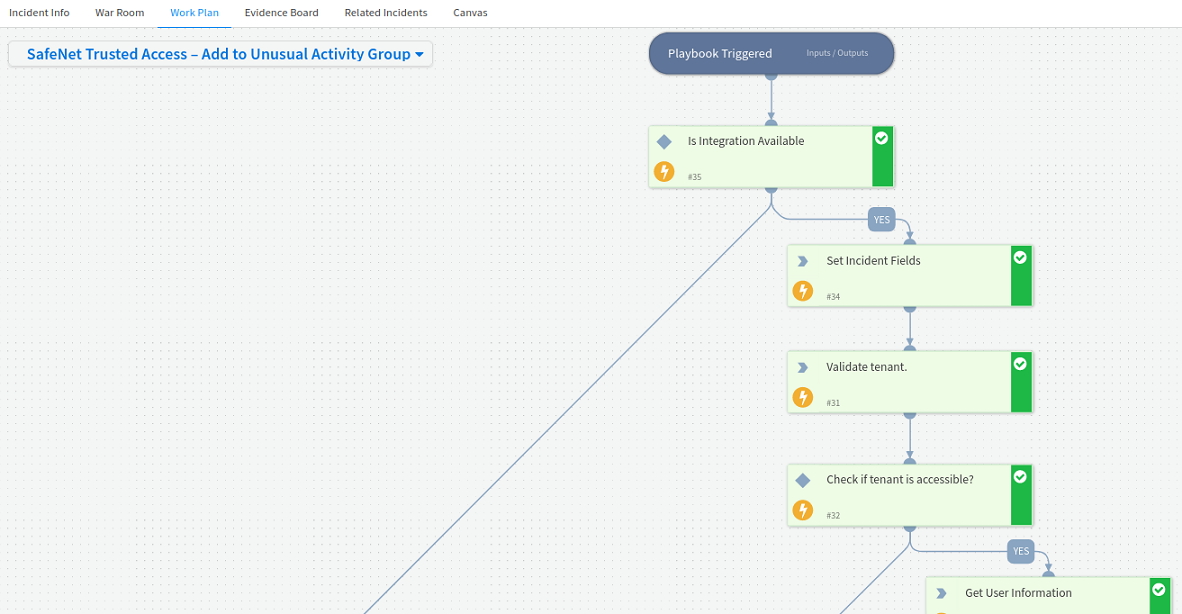
Click the Work Plan tab to verify that SafeNet Trusted Access – Add to Unusual Activity Group playbook is automatically executed. The playbook will add the user to the Unusual Activity group for the configured period of time.
-
Log into the User Portal using the same credentials to verify if the policies configured for the group (for example, Unusual Activity group) have been applied.
As shown in the below screen shot, the incident gets automatically closed when the configured time duration is over and the user would be removed from Unusual Activity group.
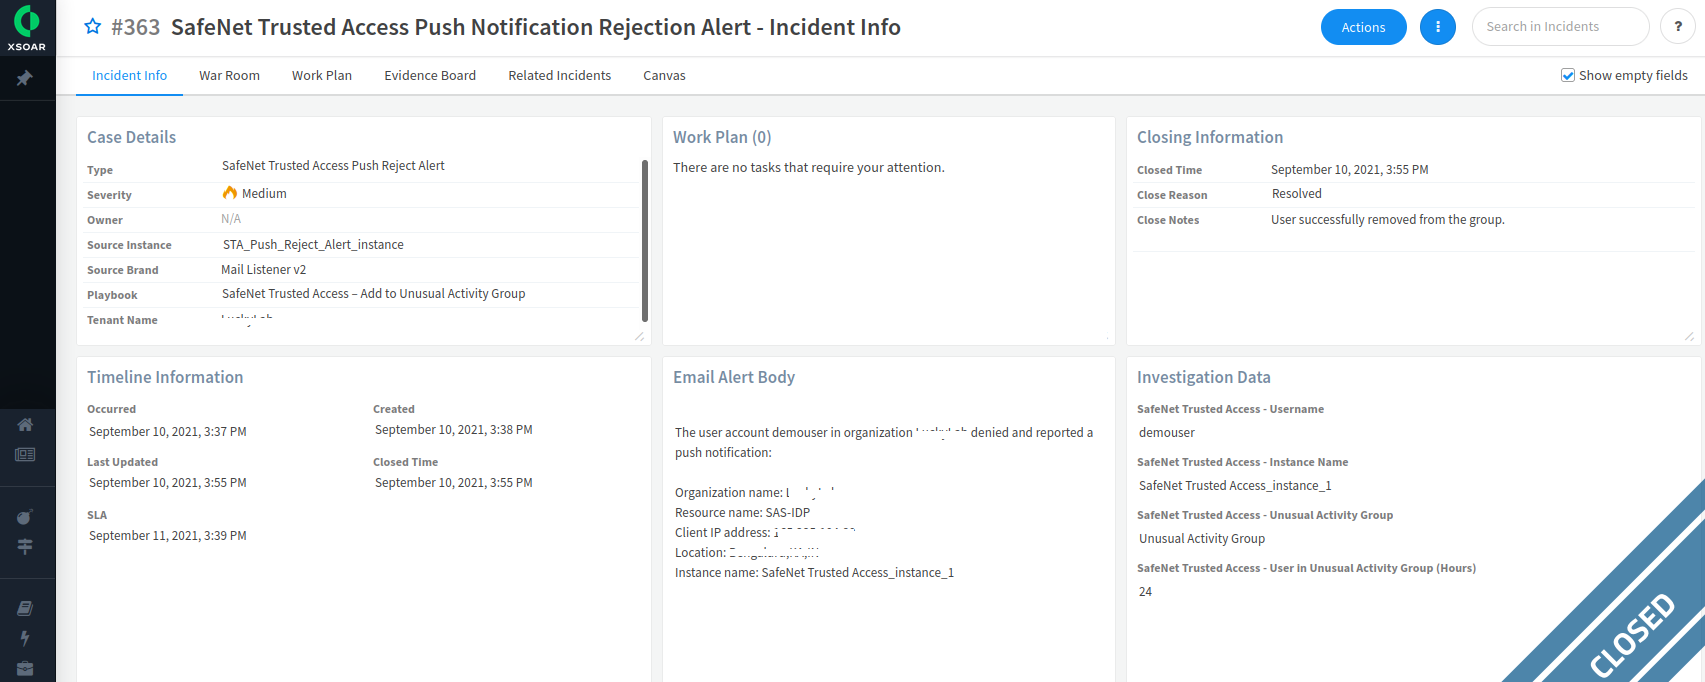
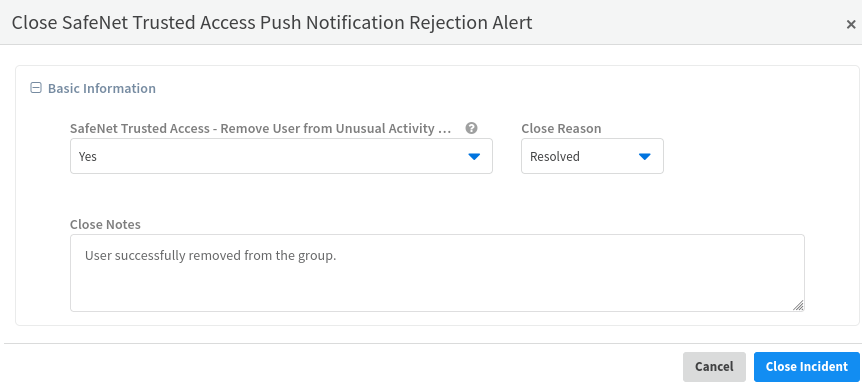
The playbook is fully automated and the incident gets automatically closed after the successful execution of the playbook. If you manually close the incident, you need to ensure that the user is removed from the user group (for example, Unusual Activity group). Refer to the below screen shot:
Terminating a User’s Single Sign On Session after Receiving an Account Lockout Alert
A user's SSO session is terminated after an account lockout alert is received for the user’s account to provide stronger protection on the next login attempt by enforcing a new login session.
The alert handling process involves the following steps:
-
STA sends an Account Lockout alert on exceeding the maximum number of consecutive failed authentication attempts.
-
Cortex XSOAR listens to the alert received from STA and classify the same in order to perform remediation action.
The remediation process involves the following steps:
-
Cortex XSOAR creates an incident, which automatically invokes a playbook that executes the security remediation steps.
-
The remediation action involves terminating the user's SSO sessions so that when the account gets unlocked, upon the follow up next login attempt, a new session is needed and authentication is required.
Configuring the Alert
The following steps need to be performed to configure the alert:
-
Perform the following steps as mentioned in the Invoking Remediation Actions on STA section:
-
Integrate the Reject Push Authentication alert as described in the Integrating Alerts from STA section.
Validating the User Case
-
Log in to the STA User Portal.
-
In the left pane, click the Applications
 icon.
icon. -
In order to create use-case scenario, perform the following steps:
-
Open the STA User Portal login URL in the incognito mode of the web browser.
-
Exceed the maximum number of consecutive failed authentication attempts (by default, maximum number is 3) using a wrong password or token. As a result, the your account will be locked.
-
-
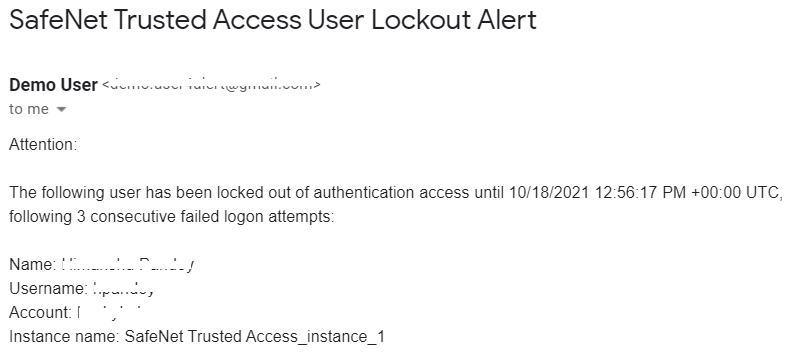
Log in to the configured email address to see the Account Lockout alert.
-
On the Cortex XSOAR dashboard, in the left pane, click Incidents.
-
In the right pane, click Refresh to refresh the window.
-
Under Incidents, a new incident is displayed. In the ID column, click the incident ID (for example, #356).
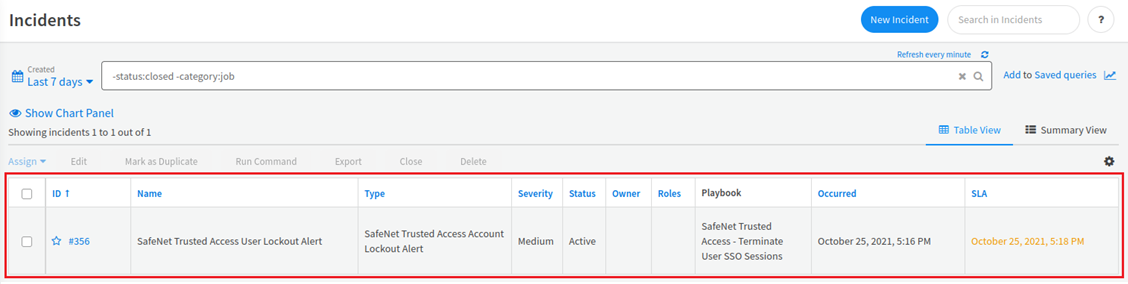
On the Incident Info window, on the Incident Info tab, details of the incident are displayed.

-
Click the Work Plan tab to verify that SafeNet Trusted Access – Add to Unusual Activity Group playbook is automatically executed.
-
In the User Portal Applications tab, which you have opened in Step 2, click on any application that you want to access. Now, full authentication is required to access the application as user SSO sessions are terminated.
As shown in the below screen shot, the incident is automatically closed after two minutes.