Single Sign-On
CCC introduces Single Sign-On (SSO) with OpenID Connect, letting you connect an external identity provider (IDP) for seamless, secure logins. Admins can set it up easily—grab your IDP’s discovery URL, client ID, client secret, and customized claim names for CCC, then configure it in CCC under Administration > Single Sign-On. Choose automatic setup or enter details manually. Once saved, users enjoy fast access with no extra logins.
CCC supports any Identity Provider that uses the OpenID Connect protocol. However, it has been officially tested only with STA and Okta. If you're using a different provider, run end-to-end tests before going live. For help, contact Thales support.
What You’ll Need from Your IDP
To set up SSO in CCC, collect these details from your IDP beforehand:
-
Discovery URL – Often ends in
/.well-known/openid-configuration(e.g.,https://your-idp.com/.well-known/openid-configuration). -
Client ID – Unique to your CCC app in the IDP.
-
Client Secret – Keep this secure; it’s like a password for your app.
-
Role Claim Name – Used to map user roles in the IDP to roles in CCC (e.g., roles, ccc_roles)..
-
Organization Claim Name – Used to map the organization associated with the user in the IDP to the organization in CCC (e.g., organization, ccc_organization).
How to Set Up SSO in CCC
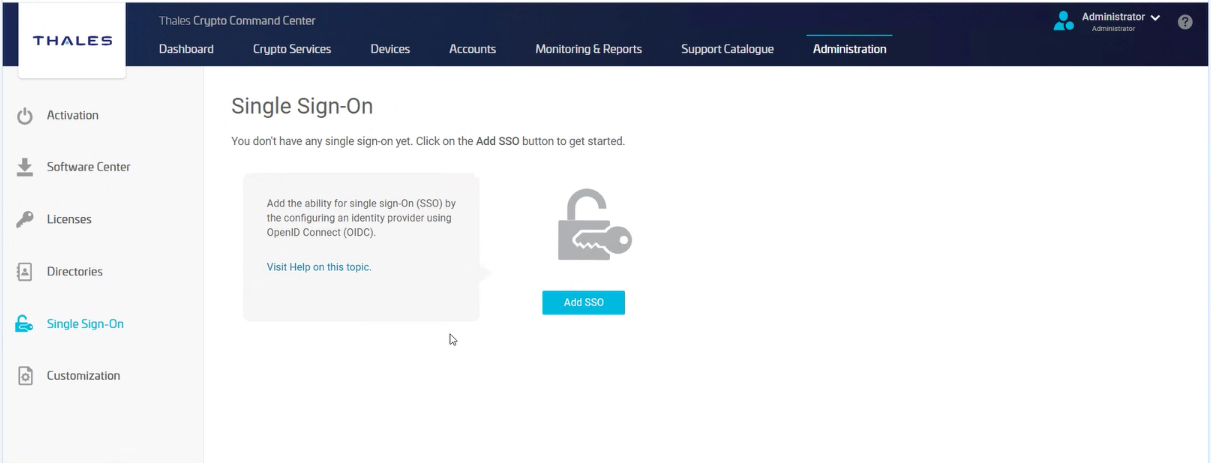
Head to Administration > Single Sign-On > Add SSO.
You’ll need primary admin privileges to access this section.

Fill in basic SSO details:

| Field | What It Means |
|---|---|
| SSO Display Name | A friendly name users will see (e.g., “Company Login”). |
| Alias | A unique ID for your identity provider (e.g., company-idp). Avoid spaces or special characters. |
| Sign-in Redirect URL | Auto-generated after adding the Alias. Copy this URL—it’s what you’ll register with your IDP. |
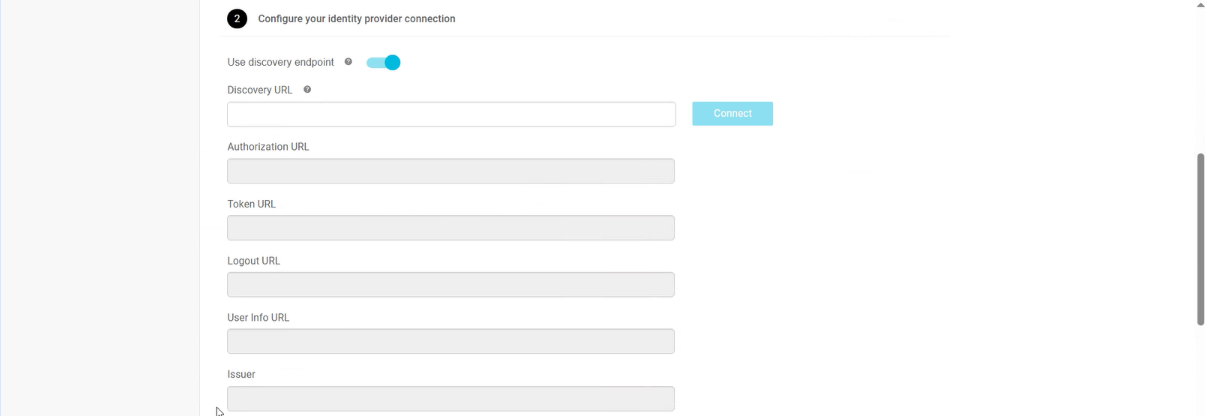
Set Up Your IDP. Choose one of these two options:

Option 1: Automatic Setup (Recommended)
a. Turn on the Use discovery endpoint toggle.
b. Paste the Discovery URL into the field (e.g., https://your-idp.com/.well-known/openid-configuration).
c. Click Connect.
d. Success? You’ll see a confirmation, and the IDP URLs (like Authorization and Token URLs) will fill in automatically. If it fails, double-check the URL for typos or ask your IDP if the endpoint is active.
Option 2: Manual Setup
a. Turn off the Use discovery endpoint toggle.
b. Enter these details by hand (you can find them in your IDP’s documentation):
| Field | What It Does |
|---|---|
| Authorization URL | Handles authentication requests (e.g., https://your-idp.com/auth). |
| Token URL | Gets authentication tokens (e.g., https://your-idp.com/token). |
| Logout URL | Sets where users go when logging out (optional; e.g., https://your-idp.com/logout). |
| UserInfo URL | Pulls user details after login (e.g., https://your-idp.com/userinfo). |
| Issuer | Identifies who issues the tokens (e.g., https://your-idp.com). Must match what your IDP expects. |
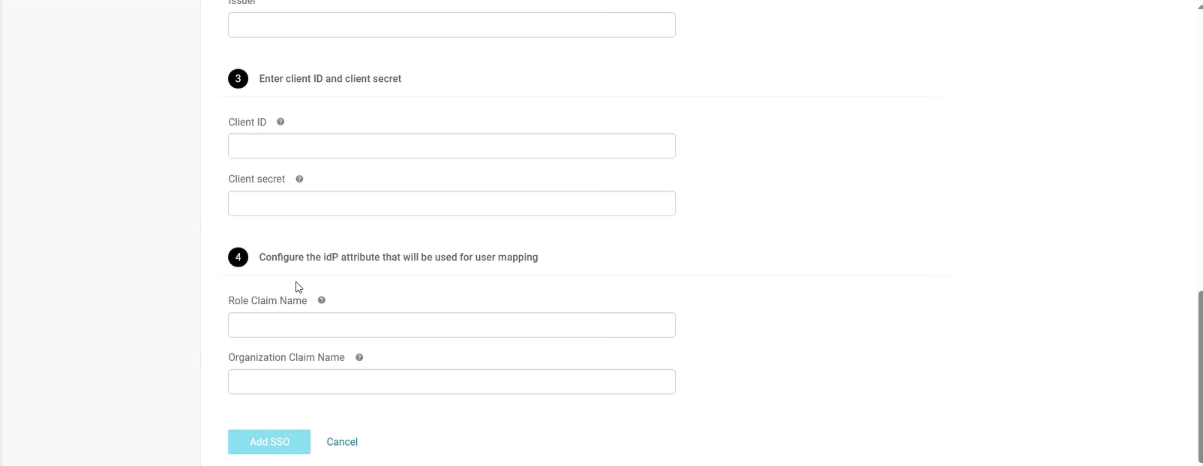
Add Authentication Details:

| Field | What It Means |
|---|---|
| Client ID | Your IDP-registered identifier (e.g., ccc-app-123). |
| Client Secret | Your IDP-registered secret key (e.g., xyz789). |
| Role Claim Name | Defines the claim for user roles (e.g., roles). This maps IDP roles to CCC permissions. |
| Organization Claim Name | Links users to an organization via this claim (e.g., org). Ensures users access the right data. |
CCC requires custom claim names from your IDP. Test the configured values in CCC to ensure they map roles and organizations correctly.
Save and Activate SSO: Hit Add SSO to lock in your settings.
Test the login process with a user account to verify everything’s working.
Once configured, users can log in to CCC with SSO—making access fast, simple, and secure across your corporate setup. They’ll see the SSO Display Name (e.g., “Company Login”) on the login screen. If issues arise, check the IDP logs or CCC error messages for clues.

